Things you should do if Twitch keeps buffering [Complete Guide]
Twitch is definitely the leading and the biggest streaming platform that is being used around the globe. In spite of its brilliant features, it however isn’t flawless. Lately, a problem has been reported by a number of users that their Twitch Stream keeps Buffering even if they have a strong internet connection. If you have encountered this issue on your computer, fret not because we have compiled user-feedback based solutions for you to immediately get rid of this issue.

What Causes the Twitch Keeps Buffering Issue?
Before proceeding to resolve this issue, you must know about the reasons that might trigger the Twitch Keeps Buffering issue on your computer. We have compiled the most common ones below.
- Corrupted Browser’s Cache and Cookies: Your browser regularly generates Cache and Cookies where it keeps essential information about different functions. These files can sometimes get corrupted and trigger many issues. You can easily clear your browser’s cache and cookies by following the steps listed in Solution 1.
- Enabled Hardware Acceleration: Hardware acceleration is a feature integrated into your browser that tackles graphics-intensive tasks by utilizing your computer’s GPU. These include games, streaming, or any other task that requires quicker computation. You might encounter the Twitch Keeps Buffering issue if Hardware acceleration is enabled on your computer. Hence, disable hardware acceleration by following the steps listed in Solution 2.
- Disabled Flash Player: Almost all web browsers come integrated with a Flash player that helps you in viewing multimedia content including animations, video, and other interactive content. If your Twitch Keeps Buffering, there might be a chance that the Flash Player is disabled in your browser. To enable the Flash Player, follow the steps in Solution 4.
- Browser’s Extensions: A Browser Extension is a software module that can be installed on the web browser to add more functionality or to extend its functionality. However, many users have reported that there are certain browser extensions such as Ad-block or uBlock that interfere with the Twitch stream and trigger many problems due to which the Twitch stream keeps Buffering. If you have too many extensions enabled on your browser, then there is a higher chance for you to come across this issue. Therefore, in order to rectify this problem, disable all the extensions, and enable them one by one to point out the extension that is preventing you from streaming properly. To carry this task out, follow the steps listed in Solution 3.
- Background Applications: You might encounter this problem if too many applications are open in the background. In most situations, Twitch takes too long to buffer a video if Steam is downloading or updating a game in the background or any other application is running in the background that is using a lot of network resources. If that is the case, please make sure that you close all the other applications and run only Twitch on your computer by following the steps indexed in Solution 8.
- Windows Proxy settings: A proxy server is a server that acts as a filter between you and the internet by establishing an intermediary server between your connection and the server. However, enabling this function on your computer might be limiting the network resources due to which Twitch keeps buffering. If a proxy server is enabled on your computer, follow the steps listed in Solution 10 to rectify your issue.
- Windows real-time protection: Windows real-time protection and the Windows defender firewall are essential components that are embedded in the Windows OS. These programs help you filter the data that is coming to your computer from the Internet to protect your system from viruses and threats. However, they sometimes end up blocking network requests from safe sources which can trigger this issue. So, in order to get rid of the Twitch keeps buffering problem, follow the steps listed in Solution 12 and 13.
- Outdated Graphics Drivers: A Graphics driver is a software component that plays a key role in displaying images, videos, and in generating graphics on your screen. Your stream might take too long to buffer if your graphics driver is outdated. If this is the case, follow the steps indexed in Solution 14 to rectify this error
- Saturated WiFi Channel: The WiFi networks installed in our homes and offices send and receive data through various WiFi channels. Routers operating on 2.4 GHz and 5 GHz are allocated 11 and 45 channels respectively. So, it is possible for you to switch to a different less saturated channel if the one you are connected to has higher bandwidth usage. Therefore, to terminate this problem, follow the steps listed in Solution 17.
Before we start:
Before adopting any major solution, there are a couple of things that we need to get out of the way. Follow the steps indexed below:
- Take the power adapter of your router out of the socket and wait for it to completely shut down.
- In the meanwhile change the place of the router where it can get a better signal strength. Also, move other electronic devices away from the router that might interfere with the signals.
- After waiting for a couple of minutes, reinsert the power adapter of the router back into the socket and restart it and wait till it acquires complete network signals.
- If the issue still persists, it is highly recommended to switch to a wired connection by connecting your computer directly to the router via an Ethernet Cable.
- It is also recommended to pause any ongoing download on your computer.
- If the issue still persists, lower the video quality of your stream and pause the video for some time to allow it to buffer properly.
Fix the Twitch Keeps Buffering Error:
Solution 1: Clear browser’s Cache, Cookies, and History
- Locate and click on the “Three-dot” icon located at the top-right corner of the browser’s window and select “Settings”.

Open Settings - Scroll down to the “Privacy and security” section and select “Clear browsing data”.

Clear browsing data - Check the boxes parallel to “Browsing history”, “Cookies and other site data”, and “Cached images and files”. Also, set the time range to “All time”.

Clear all the data - Now click on the “Clear data” button and restart your browser to see if the error persists.


Solution 2: Disable hardware acceleration
- Locate and click on the “Three-dot” icon located at the top-right corner of the browser’s window and select “Settings”.
Open Settings - Scroll to the bottom and click on the “Advanced” button to open the Advanced tab.
- Again scroll down and locate the “System” section.

System section - Now disable the toggle button parallel to “Use hardware acceleration when available” and check whether the error is gone or not.
Use hardware acceleration when available - Verify if the Twitch keeps buffering issue is fixed.


Solution 3: Disable browser’s extensions
- Locate and click on the “Three-dot” icon located at the top-right corner of the browser’s window and select “More Tools”.

More Tools - Now navigate to the “Extensions” option.
- Locate the unwanted extensions and click on the “Toggle” button to disable them one by one and check if the issue is resolved or not.

Disable browser’s extensions - Verify if the error is eradicated.


Solution 4: Enable flash in your browser
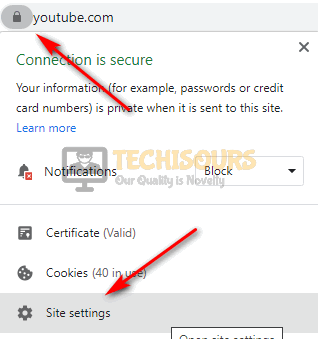
- Locate and click on the “Padlock” icon located at the left side of the address bar of your browser and select “Site settings”.

Site settings - Now navigate to “Flash” and select “Allow” from the drop-down menu located in parallel.
Enable Flash Player - Check and see if the error still occurs.

Solution 5: Stream in Incognito mode
- Locate and click on the “Three-dot” icon located at the top-right corner of the browser’s window and select “New incognito window”.

New incognito window - Now copy the video link and paste it into the search bar to check if the error is terminated or not.

Solution 6: Switch to another browser
There is a variety of web browsers available on the internet that you can download according to their offered features that are required by you. If your Stream is taking too long to play on a certain browser that you use for everyday web surfing, then an efficient approach to check whether the issue is with the browser or in the computer settings is to switch to a different browser and try to stream your video there. For example, if you use are facing this issue on Google Chrome than switch to Mozilla Firefox and see if the issue persists.
Solution 7: Disable Low-latency mode on Twitch
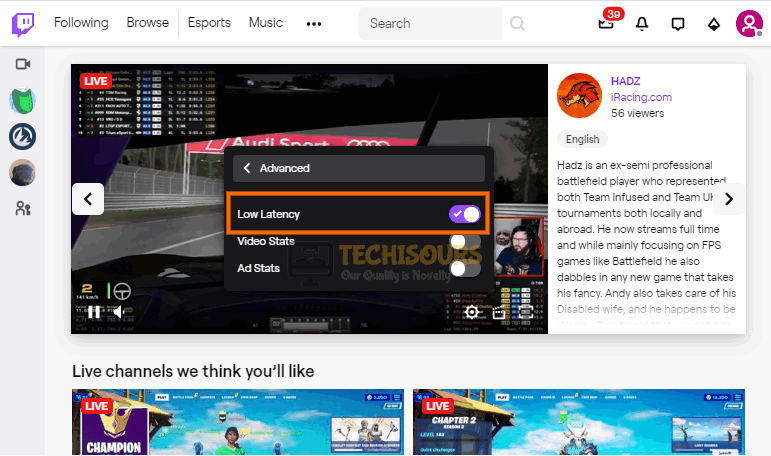
- Click on the “Settings” icon at the bottom right of the stream window and select “Advanced”.

Advanced - Disable the toggle button that is parallel to “Low Latency”.
Low Latency - Check and see if the issue still occurs.

Solution 8: Close background applications
- Press “Ctrl+Shift+Esc” on your keyboard to open “Task Manager”.
- Locate and select the application that you might think is causing the error and click on “End Task”.

Close background applications - Check and see if the issue still occurs.

Solution 9: Switch to Google’s DNS
- Press “Win+R” on your keyboard and search for “Control Panel”.

Typing in Control Panel - Now proceed to the “Network and Internet” option and select “Network and Sharing Center”.

Network and Sharing Center - On the left pane, select “Change Adapter Settings”.
Change Adapter Settings - Right-click on the Internet you are connected to and select “Properties”. Double-click on “Internet Protocol Version 4 (TCP/IPv4)” to open its properties.

Internet Protocol Version 4 (TCP/IPv4) - Enable the radio button, parallel to “Use the following DNS server addresses”.
- Now set the “Preferred DNS” and “Alternate DNS” as “8.8.8.8″ and “8.8.4.4″ respectively.

Switch to Google’s DNS - Verify if this solution has fixed the Twitch keeps buffering error.


Solution 10: Disable Proxy and VPN on Windows
- Press “Win+I” on your keyboard to open “Settings” and navigate to “Network and Internet”.

Network and Internet - From the left pane, navigate to “Proxy” and disable the toggle buttons associated with both “Automatically detect settings” and “Use setup script”.
Proxy - Again, from the left pane, navigate to “VPN” and disable the toggle buttons associated with both “Allow VPN over metered networks” and “Allow VPN while roaming”.
VPN - Verify whether the Twitch keeps buffering issue is rectified. If it is still there proceed to the next potential fix below.


Solution 11: Block certain IP’s
- Press “Win+R” on your keyboard and search for “Control Panel”.
Typing in Control Panel - Locate and click on “Windows Defender Firewall” and select “Advanced settings” from the left pane.

Advanced settings - From the left pane, select “Inbound Rules” and click on “New rules” from the right pane.

Inbound Rules - Check the button, parallel to “Custom” and select “Next”.

Custom - Select “Scope” from the left pane and enable the radio button associated with “Which remote IP address this rule applies to” and click on “Add”.
Which remote IP address this rule applies to - Click on “This IP address range” and enter “206.111.0.0” and “206.111.255.255” in the text fields parallel to “From” and “To” respectively.

This IP address range - Save the above changes and repeat steps 5 and 6. But this time, enter “173.194.55.1” and “173.194.55.255” in the text fields parallel to “From” and “To” respectively.
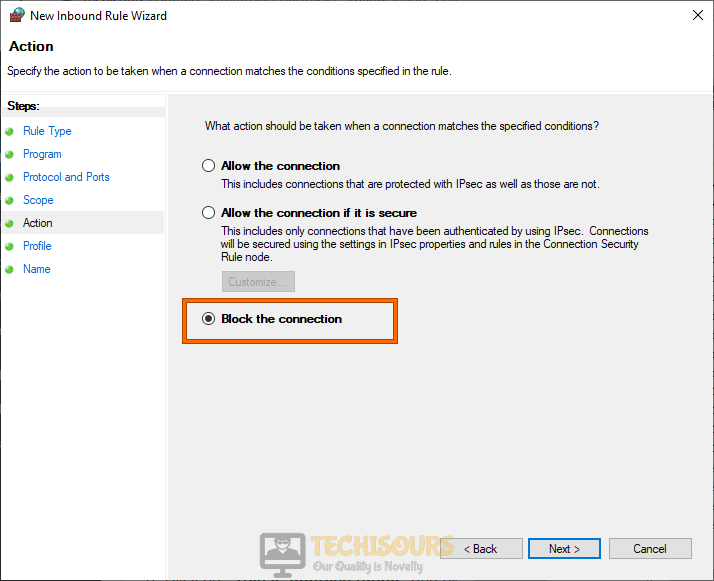
- Save the changes and select “Action” from the left pane.
- Select ” Block the connection” and click on “Next”.
Block the connection


Solution 12: Disable Windows real-time protection
- Press “Win+I” on your keyboard to open “Settings” and navigate to “Update and Security”.
Update and Security - From the left pane select “Windows Security” and click on “Virus and threat protection” from the right side of the window.
Virus and threat protection - Now click on “Manage Settings” under the “Virus and threat protection settings” section.
Manage Settings - Disable the toggle button that is associated with “Real-Time Protection”.
Disable real-Time Protection - Check whether the Twitch keeps buffering issue is eliminated.


Solution 13: Disable Windows Defender Firewall
- Press “Win+R” on your keyboard and search for “Control Panel”.
Typing in Control Panel - Locate and click on “Windows Defender Firewall” and select “Turn Windows defender firewall on or off” from the left pane.
Turn Windows defender firewall on or off - Now check the option parallel to “Turn off Windows defender firewall” under both “Private network settings” and “Public network settings” sections.
Turn off Windows defender firewall


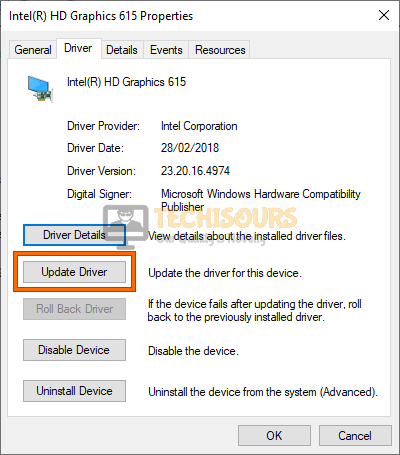
Solution 14: Update your Graphics card driver
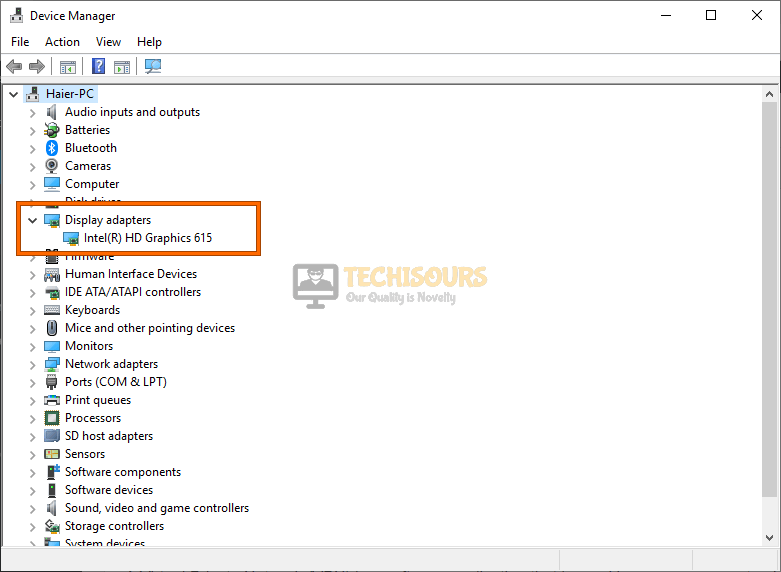
- Press “Win+X” on your keyboard and select “Device Manager”.

Device Manager - Click on the “Display Adapter” option to expand its list and double-click on your graphics card driver.

Display Adapter - Navigate to the “Driver” tab and click on the “Update driver” button.
Update driver - After the Driver update is complete, check and see if the Twitch stream works properly.

Solution 15: Use a VPN
A Virtual Private Network (VPN) is a software application that is used a lot of users for anonymity. If you still can’t get rid of this issue and your Twitch keeps buffering, then it is highly recommended to use a VPN. Many users have reported that they have fixed this issue by using the Speedify VPN that helps them to fix packet loss and bandwidth drops while streaming on Twitch. So, as a solution, download the VPN and install it to check if the problem persists.
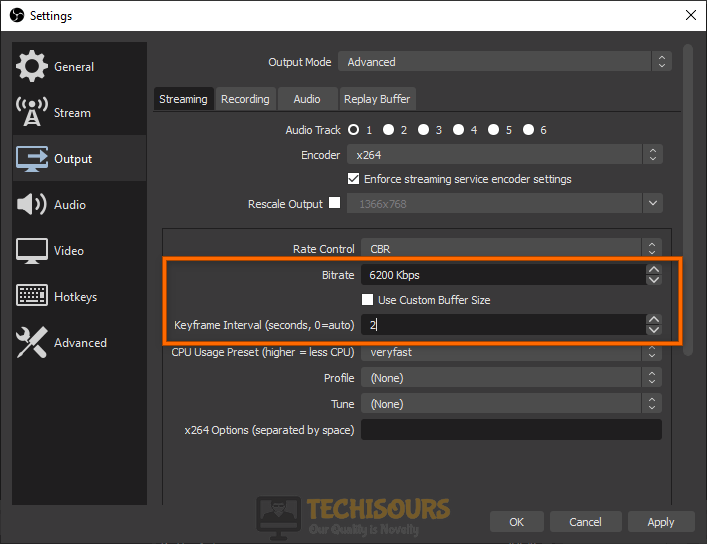
Solution 16: Tweak some settings in OBS
- Launch the browser and choose a different Ingests server of Twitch and copy its link.
- Now launch OBs and click on the “File” option in the toolbar and select “Settings”.

Settings - From the left pane, navigate to the “Stream” tab and paste the copied URL in the input field labeled as “URL”.
- From the left pane, navigate to the “Output” tab and lower the value of the “Bit rate” from the one you are already using. Also, make sure that you set the value of “Keyframe value” to “2”.

Setting bit rate and keyframe

Solution 17: Switch to a less clogged WiFi channel
- Launch your favorite browser and download Acrylic Wifi Scanner.
- Double-click on the downloaded file and follow the on-screen instructions to install the scanner.
- Now launch this tool and scan for the channels running and the number of nearby networks using them.
- Locate and note down the least clogged channel from the list.
- Now press the “Win + R” keys on the keyboard to open the Run box. Type “cmd” and hit the “Shift + Ctrl + enter” keys on the keyboard simultaneously to open it as administrator.

Open Command Prompt as admin - Type the following command in the prompt and hit enter to execute it:
ipconfig
- Scroll down until you see a setting for “Default Gateway” under Ethernet or Wi-Fi.

Default Gateway - Copy the router’s Default Gateway IP Address and paste it in your browser’s search bar to open your “Internet Settings”.
- From the menu on the left pane, click on “Wireless” and then select the “Advanced” option.

Switch to another channel - Now from the right pane, click on the list option parallel to “Channel” and select the channel that you observed in the Acrylic Wifi Scanner above.


Important Note: Numerous users have reported that the most efficient alternative to Twitch’s web client is Streamlink Twitch GUI that eliminates the buffering issue permanently while streaming. It removes the need for a web browser by providing the user with an opportunity to watch the streams in a video player of his choice. We always recommend VLC media player to play your videos in order to experience the best results.
Solution 18: Contact Your ISP
If none of the solutions explained above helped you rectify your issue, then the only option you are left with is contacting your ISP. There might be a chance that the servers of your area are clogged up or Twitch is currently unavailable for your network. Just call your ISP and explain your problem to them. They will most probably fix this issue if the problem is at their side or provide you with an efficient solution if the problem is at your side.
By now you should’ve managed to fix the error but if you are still facing it, make sure to contact us.