How to Fix the Server DNS Address Could not be Found Issue [Complete Guide]
Some users have come to us with reports of the “Server DNS Address could not be found: The site can’t be reached” issue. In this article, we have gone into the details of why this issue occurs and how you can fix it on your computer. The issue is mainly related to certain DNS issues and other internet connectivity problems that can arise while using the internet.

Why do you get the “Server DNS Address Could not be Found” Error?
After having to go through the solutions and workarounds that most people use to fix this issue, we concluded that the following must be the primary reasons why it occurs.
- Outdated Drivers: If you haven’t recently updated your computer’s drivers, it is possible that they are the culprit behind this issue. This is because outdated drivers often cause conflicts with newer applications and this can easily be fixed simply by updating the drivers.
- DNS Cache: It is possible that the Server DNS address could not be found because the DNS cache that your browser had stored got corrupted. Therefore, we suggest that you clear out this cache using the solutions mentioned below in order to be able to fix the issue.
- DNS Configuration: Sometimes, the DNS configuration of your computer might have gotten messed up which can lead to the Server DNS address could not be found error. Therefore, we suggest that you reconfigure the DNS settings to point to a different DNS server as we have mentioned below.
Now that we have taken you through most of the reasons behind its occurrence, we can finally start implementing the solutions.
Before You Start:
- One of the reasons for this error can be your location as some websites block traffic from specific regions of the globe, therefore, this issue occurs. In order to counter this error, use a credible VPN like NordVPN to change your location and gain access to the website. Firstly, download NordVPN and after installation, launch the app, then connect with any country’s server and see if the problem is still there.
- A simple solution to this problem can be changing the browser, if you were previously using Google chrome, then now switch to Mozilla Firefox, Microsoft Edge, or Safari. If changing the browsers works for you then it is confirmed that the issue originates from the browser and you should update the default browser or reinstall it. But if the error still persists, then your browser is not the source of the error.
- Some users also reported that restarting your router can also fix this issue.
How to rectify server DNS address completely:
Fix 1: Troubleshoot Network Connection
In some instances, an essential Windows function cannot execute because of some bug, glitch, or corrupt files and this causes the error at hand. Hence, run the network troubleshooter by following the steps mentioned below:
- Initially, press the “Start” button and access the “Settings” option, then navigate to the “Update & Security” option.

Accessing Update & Security - Now, hit the “Troubleshoot” option located on the left side of the window, but if no errors appear then click on the “Additional troubleshooters” option.

Accessing Additional Troubleshooter - Inside the “Additional troubleshooters” option, click on “Internet Connections” and press the “Run the troubleshooter” button.

Tapping on Run the Troubleshooter - Follow the on-screen instructions to complete the troubleshooting and see if the problem persists.


Fix 2: Update Drivers using DriverEasy
An outdated network driver or adapter can be the cause of this error so, you’ll have to update your drivers. You can do this yourself painstakingly or you can use software that does this for you. This software identifies, downloads, and installs the required updates on your computer automatically, although some features will be missing in its (free) version. To download and install this software, follow the solutions mentioned below:
- Initially, download DriverEasy from their website and run the installation files, then hit the “Scan Now” option to scan for any outdated, corrupt, and missing drivers on your PC.

Scanning Through Driver Easy - Now, if DriverEasy detects an update in the network adapter driver, then you can manually download and install that update with the free version, otherwise, the pro version of this software will update all the drivers and notify you.
- Once the updates are complete, restart your computer and check if the issue still persists.

Fix 3: Reinstall Google Chrome
Sometimes this issue is not caused by the Network Configurations but instead is caused by the browser you are using, hence follow the instructions below to uninstall Google Chrome and then install it again:
- Firstly, double-check if you have closed all the tabs in your browser before uninstalling it, in order to avoid losing data.
- Now, press the “Windows + I” key to access “Settings”, click on the “Apps” option and then navigate to the “Apps & Features” option.

Accessing Apps & Features - Look for Google Chrome in the “Apps & Features” option, then click on the icon and press the “Uninstall” option.

Tapping the Uninstall Option - This is will give another pop-up option to confirm the uninstall process so press the button again, but If you also want to delete your history, bookmarks, and profile information, then select the option that states “Also delete your browsing data”.

Selecting the Additional Option - Lastly, Google Chrome will give a final pop-up to confirm the uninstallation procedure and after you click that option, the complete uninstallation of Google Chrome will commence.
- Double-check that the uninstallation of the browser has been completed before you install it again.


To install the browser again, follow the steps below:
- Download the installation file for your browser through their official website.
- When you hit the “Download” button, you will be presented with either the “Run” or “Save” option, so press the “Save” option and run the installation file when the download is complete.

Saving Chrome FIle - After Google Chrome has been completely installed, start the browser, and don’t forget to set it as the default browser because it works best that way. Finally, check to see if the problem persists.

Setting as Default Browser


Fix 4: Start PC in Safe Mode
- Firstly, press the “Windows + R” keys simultaneously to launch “Run”, then type “msconfig” in the box and hit the “OK” button.

Typing in “Msconfig” - Navigate to the boot tab and under the boot options check the “Safe boot” option, then click on the “Apply” button and the “OK” button.

Clicking on Safe Boot


Fix 5: Reset Internet Explorer Settings
- Press the “Windows + X” button simultaneously to access the context menu and hit the “Run” option, then type the following command in the run dialogue box and click on the “OK” option:
inetcpl.cpl

Typing Command in Run Prompt - In the internet properties window, navigate to the “Advanced tab” and press the “Reset” button located near the bottom right.

Tapping the Reset Option - Google Chrome will also require a reset after the internet explorer has been reset, therefore, launch chrome and click on the “Three dots”, then navigate to the “Settings” option.

Navigating to the Settings - Now, hit the “Advanced” option and select the “Reset and Cleanup” option from the extended options located on the left.

Tapping the Reset & Cleanup - Lastly, select the “Reset Settings to their Original Defaults” option and wait for the reset to complete, then reboot your PC and see if the issue persists.

Clicking on the Restore Option


Fix 6: Configure to Open a New Tab
Occasionally, on browser startup, an unwanted browser extension opens a unique group of websites in different tabs. This extension is installed on your browser by malware. This extension also causes this error, hence, to set up Google Chrome to open a new tab page, follow the instructions mentioned below:
- On the top right of the browser, click on the “Options menu” represented by three dots and navigate to the “Settings” option.
Navigating to the Settings - Now, hit the “On startup” option located in the left pane, then select the “Open the New Tab page”.

Selecting Open New Tab - Finally, restart Google Chrome and see if the new setting has fixed the issue.

Fix 7: Turn OFF Windows Firewall
- Initially, click on the “Start” button and access the “Settings” option, then navigate to the “Update & Security” option.
Accessing Update & Security - Now, hit the “Windows Security” option on the left menu list, then click on the “Firewall & Network Protection” option and turn “OFF” the firewall for all networks.

Turning OFF Firewall

Fix 8: Clear Chrome DNS Cache
- Firstly, start Google Chrome and click on the “New tab” option, then type the following in the address bar and hit the “Enter” button:
chrome://net-internals/#dns
- Finally, click on the “Clear Host Cache” option in order to clear the browser’s cache, then check to see if the issue persists.

Tapping Clear Cache

Fix 9: Turn Autocomplete Option OFF
- Launch Chrome and hit the “Three dots” on the top right of the window, then access the “Settings” and click on the “Sync and Google Services” option.

Tapping on Sync Option - Now, toggle the “Autocomplete searches and URLs” switch option “OFF” and see if the error is still there after the predictive search option has been turned off.

Turning OFF Autocomplete Option


Fix 10: Reinstall Network Drivers
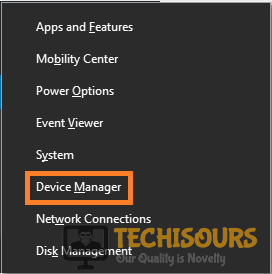
- Firstly, right-click on the “Start” button and select the “Device Manager” option, this will launch the device manager.

Accessing Device Manager - Now, click on the “Network Adapters” option to expand the list, then right-click on the internet adapter used by your computer and select the “Uninstall” option.

Tapping the Uninstall Option - Finally, restart your PC, this will prompt Windows to install the missing drivers automatically and then check if the error is still there.

Fix 11: Update your DNS
After coming across the fact that Google’s DNS is quite reliable, we can make an attempt to solve this problem by using Google’s DNS or Cloudfare’s DNS, therefore, follow the instructions below:
- Firstly, click on the “Start” icon and access windows settings, then go to the “Network & Internet” options and navigate to the “Change Adapter Options” option.

Accessing the Adapter Options - Now, right-click on your Network Adapter and access its “Properties”, then, double-click on the “Internet Protocol Version 4 (TCP/IPv4)” option.

Tapping on Internet Protocol Option - This will open a new window “Wi-Fi Properties”, then check the “Use the following DNS server addresses” option.

Selecting the DNS Server Option - After accessing that option, type “8.8.8.8” in the preferred DNS server and “8.8.4.4” in the alternate DNS server.

Typing DNS Addresses Manually - Press the “Windows Key + X” keys simultaneously, this will open the quick link menu, so choose the “Command prompt” or “PowerShell (Admin)” option.
- Finally, type in the following command to refresh the DNS Servers:
ipconfig /flushdns

Typing Command - Check if this fixes the Server DNS Address Could not be Found issue.


Fix 12: Search and Add IP Address to Hosts File
- If you can browse other Websites, then try browsing the following link and paste the domain you cannot browse instead of “domain.com”.
https://www.whatsmydns.net/#A/domain.com

Checking Domain - Initially, click on the “Start” icon and type “Notepad” in the search box, then right-click on the “Notepad” icon and run it as administrator.

Navigating to Notepad - Press the “File” option on the top left, then click on the “Open” option within the “File” option and paste the following address into the browsing tab:
C:\Windows\System32\drivers\etc

Typing the address - After pasting the address select the “All files and Hosts” option and access the “Hosts” file, then, add the following IP address at the end of the file:
0.0.1 domain.com
- Now, swap the IP address you had copied earlier in place of “127.0.0.1” and also the domain you searched through the above-mentioned website.
- Lastly, press the “Save” option, then try to browse the website.


Fix 13: Reset Network Configurations
If your PC isn’t using the right combination of network configurations as it hasn’t been rightly configured, an error will pop up in the browser while surfing on the internet, therefore reset the network configurations by following the instructions below:
- Firstly, right-click on the “Start” icon on the bottom left of the “Taskbar” and hit the “Run” option, then type “cmd” in the empty box.
- Now press the “Ctrl + Shift + Enter” keys simultaneously to provide the administrative permissions in order to launch the “command prompt”.

Typing in cmd - After the “Command Prompt” launches, type the following commands individually, and don’t forget to press “Enter” after each one to execute them.

netsh int ip reset

netsh winsock reset

ipconfig /release

ipconfig /renew

ipconfig /flushdns
- After all the commands have been executed, see if the error is still there.
Fix 14: Reboot the DNS Service
- Initially, right-click on the “Windows” icon and hit the “Run” option, then type “services.msc” and press the “Enter” button to access the service management window.

Typing in “services.msc” - Inside the service manager window, scroll down the list and search the list of services, then right-click on the “DNS Client”.

Refreshing DNS Client - Finally, hit the “Restart” option from the list and wait patiently until the services are rebooted, then see if the issue pops up again.


Fix 15: Delete ETC Folder Contents
This error is sometimes caused by the presence of unnecessary files in the “etc” folder of the Windows Operating System. Hence, in order to fix this issue, we will delete these files but before that, we should make a complete backup of these files if this fix doesn’t work. In order to delete these files, follow the instructions below:
- To begin, access the “This PC” option located on your desktop that will open the “File Explorer”, then paste the following address in the address bar and hit the “Enter” button:
C:\Windows\System32\drivers\etc

Navigating to the Address - Select all the files located in the folder and delete them permanently, then see if the problem has been solved after the deletion of files.

Deleting All Files - Check if the issue is now fixed.


Fix 16: Tweak DNS Server Settings
- Firstly, press the “Windows + I” keys simultaneously to open the settings, then type “Control panel” in the search box and click on the control panel option from the search results.

Type Control in Run Box - Navigate to the “View By” option and choose the “Large icons” option from the drop-down menu, then hit the “Network and Sharing Center” option.

Accessing Network & Sharing Center - Now, navigate to the “Change Adapter Settings” option located on the top left of the network and sharing center window.

Tapping on Adapter Settings - Choose the connection icon that you are using (Local area or Wireless connection), then right-click on the icon and hit the “Properties” option.

Accessing the Properties Option - After accessing the “Properties” option, select the “Internet Protocol Version 4 (TCP/IPv4)” and hit the “Properties” option.

Tapping on the Properties Option - In the “Properties” tab, the “Obtain DNS Server Address” option would be selected as the default unless it has been changed by the user.

Checking the DNS Server Option - Now, select the “Use the Following DNS Addresses” option, then type “8.8.8.8” in the primary and “8.8.4.4” in the secondary DNS Server Addresses.

Typing DNS Addresses - Finally, press the “OK” button to save the changes and close the window, then check if the server DNS issue is resolved in the browser after changing the settings.


Fix 17: Flush the DNS Cache
- At first, right-click on the “Start” button on the bottom left to open the context menu and hit the “Run” option.
- Type “cmd” in the Run box and press “Ctrl + Shift + Enter” simultaneously, this will open the administrator command window.
Typing in cmd - Now, type the following commands, one in each line, and press the “Enter” button to execute each of them:
ipconfig /flushdns

ipconfig /renew

ipconfig /registerdns
- Finally, check if the error persists after you have executed all of the mentioned commands.
Fix 18: Turn OFF Proxy Settings
Another cause of this error is that your PC is set to run a proxy connection as default, so follow the instructions below to disable the proxy settings:
- To begin, press the “Windows + X” buttons simultaneously to open the context menu and click on the “Run” option, then type “MSConfig” in the box and hit the “OK” option.
Typing in “Msconfig” - Now, access the “Boot” tab from the system configuration Window and check the “Safe boot” option under Boot options. then press the “Apply” and “OK” option.
Clicking on Safe Boot - Reboot your computer and this time it will boot into safe mode, then press the “Windows + R” buttons simultaneously to launch “Run” again and type the following command in the empty box:
inetcpl.cpl

Typing “inetcpl.cpl” - Hit the “Enter” option to run the command, then an internet properties window will pop up on the screen, so click on the “Connections” tab.

Clicking on the Connections Tab - In the connections tab, navigate to the “LAN settings” option and uncheck the “Use a proxy server for your LAN” option box, then hit the “OK” option.

Unchecking the Proxy option - Lastly, access MSConfig again through “Run” and disable the “Safe boot” option, then save the settings and reboot your system.
Clicking on Safe Boot - Verify if this has fixed the Server DNS Address Could not be Found issue.
Fix 19: Edit the Windows Hosts file
- Initially, click on the “Start” button and type “Notepad” in the search box, then right-click on the icon and select the “Run as administrator” option.

Navigating to Notepad - Now, press the “Ctrl + O” buttons simultaneously to open a file, then browse to the following address:
C:\Windows\System32\drivers\etc
- After you have accessed the file location, click on the file type menu and select “All Files”, then select the “Hosts” file and hit the “Open” option.

Accessing the Hosts File - Delete all the addresses present after the last hashtag sign, then press “Ctrl + S” to save the file and close the notepad.

Deleting the Addresses - Lastly, reboot your PC and check if this has resolved the Server DNS Address Could not be Found error.
Fixes For Android Users:
Fix 1: Change DNS Address through App
- Firstly, download the “DNS Changer” app through Play Store, then launch the app and select “Google” as DNS Provider.

Selecting Google DNS - Finally, hit the “Start” button and wait, the app will make changes in the network but you need to keep the app running in the background in order to keep it working.

Tapping the Start Button - Check to see if this fixes the Server DNS Address Could not be Found issue.
- Initially, click on the “Start” button and type “Notepad” in the search box, then right-click on the icon and select the “Run as administrator” option.


If you still cannot resolve this error, Contact Us for further assistance.