Resolve the Windows Update Error 0x80240034 [Complete Guide]
The Windows Update Error 0x80240034 is basically an error message that is displayed after Windows update fails to install on Windows 10 and this message indicates that there has been some sort of file corruption with the update files due to which Windows has been unable to install new updates. We have compiled this comprehensive guide to help you make sure that you get rid of this error message completely.

What Causes Windows Update Error 0x80240034?
After sifting through some basic troubleshooting techniques, we decided to compile a list of reasons due to which this error occurs in the first place.
- File Corruption: The most basic and common reason due to which this error shows up on your computer is the corruption of the actual Windows Update files which prevent the update from being installed and trigger the 0x80240034 error.
- System File Issue: If the system files or drivers have been improperly installed or have been corrupted, you will be unable to update your Windows 10 installation because all of the Windows files and drivers need to be properly installed in order to process the new update on your computer.
- Windows Firewall: It is possible that the Default Windows Firewall is preventing the update from being installed on your computer due to a false positive and it is the reason that you are seeing the Windows Update Error 0x80240034 on your computer.
- .NET Framework Disabled: The .NET Framework software is very important and needs to be installed and enabled on the Windows computer on which you are trying to process the update because it helps during the installation process.
Now that you have been made familiar with most of the reasons behind the occurrence of this issue, we can finally move on towards implementing the fixes.
Before we start:
- Take the power adapter of your computer out of the power socket and shut it down completely.

Plugging out the power cable - After waiting for almost 5 minutes, power cycle your computer by inserting the power adapter back into the socket.
- If you are using an external drive or an external DVD or SD card-reader with your computer, then we recommend you to “Disable” it from the “Device Manager”.
- Now press “Win + I” keys simultaneously on the keyboard to open the System settings and then navigate to the “Update and security” option.

Click Update and Security - From the left pane, select “For developers” and then check the box parallel to the “Sideload apps” option located at the right side of the Window.

Sideload Apps - Now go back to the main menu and select “Apps”.

Clicking on Apps - From the left pane, select “Apps and features” and then click on the “Manage Optional Features” option located on the right side of the window.
Manage optional features - Now scroll down and click on the “Uninstall” button associated with the “Windows Developer mode”.
- Now navigate to the “Troubleshoot” tab from the left pane and click on the “Run the troubleshooter” button associated with the “Windows Update” option

Run the Troubleshooter


Fixing the Windows Update Error 0x80240034:
Solution 1: Check for corrupt system files
- Right-click on the “Search” icon located on the taskbar and search for “cmd”.
- Now right-click on the “Command Prompt” option and select “Run as administrator”.

Run Command Prompt - Now type the following commands in the command prompt and hit the “Enter” key on the keyboard to execute the following commands:
sfc /scannow
dism.exe /Online /Cleanup-image /Restorehealth
- When the commands are executed successfully, proceed to update your Windows and see if you encounter windows error code 0x80240034 again.

Solution 2: Reset Windows Update Store
- Right-click on the “Search” icon located on the taskbar and search for “cmd”.
- Now right-click on the “Command Prompt” option and select “Run as administrator”.
Run Command Prompt - Now type the following commands in the command prompt and hit the “Enter” key on the keyboard to execute the commands:
net stop wuauserv
net stop cryptSvc
net stop bits
net stop msiserver
Ren C:\Windows\SoftwareDistribution SoftwareDistribution.old
Ren C:\Windows\System32\catroot2 Catroot2.old
net start wuauserv
net start cryptSvc
net start bits
net start msiserver
- When the commands are executed successfully, proceed to update your Windows and see whether the error code 0x80240034 has been resolved.
Solution 3: Run a full system scan
- Press “Win + I” keys simultaneously on the keyboard to open the System settings and then navigate to the “Update and security” option.
Update and Security - From the left pane, select “Windows Security” and then click on the “Virus and threat protection” located on the right side of the Window.
Virus and threat protection - Now click on the “Quick scan” button to start scanning and removing the viruses and threats that have attacked your computer.

Choose Quick Scan Option - When the scanning process is finished, proceed to update your Windows again and check if you encounter the 0x80240034 error again while updating the Windows.


Solution 4: Modify your Registry
- Click on the “Windows” icon located on the taskbar and select “Run box” from the pop-up menu.

Click on Run Option - In the run box, type the “regedit” command and hit the “Enter” key on the keyboard to open the Registry Editor.

Typing “regedit” - From the left pane of the Registry Editor, navigate to the following location and delete both “WUServer” and “WIStatusServer” entries located on the right side of the screen.
HKEY_LOCAL_MACHINE\SOFTWARE\Policies\Microsoft\Windows\WindowsUpdate
- After propagating the above changes, reboot your computer and proceed to update your Windows to check whether the error code 0x80240034 persists.


Solution 5: Clear the Windows Update cache folder
Method 1:
- Click on the “Windows” icon located on the taskbar and select “Run box” from the pop-up menu.
Click on Run Option - In the run box, type the “services.msc” command and hit the “Enter” key on the keyboard to open the Services app.

Typing in “services.msc” - Now select the “Windows Update” service from the right pane of the window and click on the “Stop” button.

Stop the service - Now open the run box again and search for the “%windir%\SoftwareDistribution\DataStore” command.
Typing in “%windir%\SoftwareDistribution\DataStore” - In the “DataStore” folder, select all the files and click on the “Delete” key on the keyboard to delete all the files.
- After clearing all the files, navigate back to the services application, and start the “Windows Update” service by clicking on the “Start” button.
Start the service - After propagating these changes, go to settings and try to update your Windows again to check whether the issue has been resolved.


Method 2:
- Right-click on the “Search” icon located on the taskbar and search for “cmd”.
- Now right-click on the “Command Prompt” option and select “Run as administrator”.
Run Command Prompt - Now type the following commands in the command prompt and hit the “Enter” key on the keyboard to execute the commands:
net stop wuauserv
rmdir %windir%\SoftwareDistribution /S /Q
net start wuauserv
- When the commands are executed successfully, proceed to update your Windows and see whether you encounter error code 0x80240034 again.
Solution 6: Modify the Windows Update service type
- Right-click on the “Search” icon located on the taskbar and search for “cmd”.
- Now right-click on the “Command Prompt” option and select “Run as administrator”.
Run Command Prompt - Now type the following commands in the command prompt, one by one, and hit the “Enter” key on the keyboard to execute the commands:
SC config wuauserv start= auto
SC config bits start= auto
SC config cryptsvc start= auto
SC config trustedinstaller start= auto
- When the commands are executed successfully, proceed to your system settings and try to update your Windows again to check whether the error code 0x80240034 arises again while running a windows update.
Solution 7: Temporarily disable Windows Firewall
Windows defender firewall:
- Click on the “Windows” icon located on the taskbar and select “Run box” from the pop-up menu.
Click on Run Option - In the run box, type “Control panel” and hit the “Enter” key on the keyboard to open the Control panel.

Typing in Control Panel - Now select “Large Icons” from the “View by” drop-down list located on the top-right corner of the screen and then click on the “Windows Defender Firewall” option.

Windows Defender Firewall - From the left pane, click on the “Turn Windows Defender Firewall on or off” option.

Check the Option - Now check the boxes parallel to “Turn off Windows defender firewall” under both “Public network settings” and “Private network settings” sections.
Turn off Windows defender firewall


Third-party antivirus applications (Avast Users):
- Click on the “^” button located at the bottom right of the taskbar and then right-click on the Avast icon.
- Hover over the “Avast Shield Control” and select the “Disable Permanently” option to disable your antivirus software.

Disable antivirus permanently

Virus and threat protection:
- Press “Win + I” keys simultaneously on the keyboard to open the System settings and then navigate to the “Update and security” option.
Update and Security - From the left pane, select “Windows Security” and then click on the “Virus and threat protection” located on the right side of the Window.
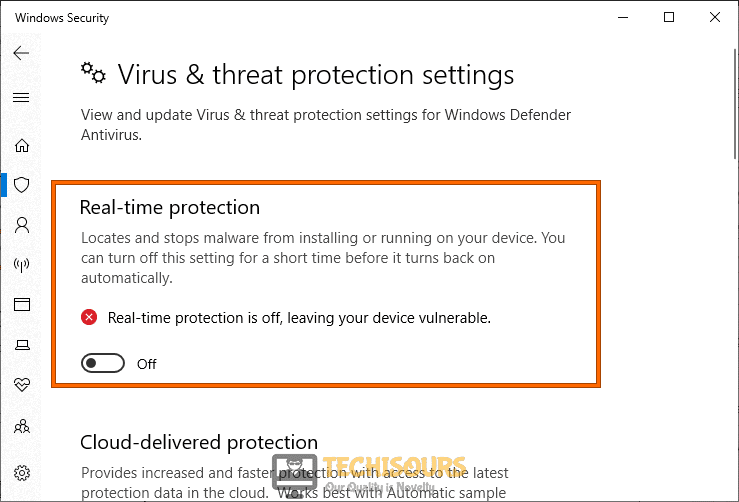
Click Virus and threat protection - Now click on the “Manage Settings” option located under the “Virus and threat protection settings”.

Manage Settings - Now disable the toggle button under the “Real-time protection” section and check if you encounter Error code 0x80240034 again while updating your Windows.
Disable Real-time protection

Solution 8: Re-enable Microsoft .NET Framework 3.5
- Click on the “Windows” icon located on the taskbar and select “Run box” from the pop-up menu.
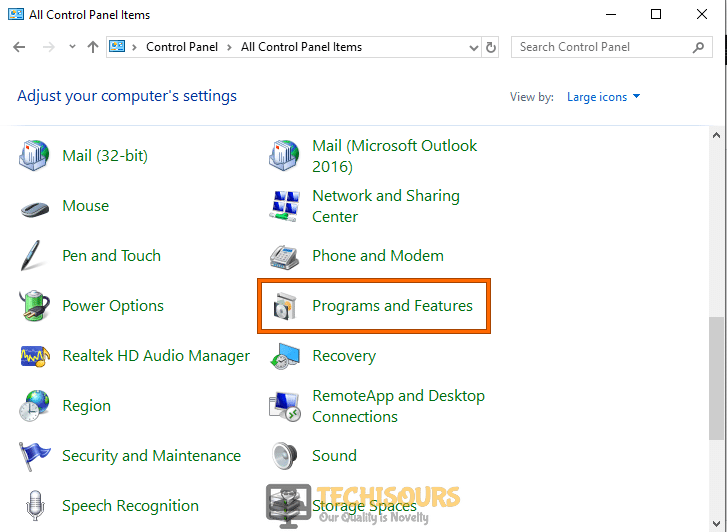
Click on Run Option - In the run box, type “Control panel” and hit the “Enter” key on the keyboard to open the Control panel.
Typing in Control Panel - Now select “Large Icons” from the “View by” drop-down list located on the top-right corner of the screen and then click on the “Program and Features” option.

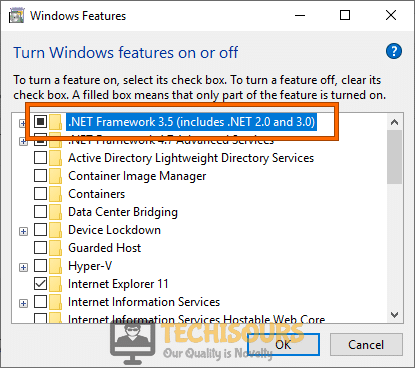
Click Programs and Features - Now select “Turn Windows features on or off” located on the left pane of the window and then check the box parallel to the “.NET Framework 3.5” option.

Install .Net Framework 3.5 - Apply the changes and restart your computer to see whether the error code 0x80240034 arises again while running a windows update.
Solution 9: Run a command in Power shell
- Right-click on the “Windows” icon located on the taskbar and select “Power Shell (Admin)”.

Windows Powershell (Admin) - Now type the following command in the command prompt and hit the “Enter” key on the keyboard to execute the command.
wuauclt.exe/updatenow
- When the command is executed successfully, proceed to update your Windows and see if you encounter Error code 0x80240034 again.

Solution 10: Update via Microsoft Update Catalog
- Right-click on “This PC” and select Properties from the pop-up menu. Here, note down the “System Type” under the “System” section.

Choose System type - Now launch your favorite browser and go to Microsoft Update Catalog. From the search bar at the top right corner of the screen, search for the KB number associated with your updated version.
- Now locate the correct version corresponding to your system type and click on the “Download button”.
- When the file is downloaded successfully, double-click on it and follow the on-screen instructions to install the update manually.

Solution 11: Update Windows 10 by using the Update Assistant
- Launch your favorite browser and download the Windows Media creation tool by Microsoft, for your computer.
- Now double-click on the downloaded executable file to run the Media Creation Tool and accept the user agreement.
- Now check the box parallel to the “Upgrade this PC now” option and then click on “Next”.

Upgrade this PC now - Now click on the “Install” button to update your Windows to the latest version.

Click on the “Install” button - When the update procedure is finished, hopefully, you won’t encounter error code 0x80240034.


Solution 12: Install Windows 10 using the ISO file
- Launch your favorite browser and download the Windows Media creation tool by Microsoft, for your computer.
- Now double-click on the downloaded executable file to run the Media Creation Tool and accept the user agreement.
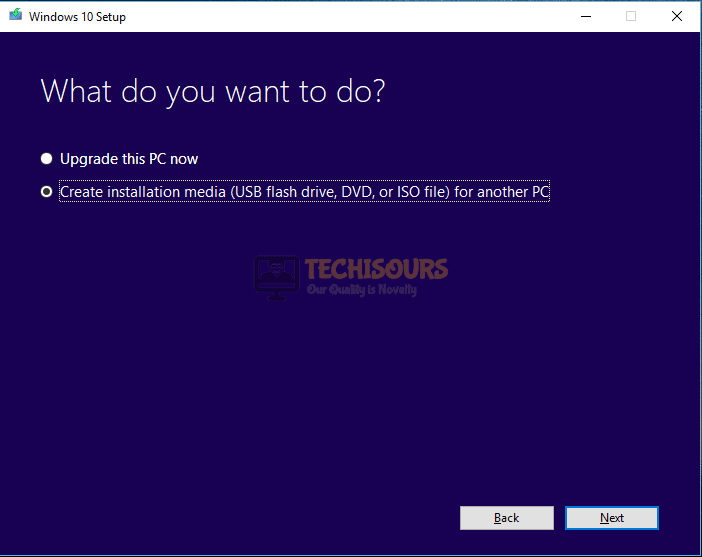
- Now check the box parallel to the “Create installation media (USB flash drive, DVD, or ISO file for another PC” option and then click on “Next”.

Create installation media - Now uncheck the box parallel to “Use the recommended options for this PC” and set your language, edition, and architecture.

Use the recommended options - Now check the box parallel to “ISO File” and click on “Next”.
- Patiently wait while the Media creation tool downloads the ISO file and saves it on your computer’s drive.
- When the file is downloaded, disconnect your computer from the internet and navigate to the location where your ISO file is downloaded.
- Now double-click on the “setup.exe” file and follow the on-screen instructions to update your Windows.

Solution 13: Clean install Windows 10
Create installation media:
- Launch your favorite browser and download the Windows Media creation tool by Microsoft, for your computer.
- Now double-click on the downloaded executable file to run the Media Creation Tool and accept the user agreement.
- Now check the box parallel to the “Create installation media (USB flash drive, DVD, or ISO file for another PC” option and then click on “Next”.
Create installation media - Now uncheck the box parallel to “Use the recommended options for this PC” and set your language, edition, and architecture.
Use the recommended options - Now check the box parallel to “USB flash drive” and click on “Next”.

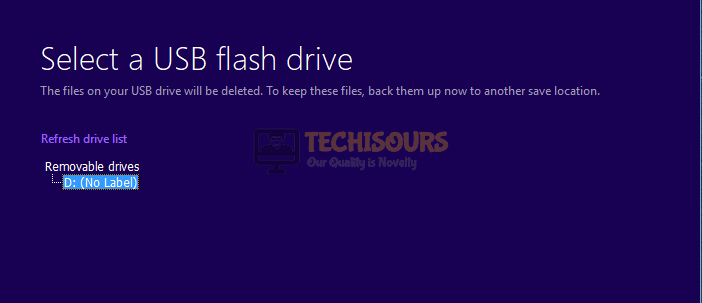
USB flash drive - Now choose the USB in which you want to burn the installation media and click on “Next”.

Select the USB - Wait patiently until the Media creation tool downloads Windows 10 and installs it on the USB drive.

Installation in progress


Clean install Windows:
- Insert the USB in your system and restart it.
- While the computer is restarting, press and hold the ESC button to enter the “BIOS settings”.
Note: Different computers have different buttons to enter BIOS settings e.g, F2, F12, or Delete. - Adjust your boot order to allow the computer to boot from the USB and restart your system again to let the computer boot from the USB.
- Now click on “Install now” and type the authorized product key.

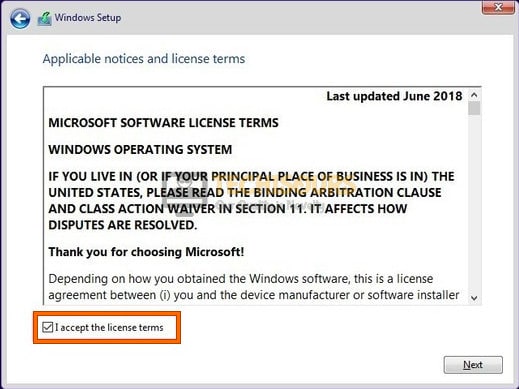
Type the authorized product key - Now check the box parallel to “Accept the license term ” located at the bottom of the screen and select “Next”.

Accept the license term - Now choose the partitions that were previously created and delete them to reallocate the available memory space.

Delete partitions - Now follow the onscreen instructions to clean install Windows 10 on your computer.


Workaround:
If you’re using WSUS, make sure you’ve added the .esd to IIS. Follow the steps indexed below to carry this task out.
- Click on the “Windows” icon located on the taskbar and select “Run box” from the pop-up menu.
- In the run box, type “Control panel” and hit the “Enter” key on the keyboard to open the Control panel.
- Now select “Large Icons” from the “View by” drop-down list located on the top-right corner of the screen and then click on the “Administrative tools” option.
- Now open the “IIS Manager” and select the server name.
- Now open “MIME types”, located under the “IIS” section and then click on the “Add” button.
- Now set the “File Name Extention” equal to ” .esd” and “MIME type” equal to “application/octet-stream”.
Hopefully, the error might have gone by now but if you need further assistance, contact here.