GUIDE: Fix Error 0x80070643 on Windows Update
Windows Update is a good way to keep your operating system up to date with the latest Microsoft updates but for most users, it often spurs new issues. Once recent error that we came across was the ‘2018-11 update for Windows 10 version 1803 for x64-based systems (KB4023057) – Error 0x80070643‘ which prevents the latest update from being installed on the users’ computers.
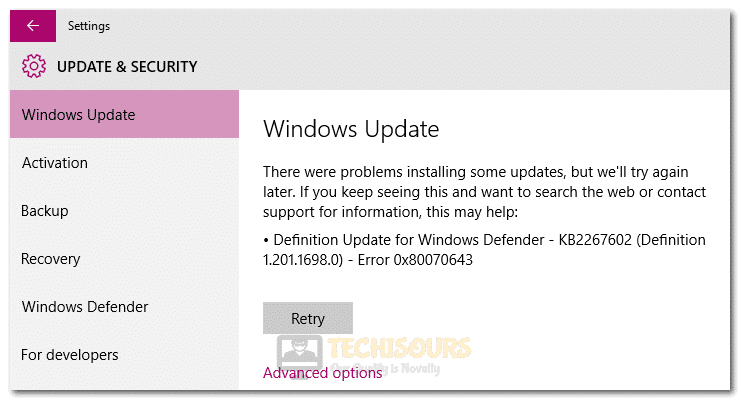
In this guide, we have compiled a comprehensive and detailed framework to completely eradicate this issue from your computer. We have listed fixes, solutions, and some convenient workarounds to help you circumvent this error completely.
What Causes the Error 0x80070643 on Windows Update?
After going through some basic troubleshooting techniques, we compiled a list of methods to fix the error 0x80070643 completely. While doing this, we thought that you should also be made familiar with some of the reasons due to which it occurs in the first place.
- Faulty Update Installation: In most cases, the Error 0x80070643 mostly only arises when you have installed a faulty update on your computer and now while installing the new update, the computer is unable to properly recognize and process the older installation.
- Windows Installer Service: If the Windows Installer service has been glitched on your computer, this error can arise because the computer is unable to properly install the new update on your computer. A good way to circumvent this issue has been discussed below in the solutions.
- Windows Update Components: We have seen cases, where the Windows Update components were improperly launched during startup or their startup itself, was compromised due to which the Error 0x80070643 was being triggered while trying to download and install updates on the computer.
- Third-party Antivirus software: There have been instances where the computer was unable to properly process the updates for your operating system because the Third-party antivirus software installed on your PC was preventing it from being able to do so and thus causing the 2018-11 update for windows 10 version 1803 for x64-based systems (kb4023057) – error 0x80070643.
- System File Damage: If the System files or drivers have been improperly installed or damaged due to a storage failure, you might see this error on your computer. It is best to perform a thorough scan of your computer to find any abnormalities and fix them automatically.
- Outdated Drivers: It is also possible in some cases that the drivers that you are currently using on your computer have been outdated and require updates in order to dispense proper system functionality. Therefore, checking for and installing missing/outdated drivers is a good way to diagnose these issues.
Now that you have been made familiar with most of the reasons behind this issue, we can finally move on towards implementing fixes to eradicate it completely.
Before we start:
- Take the power adapter of your computer out of the socket and shut it down completely.
- After waiting for about 2 minutes, insert the adapter back into the power socket and restart your computer. Make sure you log in as an administrator this time.
Power cycle computer - Now press “Win + I” keys simultaneously on the keyboard to open “Settings” and then navigate to the “Update and Security” option.
Choose Update and Security - From the left pane, navigate to “Troubleshoot” and then click on the “Run the Troubleshooter” associated with “Windows Update” located on the right side of the window.
Run the Troubleshooter
Fixing the Error Code 0x80070643 on 2018-11 update for windows 10 version 1803 for x64-based systems (kb4023057):
Solution 1: Uninstall kb4023057 Update
- Right-click on the “Windows” icon located on the left side of the taskbar and select “Run” to launch the Run box.
Click on Run - Now type “appwiz.cpl” command in the Run box and hit the “Enter” key on the keyboard to view the list of programs and applications installed on your computer.
Typing “appwiz.cpl” - From the left pane, click on the “View installed updates” option to view the Windows updates that you have installed recently.
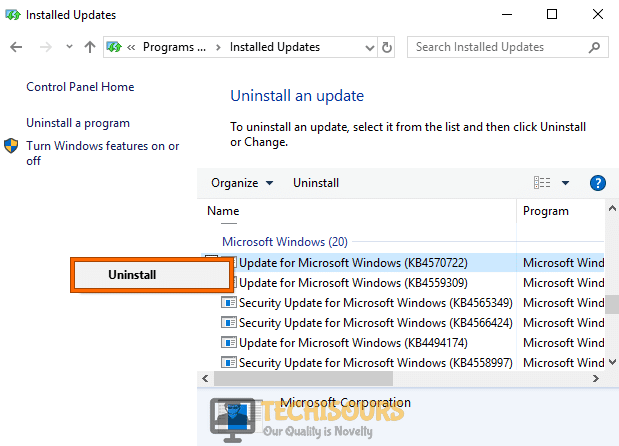
View installed updates - Now select the update labeled as “kb4023057” and click on the “Uninstall” uninstall button located on the top of the list, adjacent to “Organize”, to uninstall the update completely from your PC.
Uninstall Windows Update - After uninstalling the update, press “Win + I” keys on the keyboard top open “Settings” and navigate to “Update and Security”.
Update and Security - From the left pane, select the “Update Windows” tab and click on the “Check for updates” button located on the right side of the window.
Check for updates - Now patiently wait while your computer installs the latest version of Windows and hopefully 2018-11 update for windows 10 version 1803 for x64-based systems (kb4023057) – error 0x80070643 would be removed from your PC.
Solution 2: Restart Windows Installer service
- Right-click on the “Windows” icon located on the left side of the taskbar and select “Run” to launch the Run box.
Click on Run Option - Now type “services.msc” in the Run box and hit the “Enter” key on the keyboard to open the Services app.
Typing in “services.msc” - From the right pane, select “Windows Installer” and then click on the “Restart” button located on the left pane, to restart the services.
Restart Windows Installer service - When the service is restarted, proceed to update your windows again and see if the error 0x80070643 is resolved.
Solution 3: Reset Windows update components
- Click on the search button located on the taskbar and type in “cmd”.
- Now right-click on “Command Prompt” and select “Run as administrator” from the pop-up menu.
Run Command Prompt - Type the following commands in the command prompt one by one and hit the “Enter” key to execute them:
net stop bits
net stop wuauserv
net stop appidsvc
net stop cryptsvc
ren %systemroot%\softwaredistribution softwaredistribution.old
ren %systemroot%\system32\catroot2 catroot2.old
net start bits
net start wuauserv
net start appidsvc
net start cryptsvc
- When the above commands are successfully executed, try to update your windows again and see if you encounter the error 0x80070643 again.
Solution 4: Disable third-party antivirus software
- Click on the “^” icon located on the right side of the taskbar to open the System tray and locate the icon of antivirus installed on your PC.
- Now right-click on your antivirus icon and disable the toggle button parallel to “Protection is ON” to disable the antivirus completely.
Disable antivirus
Note: If you have any other antivirus installed on your PC, you can follow a similar procedure to disable it.
Solution 5: Run SFC Scan on your system
- Click on the search button located on the taskbar and type in “cmd”.
- Now right-click on “Command Prompt” and select “Run as administrator” from the pop-up menu.
Run Command Prompt - Type the following commands in the command prompt one by one and hit the “Enter” key to execute them:
sfc /scannow
DISM.exe /Online /Cleanup-image /Scanhealth
DISM.exe /Online /Cleanup-image /Restorehealth
DISM.exe /online /cleanup-image /startcomponentcleanup
- When the above commands are successfully executed, try to update your windows again and see if encounter the 2018-11 update for windows 10 version 1803 for x64-based systems (kb4023057) – error 0x80070643 occurs again.
Solution 6: Scan your system for viruses
- Press “Win + I” keys simultaneously on the keyboard to open Settings and then navigate to “Update and Security”.
Update and Security - From the left pane, select “Windows Security” and then choose “Virus and Threat protection” from the right side of the window.
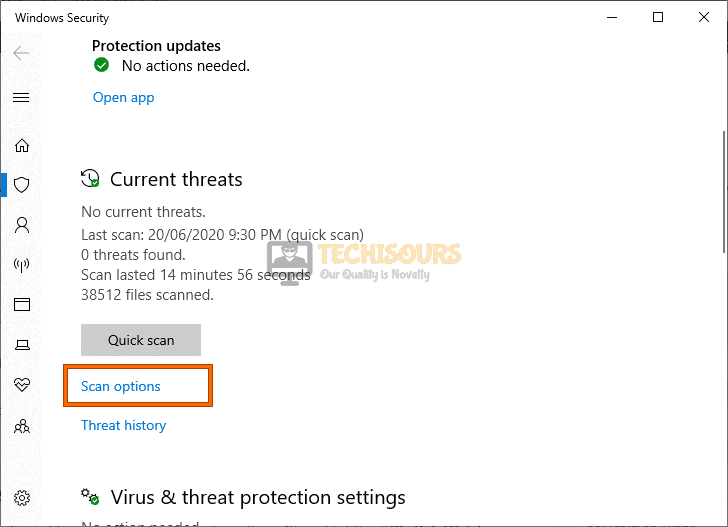
Virus and threat protection - Now click on the “Scan options” and then check the box parallel to “Full scan”.
Choose Scan options - Now scroll down to the bottom of the screen and click on the “Scan Now” button to start the scanning process.
Perform a full scan - When the scanning process is completed, proceed to update your windows and check whether the error 0x80070643 has been resolved on your PC.
Solution 7: Run disk cleanup on your computer
- Double-click on “This PC” icon to open the File Explorer on your computer.
- Right-click on the “Local Disk (C:)” partition and select “Properties” from the pop-up menu.
Selecting Properties - Navigate to the “General” tab and click on the “Disk Cleanup” button.
Disk Cleanup - Now click on the “Clean up system files” button located at the bottom-left of the window.
Clean up system files - Now check the boxes parallel to both “Previous Windows Installation(s)” and “Temporary Windows Installation files” options and click on the “OK” button.
Check the box - Follow the same procedure to check all the disk partitions of your computer and check whether you encounter the 2018-11 update for windows 10 version 1803 for x64-based systems (kb4023057) – error 0x80070643 again while updating your windows.
Solution 8: Check your disk using the command prompt
- Click on the search button located on the taskbar and type in “cmd”.
- Now right-click on “Command Prompt” and select “Run as administrator” from the pop-up menu.
Run Command Prompt - Type the following command in the command prompt and hit the “Enter” key to execute it:
chkdsk /F
Solution 9: Perform a clean boot
- Right-click on the “Windows” icon located on the left side of the taskbar and select “Run” to launch the Run box.
Click on Run Option - Now type “msconfig” in the Run box and hit the “Enter” key on the keyboard to open the System Configuration wizard.
Typing in “Msconfig” - Under the “Services” tab check the boxes parallel to “Hide all Microsoft services” and click on the “Disable all” button.
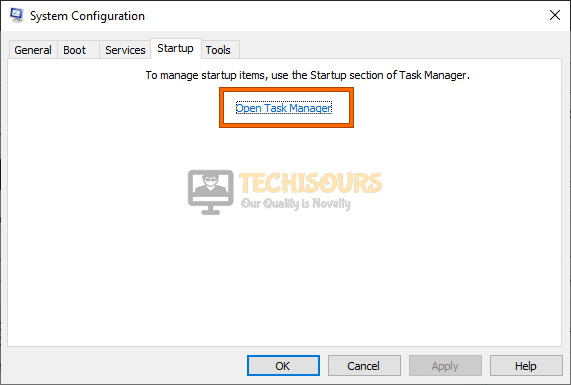
Hide all Microsoft services - Now go to the “Startup” tab and click on “Task Manager”
Open Task Manager - Here, select each service one by one and click on the “Disable” button to disable all the services that initiate on startup.
Disable all startup services - Now reboot your computer and proceed to update your Windows and hopefully, error 0x80070643 would be resolved.
Solution 10: Disable Fast Startup on your PC
- Right-click on the “Windows” icon located on the left side of the taskbar and select “Run” to launch the Run box.
Click on Run - Now type “powercfg.cpl” in the Run box and hit the “Enter” key on the keyboard to open the System Settings wizard.
Typing in “powercfg.cpl” - From the left pane, select the “Choose what the power buttons do” option and then choose “Change settings that are currently unavailable”.
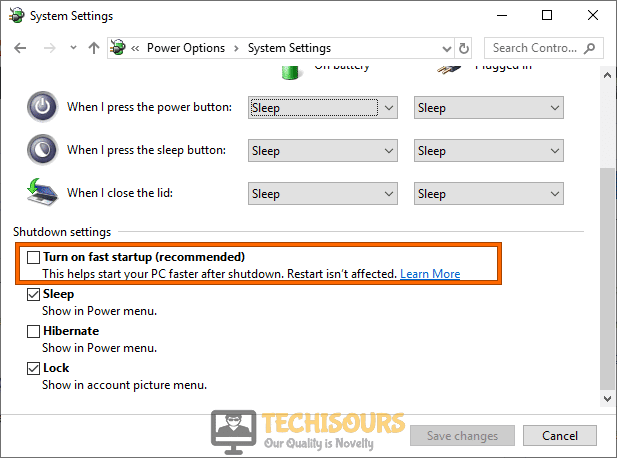
Change Settings - Now uncheck the box parallel to the “Turn on fast startup” option and click on the “Save Changes” button.
Disable Fast startup
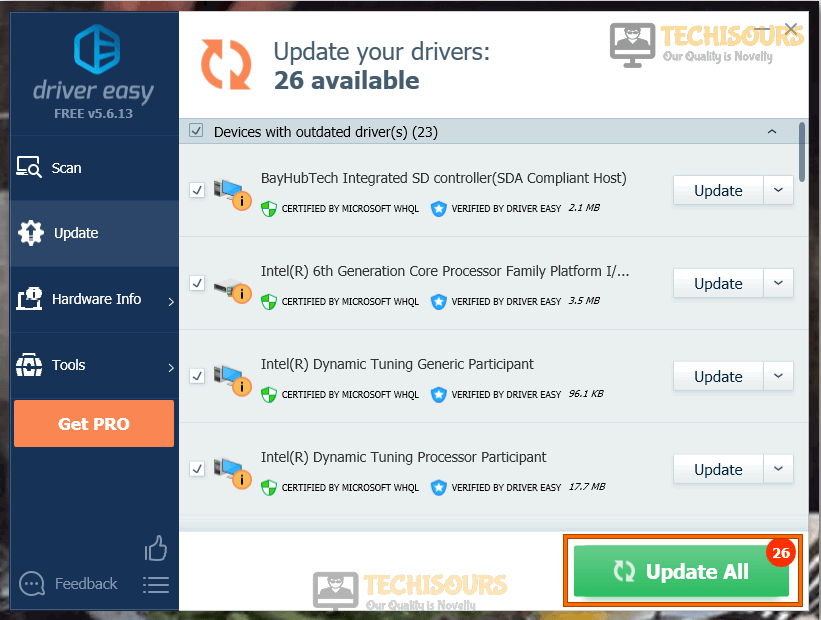
Solution 11: Update device drivers automatically
- Open your favorite browser and open the official website of Driver Easy to download their tool.
- When downloaded, double-click on the executable file to open the installation wizard and follow the on-screen instructions to install it on your computer.
- Now launch the tool and click on the “Scan Now” button to scan for all the outdated device drivers installed on your computer.
Choose Scan now - When the scan is completed, click on the “Update All” button, located at the bottom-right of the screen to update all the drivers at once.
Update all Drivers
Solution 12: Remove newly installed device on your PC
- Right-click on the “Windows” icon located on the taskbar and select “Apps and Features” from the pop-up menu.
Choose Apps and Features - Now scroll down and locate all the new apps that you have recently installed on your computer.
- Click on the “Uninstall” button associated with all the recently installed apps to uninstall them and check whether you encounter the 2018-11 update for windows 10 version 1803 for x64-based systems (kb4023057) – error 0x80070643 again while updating your Windows.
Uninstall latest software
Solution 13: Update Windows Defender in PC
- Press “Win + I” keys simultaneously on the keyboard to open Settings and then navigate to “Update and Security”.
Clicking Update and Security - From the left pane, select “Windows Security” and then choose “Virus and Threat protection” from the right side of the window.
Virus and threat protection - Now click on the “Check for updates” option located under the “Virus and Threat protection updates” section and install the latest version of the defender if available.
Virus and threat protection updates - After updating the Windows defender to its latest version, check whether the error 0x80070643 occurs while updating the Windows on your PC.
Solution 14: Reinstall the latest .NET Framework
- Right-click on the “Windows” icon located on the taskbar and select “Run” from the pop-up menu.
Click on Run Option - In the run box, type in “appwiz.cpl” and hit the enter key to view the list of applications installed on your computer.
Typing “appwiz.cpl” - Right-click on the latest “.NET framework” version installed on your computer and select “Uninstall” from the pop-up menu to remove it completely from your computer.
- Now open a browser and download the latest version of the .NET framework on your computer.
- Now double-click on the downloaded file and follow the on-screen instructions to install it on your computer.
- After the .NET framework is successfully installed on your PC, try to update your windows again and see if the 2018-11 update for windows 10 version 1803 for x64-based systems (kb4023057) – error 0x80070643 persists.
Solution 15: Run Automatic Windows Repair
- Hit the “Win + I” keys simultaneously on the keyboard to open the Settings and navigate to “Update and Security”.
Update and Security - From the left pane, select “Recovery” and then click on the “Restart Now” button located under the “Advanced Startup” section on the right pane of the window.
Clicking Restart now - Click on “Troubleshoot” and then select “Advanced Options”.
Choose Advanced Options - Now click on the “Automatic Repair” option to start the troubleshooting process.
Choose Automatic Repair - On the completion of this process, press the “Win + E” keys simultaneously on the keyboard to open the file explorer and navigate to the following location.
C:\Windows\SoftwareDistribution
- Now delete all the files present in this folder and try to update your windows again and see if the error 0x80070643 has been rectified.
Solution 16: Fix registry errors using a third-party tool
- Open your favorite browser and download the Restoro Repair tool on your computer to diagnose, list, and rectify any registry errors.
- When downloaded, double-click on the executable file to open the installation wizard and follow the on-screen instructions to install it on your computer.
- Now launch the tool and click on the “Start Repair” button to scan for all the registry issues and fix them immediately.
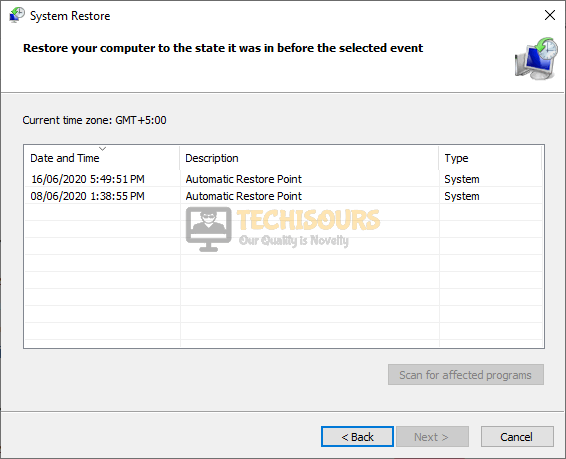
Solution 17: Restore your system
- Right-click on the “Windows” icon located on the left side of the taskbar and select “Run” to launch the Run box.
Click on Run - Now type “rstrui” command in the Run box and hit the “Enter” key on the keyboard to open the System Restore wizard.
Typing in “rstrui” Command - In this wizard, select a point that was created before this error was triggered on your computer.
Perform a system restore - Now click on “Next” and then click on the “Finish” button to revert your computer to a previous stage.
- After the system has been restored, check if you encounter the error 0x80070643 again.
Solution 18: Update via Microsoft Update Catalog
- Right-click on “This PC” and select Properties from the pop-up menu. Here, note down the “System Type” under the “System” section.
Choose System type - Now launch your favorite browser and go to Microsoft Update Catalog. From the search bar at the top right corner of the screen, search for “KB4023057”.
- Now locate the correct version corresponding to your system type and click on the “Download button”.
- When the file is downloaded successfully, double-click on it and follow the on-screen instructions to install the update manually.
- Now reboot your computer and proceed to check for Windows updates to check if you encounter the 2018-11 update for windows 10 version 1803 for x64-based systems (kb4023057) – error 0x80070643 again.
Workaround:
- Make a new “Text Document” and paste the following script in it:
@echo off
setlocal
echo.
echo Determine whether we are on an 32 or 64 bit machine
echo.
if "%PROCESSOR_ARCHITECTURE%"=="x86" if "%PROCESSOR_ARCHITEW6432%"=="" goto x86
set ProgramFilesPath=%ProgramFiles(x86)%
goto startResetting
:x86
set ProgramFilesPath=%ProgramFiles%
:startResetting
echo.
if exist "%ProgramFilesPath%\Windows Resource Kits\Tools\subinacl.exe" goto filesExist
echo ***ERROR*** - Could not find file %ProgramFilesPath%\Windows Resource Kits\Tools\subinacl.exe. Double-check that SubInAcl is correctly installed and re-run this script.
goto END
:filesExist
pushd "%ProgramFilesPath%\Windows Resource Kits\Tools"
subinacl.exe /subkeyreg HKEY_LOCAL_MACHINE /grant=administrators=f /grant=system=f
subinacl.exe /subkeyreg HKEY_CURRENT_USER /grant=administrators=f /grant=system=f
subinacl.exe /subkeyreg HKEY_CLASSES_ROOT /grant=administrators=f /grant=system=f
subinacl.exe /subdirectories %windir% /grant=administrators=f /grant=system=f
echo FINISHED.
echo.
echo Press any key to exit . . .
pause >NUL
popd
:END
endlocal
- Now select “Save as” from the file menu and set its name and type to “reset.cmd” and “All Types” respectively.
- Open your favorite browser and download the SubInACL tool.
- Now double-click on the downloaded executable file to open the installation wizard and follow the on-screen instructions to install the tool on your PC.
- After the tool is installed, on the script you made before and select “Run as administrator” from the pop-up menu.
- Patiently wait while the script is executed and after it is done, proceed to run the Windows update again on your PC.
Hopefully, the error might have gone by now but if you need further assistance, contact here.


