Fixing the Power Kernel BSOD Error Code (70368744177664),(2) [Complete Guide]
Windows is one of the most popular operating systems but users have been recently getting the ‘Power Kernel BSOD Error Code (70368744177664),(2) Event ID 41’ error while trying to launch their computer or sometimes randomly while using their computers. We will be addressing and fixing this error in today’s post and hopefully, you will not get the error anymore after going through these solutions.

What Causes the ‘Power Kernel BSOD Error Code (70368744177664),(2)’ Error on Windows 10?
After carefully analyzing user experiences and going through normal repair strategies, we concluded that the following are the most common triggers behind this error.
- Fast Startup: If you have enabled Fast Startup on your computer, the ‘Power Kernel BSOD Error Code (70368744177664),(2)’ error might be triggered while trying to launch it. This is because the error is mostly related to a power failure and it most commonly occurs while launching the computer with Fast Startup enabled.
- Outdated Device Drivers: This error can also show up if there are any outdated device drivers on your computer and any incompatibilities with the latest operating system or a program can cause a power failure that can end up in a Power Kernel BSOD.
- CPU Overclock: If you are a fan of overclocking but you have pushed your CPU clock to an amount that cannot be supported by other components on the computer, this error might be triggered. It is best to check and configure your CPU overclock for optimal power delivery.
- Power Settings: If the Power CFG that you are using on your computer hasn’t been configured properly, this error message can be seen on the screen. It is best to check and reconfigure these power settings using the guide below to fix the ‘Power Kernel BSOD Error Code (70368744177664),(2)’ error on your computer.
- Outdated Bios: Latest Bios updates increase the functionality of the motherboard and often contain some bug and glitch fixes. Therefore, it is best for you to try and update your Bios version to the latest available one to fix the ‘Power Kernel BSOD Error Code (70368744177664),(2)’ issue on your computer.
- Unseated Components on the Motherboard: If while putting the computer together, a cable or any other hardware component wasn’t properly seated in their slot, the ‘Power Kernel BSOD Error Code (70368744177664),(2)’ error might be triggered while startup up the computer. It is best to check for any such components and seat them properly.
- PSU Failure: The ‘Power Kernel BSOD Error Code (70368744177664),(2)’ error most commonly occurs due to a power kernel failure and these failures are almost always a result of a power surge or improper power delivery from the PSU. It is best to check for a PSU failure with such a BSOD error.
Now that you know of the most probable culprits behind this error, we can move on towards implementing the fixes.
Before you start:
- Press “Windows + I” keys on the keyboard to open “Settings” and choose “Update and Security”.

Click on Update and Security - Navigate to the “Windows Update” tab from the left side of the screen and select “Check for Updates”.

Check for updates - When the Windows is updated, check if your system still crashes with the Error Code (70368744177664),(2).


Fixing the ‘Power Kernel BSOD Error Code (70368744177664),(2)‘ Error:
Solution 1: Disable Fast startup
- Hit “Win + R” keys on the keyboard to open the run box, type “powercfg.cpl” and hit enter to launch the Power Options menu.

Typing in “powercfg.cpl” - From the left pane of the window, click on the “Choose what the power buttons do” option and then select “Change settings that are currently unavailable”.

Change settings that are currently unavailable - Now uncheck the box parallel to “Turn on fast startup” and apply the changes.
Disabling Fast startup - When the changes have been saved, restart your computer and check if the error persists.


Solution 2: Update device drivers
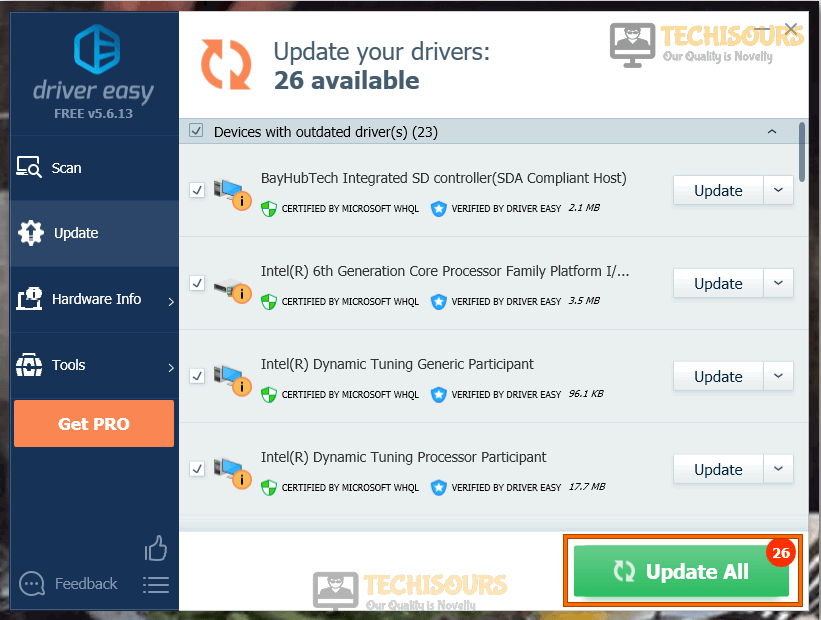
- Navigate to your favorite browser and download Driver Easy.
- Double-click on the downloaded executable file and install the tool by following the on-screen instructions.
- Click the “Scan Now” button to start the scanning process.

Start Scanning - Now a list will appear that will be comprising all of the outdated drivers on your computer. It is up to you that you update them selectively or collectively by clicking the “Update All” button at the bottom.

Click on Update all Button - When the drivers are updated successfully, restart your computer and check if the issue is resolved or not.

Solution 3: Reduce CPU Overclocking frequency
- On your keyboard, hit “Windows + I” keys simultaneously to open “Settings” and select “Update and Security”.
Choose Update and Security - From the left pane, click on “Recovery” and then select “Restart Now” under the heading of Advanced Startup.

Choose Restart now option - Click on “Troubleshoot” and then select “Advanced Options”.

Choose Advanced Options - Now select “UEFI Firmware Settings” and click on “Restart”.

Click on UEFI Firmware Settings - Press the BIOS boot key as soon as the machine’s logo appears on the screen.
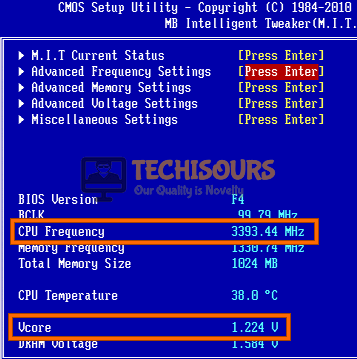
Note: Different computers/Laptops have different BIOS boot keys like DEL, F2, ESC, etc. - After entering the BIOS, navigate to “CMOS Setup utility” and select “MB Intelligent Tweaker”.
- Now locate and reduce your “CPU Frequency” and set its value slightly lower then it was set before.
- Now locate and set your “Vcore” to “1.28 V”.

Reduce CPU Overclocking frequency - Apply the changes and restart your computer to verify that the Error Code (70368744177664) (2) persists.


Solution 4: Tweak Power Settings
- Hit “Win + R” keys on the keyboard to open the run box. Type “powercfg.cpl” and hit enter to launch the Power Options menu.
Typing in “powercfg.cpl” - From the left pane of the window, click on the “Change when the computer sleeps”.
Choose computer sleep option - Now set the time of “Turn off display” and “Put the computer to sleep” according to your wish and restart your computer to check if the error has been rectified.
Tweak Power Settings


Solution 5: Update the BIOS
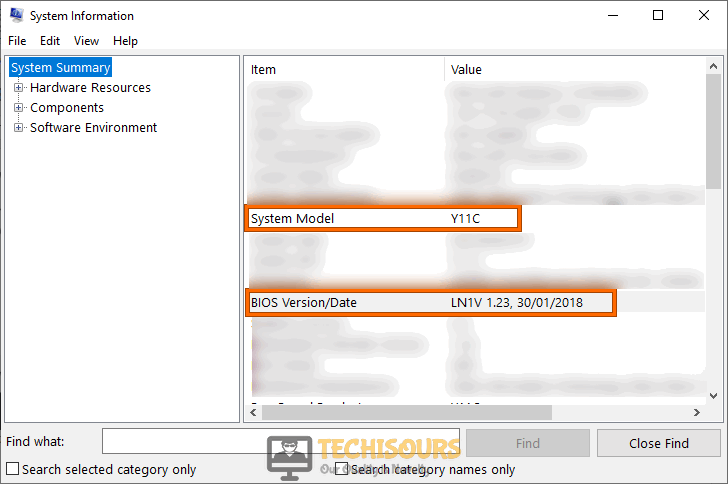
- Click on the Search button in the taskbar and search for System Information.

Click System Information - Note down the System Model and BIOS version of your computer.

Check BIOS version - Now launch your favorite browser and type your computer’s manufacturer name, your computer’s model name, and BIOS in the search bar and open a relevant link.
- Find the BIOS update file and download it after making sure that it is up to date.
- Now right-click on the downloaded BIOS files and click Extract Here.
- Plug-in a USB drive in your computer and copy the BIOS files into that USB drive.
- Now restart your computer and enter BIOS settings.
Note: Every computer has a different procedure to enter BIOS settings. - Go to the Boot tab and select the USB drive you have inserted.
- Now navigate to the Advanced tab and select the Start Flash option and it will start your update.
- Do not turn off your computer while the BIOS is updating. The computer will restart automatically after the update is fully installed.

Solution 6: Repair corrupted system files
Using Command Prompt:
- Navigate to the search bar of your system and type “Command Prompt”. Right-click on the Command prompt option and choose “Run as Administrator”.

Run Command Prompt - Now type the following commands and hit enter to execute them:
sfc /scannow
DISM.exe /Online /Cleanup-image /Restorehealth
- We also recommend you to run the CHKDSK utility to scan your disks for any corrupted files. Please execute the following command in the command prompt and see if the issue is resolved.
Note: X represents the letter of your source drive.chkdsk X: /f /r

Using Third-party tool:
- Launch your favorite browser and download MalwareBytes.
- Double-click on the setup file you just downloaded and follow the onscreen instructions to install the tool.
- Now launch the tool and click on the “Scan” button to start scanning for corrupted system files and fix them automatically.

Scan for corrupted files - When the scanning procedure is completed, hopefully, Error Code (70368744177664) (2) would be resolved on your computer.

Solution 7: Reseat components in CPU
- Take the power adapter of your computer out of the socket and detach all the peripheral devices from it.
- Open the side lid of the CPU, disconnect the RAM from its port and clean it with the help of a glint.
- After cleaning the RAM insert it back into your system and make sure that it is seated at its place with appropriate connections.

Reseat RAM - Now locate the hard drive and the SATA port. Detach the cables connected to your hard drive, clean the ports with a clean cloth, and afterward reattach the cables. Make sure that SATA cables are inserted into the correct port.
- Now disconnect your GPU from its ports and reconnect it carefully so that the connections are made properly.
- After re-connecting everything, reboot your computer and see if the issue is resolved.
Solution 8: Modify memory clock
If you notice that your RAM heats up easily, we recommend you to follow the steps in this solution.
- Follow the procedure explained in Solution 3 to open “MB Intelligent Tweaker” in your BIOS.
- Drop the “Memory Frequency” to a value slightly lower then it was set before. Some people have suggested that switching it from 3600 to 3533 rectified Error Code (70368744177664) (2).

Modify memory clock

Solution 9: Replace components in CPU
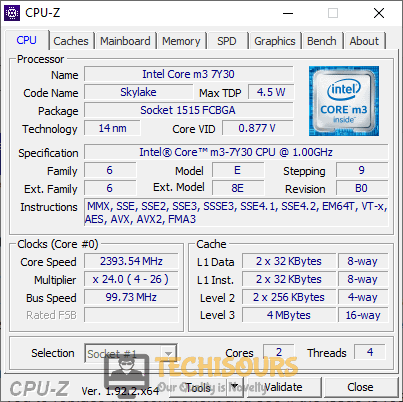
- Launch your favorite browser and download CPU-Z.
- Double-click on the setup file you just downloaded and follow the onscreen instructions to install the tool.
- Now launch the tool and carefully observe important parameters such as “VCore”, “RAM Frequency”, “RAM voltage” and “CPU Frequency” etc.

Monitor components in CPU - If you notice that these values are changing unexpectedly or the temperature of any component is increasing beyond its limit, then we recommend you to replace that component and see if the issue is resolved.
Solution 10: Check for PSU failure
In some cases, users have reported that they encountered this error and the only solution that helped them get around it was to replace their PSU with a new one. Troubleshooting of PSU failure is a very hectic task that is why we always recommend our community to use the OCCT stress testing tool. Download and install this tool on our computer and run it to stress tests your CPU, GPU, and motherboard to find out if there is any fault in them which triggers (70368744177664),(2) issue on your computer.
As an alternative to OCCT, you can borrow a PSU from your friend and connect it to your computer for testing purposes and see if you encounter the same error again. If you can use your computer normally on this PSU without encountering any error, then it is confirmed that there is a fault in your old PSU and it needs to be replaced.
If you are still unable to fix this issue, you can contact us for any further assistance.