Windows Update 0xC1900209 Error [Fixed Completely]
Windows is definitely the first choice for most PC users and it is the biggest operating system provider on the market. However, a lot of users have been getting the Windows Update 0xc1900209 error while updating on Windows 10. We have compiled a guide to help get you out of this predicament using some basic solutions and workarounds.

What Causes the Windows Update 0xc1900209 Error?
We went through the repair strategies commonly used to address this error and concluded that the following are the most common triggers behind it.
- Outdated/Missing Drivers: If some drivers on your computer are either missing or have been outdated, you might get the Windows Update 0xc1900209 error while trying to implement an update on your computer. It is best to find out these missing drivers and install them before going for an update.
- Background Applications: Certain background applications are also known for interfering with the Windows Update services and it can cause the 0xc1900209 issue while installing an update. It is best to put your computer in the clean boot state as listed below to fix this issue.
- Windows Update Cache: Another potential culprit behind the Windows Update 0xc1900209 error is a corrupted Windows Update cache which can prevent the update from being installed on your computer. It is best to get rid of this cache before attempting to install a brand new update on your Windows computer.
- Corrupted System Files: It is possible that some system registry files or other important system files have been corrupted due to a storage failure or malware issue. It is best to find these corrupted files and replace them as indicated in the solutions below.
- Windows Update Services Glitched: You can never rule out a glitched update service if you are getting the Windows Update 0xc1900209 error while trying to update. These services sometimes need to be restarted before they can start functioning normally and this needs to be done manually in some cases.
- Antivirus Software: Most people aren’t satisfied with the security that the default Windows Defender provides and they install third-party antivirus software to further protect their systems. However, this can sometimes come to bite you back if the software raises false alarms which cause the Error 0xc1900209 on your computer. It is best to add a temporary exception or disable the antivirus completely during an update.
Now that you are aware of some possible culprits behind the Windows Update 0xc1900209 error, we can move on towards implementing the fixes for this issue.
Before you start:
- Press “Win+I” on your keyboard to open “Settings” and navigate to “Update and Security”.

Click on Update and Security - From the left pane, navigate to the “Troubleshoot” tab and click on “Windows Update” from the right side of the window.

Troubleshoot Windows Update - When the troubleshooting process is completed, check whether the error is rectified.


Fixing the Windows Update 0xc1900209 Error:
Solution 1: Update your device drivers automatically
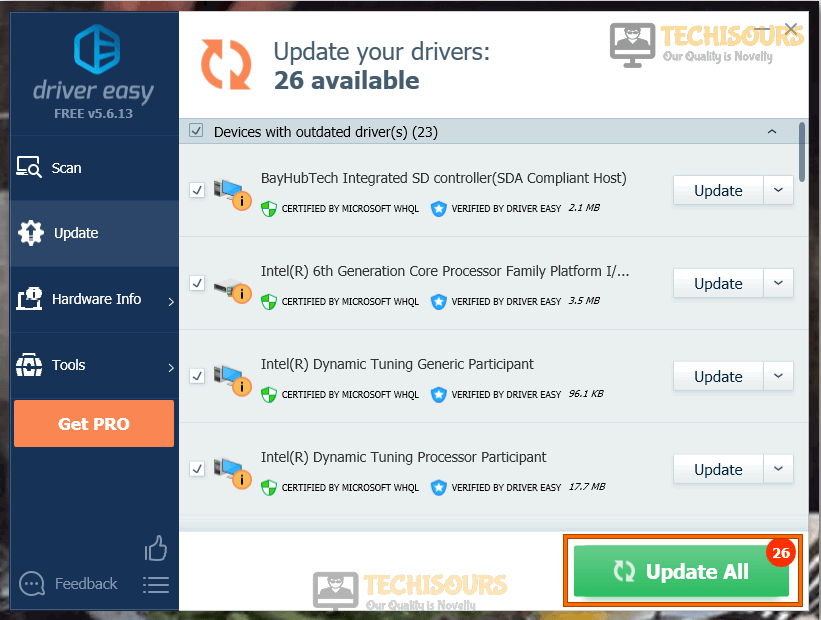
- Navigate to your favorite browser and download Driver Easy.
- Double-click on the downloaded executable file and install the tool by following the on-screen instructions.
- Click the “Scan Now” button to start the scanning process.

Click on Scan now - Now a list will appear that will be comprising all of the outdated drivers on your computer. It is up to you that you update them selectively or collectively by clicking the “Update All” button at the bottom.

Updating Drivers - When the drivers are updated successfully, restart your computer and check if the issue is resolved or not.

Solution 2: Perform a clean boot
- Press “Windows + R” to launch the Run box and type in “msconfig”.

Typing in “Msconfig” - Click on “Services” and check the “Hide all Microsoft Services” option.

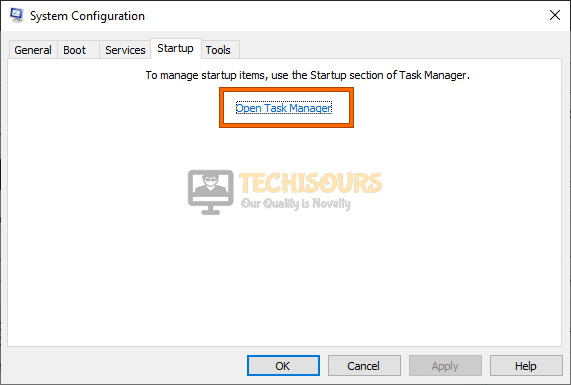
Hide all Microsoft services - Select the “Disable all” button and then click on the “Startup Tab”.
- From there select the “Open Task Manager” button to launch the task manager.
Open Task Manager - Select each service one by one and click on “Disable” to prevent them from launching on startup.

Disable startup services - Restart your computer and all the unnecessary services and applications will now be stopped.
- Now proceed to update your Windows and check if Error 0xc1900209 still occurs on your computer.


Solution 3: Manually uninstall the faulty application
- Press “Win + E” keys on the keyboard to open “File Explorer” and navigate to the following path from the location bar.
C:\$WINDOWS.~BT\Sources\Panther
- Now locate a file that has “_APPRAISER_HumanReadable.xml” at the end of its name.
For Example mYxPKaDIJUCVCAlq.3.1.2.3.6.0.0_APPRAISER_HumanReadable.xml - Right-click on the file that was most recently created and open it with “Notepad”.
- Now read the file carefully and locate the following entries.
a) PropertyList with type “Decision Maker” with the character string “<Property Name=” DT_ANY_FMC_BlockingApplication” Value=” TRUE” Ordinal=”1″ />”
b) The XML node “<PropertyList Type=Inventory”>” under the entry“Asset” with the property name LowerCaseLongPath - Now navigate to the path of the faulty application that is written in the “Property name LowerCaseLongPath” and check which application is causing this error.
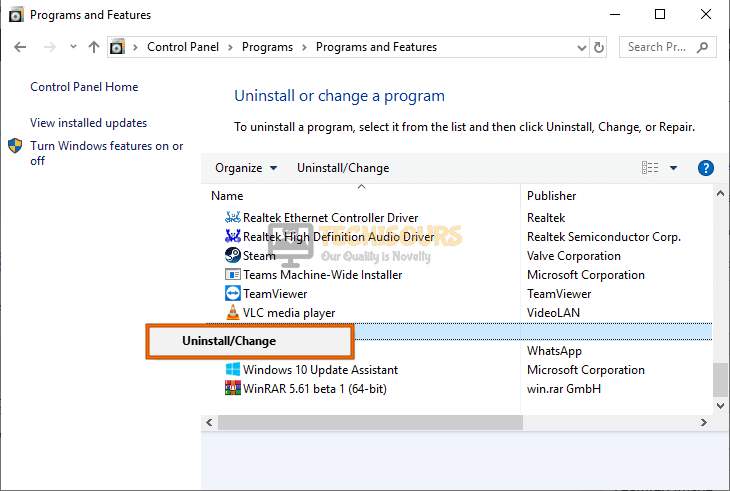
- Press “Windows key + I” on the keyboard to open the run box and search for “appwiz.cpl”.

Typing “appwiz.cpl” - Now right-click on the troublesome application app and select “Uninstall”.

Uninstall Faulty application

Solution 4: Clear Windows update cache
- Press “Windows + R” to launch the Run box and search for “services.msc” to open the services app.

Typing in “services.msc” - Now right-click on the “Windows Update” service and select “Stop” from the pop-up menu that appeared on the screen.

Stop Windows Update - Press “Windows + R” to launch the Run box and search for “%windir%\SoftwareDistribution\DataStore”.
- Now press “Ctrl + A” on the keyboard and then press the “Delete” key to delete all the files and folders present in the “DataStore” folder.

Deleting files - Now open Services app again and enable the Windows update service by right-clicking on it and selecting “Start”.
Start Windows Update


Solution 5: Fix corrupted system files
- Click on the search button located on the taskbar and search for “Command Prompt”.
- Now right-click on command prompt and select “Run as administrator”.

Run command Prompt an as administrator - Now type the following commands one by one and hit enter to execute them:
sfc /scannow
DISM.exe /Online /Cleanup-image /Scanhealth
DISM.exe /Online /Cleanup-image /Restorehealth
DISM.exe /online /cleanup-image /startcomponentcleanup
- When the repairing process is finished, check if the Error 0xc1900209 is terminated.

- Press “Windows + R” to launch the Run box and type in “msconfig”.
Typing in “Msconfig” - Click on “Services” and check the “Hide all Microsoft Services” option.
Hide all Microsoft services - Select the “Disable all” button and restart your computer after applying the changes.
- Once your computer boots up, click on the search button located on the taskbar and search for “Command Prompt” and right-click on command prompt and select “Run as administrator”.
Run command Prompt an as administrator - Now type in the following commands one by one and hit enter to execute them.
Note: replace xxxx by a password that you want to set for your hidden administrator account.net user administrator /active:yes net user administrator xxxx
- Now log out of your standard user account and sign in to the administrator account you just activated.
- After signing into this account, hopefully, error 0xc1900209 would be resolved.
Solution 7: Reset Windows Update services
- Click on the search button located on the taskbar and search for “Command Prompt”.
- Now right-click on command prompt and select “Run as administrator”.
Run command Prompt an as administrator - Now type the following commands one by one and hit enter to execute them:
net stop wuauserv
net stop cryptSvc
net stop bits
net stop msiserver
Ren C:\Windows\SoftwareDistribution SoftwareDistribution.old
Ren C:\Windows\System32\catroot2 Catroot2.old
net start wuauserv
net start cryptSvc
net start bits
net start msiserver
- After resetting the services, check whether the Error 0xc1900209 persists.
Solution 8: Fix your system using a Reimage Repair Tool
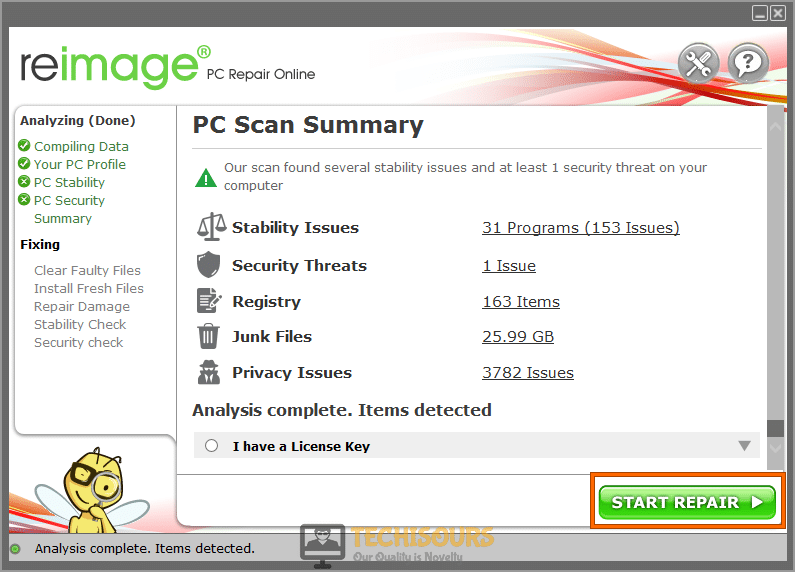
- Launch your favorite browser and download Reimage Repair.
- Double-click on the downloaded setup file and follow the on-screen instructions to install it on your computer.
- Now launch the tool and click on the “Start Repair” button to scan and repair all of the system files.

Start repairing files - When the system files have been repaired, proceed to update your windows again and see if the error is resolved.
Solution 9: Disable third-party antivirus software
- Click on the “^” button located at the bottom right of the taskbar and then right-click on the Avast icon.
- Hover over the “Avast Shield Control” and select the “Disable Permanently” option to disable your antivirus software.

Disable antivirus - After disabling the antivirus, check if the error has been rectified.

Solution 10: Clean Windows update download path
- Press the “Win + R” keys on the keyboard to open the Run box and search for “regedit”.
Typing “regedit” - Now navigate to the following path from the left pane.
HKEY_LOCAL_MACHINE\SOFTWARE\Policies\Microsoft\Windows\WindowsUpdate
- Now locate and delete “WUServer” and “WIStatusServer” from the right side of the window.

Solution 11: Use Windows Assessment and Development Kit
Download and install SQL server:
- Launch your favorite browser and download the SQL server 2019 on your computer.
- Now open the installer and follow the on-screen instructions to install the SQL server on your PC.
- When the SQL server is installed successfully, download ADK by following the steps indexed below.
Download and install ADK:
- Launch your favorite browser and download the Assessment and Development Kit on your computer.
- Now open the installer and follow the on-screen instructions to install the ADK on your PC.
- Make sure you select only “Application Compatibility Tools” from the list of tools under the “Select the features you want to install” window that appeared during the installation process.
- When the installation process is completed, follow the steps listed below to fix the compatibility issues.
Fix compatibility issues:
- Click on the search button located on the taskbar and search for “Compatibility Administrator”.
- Click on the “Search” button located on the menu bar and select the “Fixed Programs” option from the drop-down list.
- Now click on the “Find now” button and wait patiently while the application scans your system’s directory.
- When the scan is completed, a list of some applications will be displayed at the bottom pane of the window.
- Double-click on an application from the list to go back to the main section of ADK. Here, an entry will be highlighted that will be associated with the application you clicked before.
- Now “Copy” the highlighted entry and scroll down to locate the “New Database” option located under the “Custom Databases” section.
- Right-click on the “New Database” option and select “Paste” from the pop-up menu.
- Repeat steps 5, 6, and 7 for every application located in the list that appeared on the bottom pane of the window.
If you are using a 64-bit Windows, then your programs are stored in the Program Files (x86) folder also. So, make sure you search for compatibility issues in that folder also. You can do this by clicking go the “Browse” button located at the top-right corner of the “Find now” window and going to the Program Files (x86) folder.
Solution 12: Reset Microsoft store
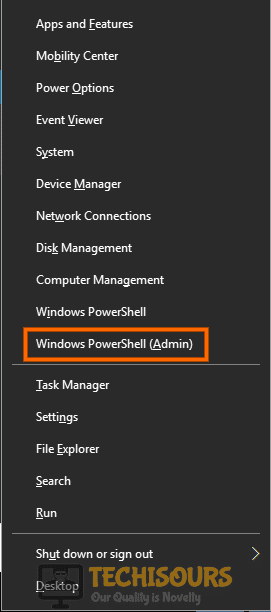
- Press “Win + X” keys on the keyboard and click on “Windows PowerShell (Admin)”.

Windows PowerShell (Admin) - Now type the following commands one by one and hit enter to execute them:
wuauclt.exe /updatenow
exit
- Now restart your computer and check whether the error is rectified.
Solution 13: Rename the CBS.log file
- Press the “Win + R” keys on the keyboard to open the Run box and search for “services.msc”.
Typing in “services.msc” - Now locate and double-click on “Windows Modules Installer” to open its properties.

Choose Windows Modules Installer - Navigate to the “General” tab and set the startup type as “Manual”.
- Apply the changes and restart your computer.
- Now open file explorer and navigate to the following path in your directory.
C:\WINDOWS\Logs\CBS
- Now locate the “CBS.log” file and rename it to “CBSold.log”.

Rename CBS.log file - After renaming the file, follow the steps 1, 2 and 3 to set the “Windows Modules Installer” startup type as “Automatic”.
Setup Startup Type


Solution 14: Install .Net Framework 3.5
- Press the “Win + R” keys on the keyboard to open the Run box and search for “appwiz.cpl”.
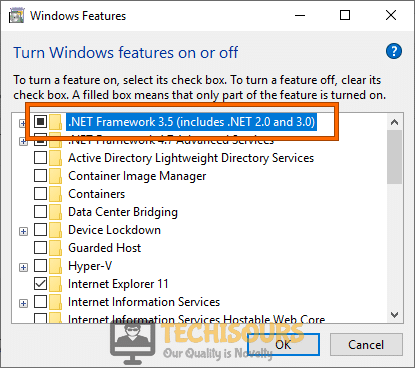
Typing “appwiz.cpl” - From the left pane, click on the “Turn Windows features on or off” option.

Turn Windows features on or off - Now uncheck the box parallel to “.NET Framework 3.5” and click on the “OK” button.

Install .Net Framework 3.5 - From the window appeared on the screen, click on “Download Files from Windows update”.
- Now, wait for your system to automatically download and install .Net Framework 3.5 and see if the error is resolved.

Solution 15: Uninstall the latest Window update
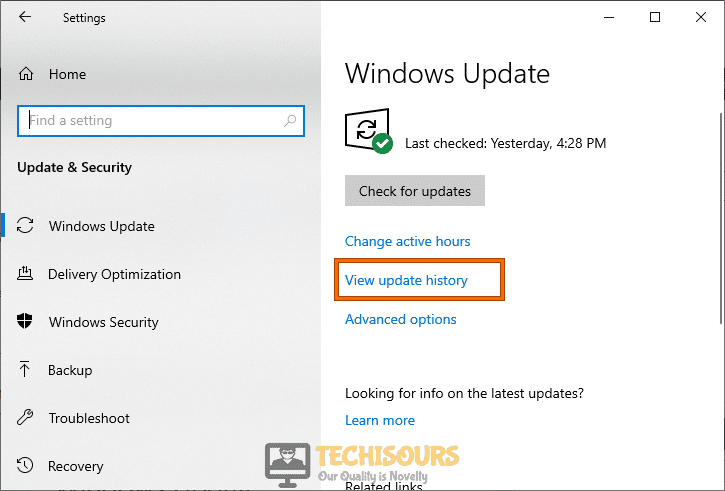
- Press “Windows + I” keys on the keyboard to open “Settings” and choose “Update and Security”.
Click on Update and Security - Navigate to the “Windows Update” tab from the left side of the screen and select “View update history”.

Choose View update history - Now click on the “Uninstall Updates” option, right-click on the Windows update that was installed on your computer recently, and select “Uninstall”.
Uninstalling Updates - When the uninstallation process is completed, most probably error 0xc1900209 would be resolved.

Solution 16: Update via Microsoft Update Catalog
- Right-click on “This PC” and select Properties. Under the “System” section, note down the “System type”.

Choose System type - Now launch your favorite browser and go to Microsoft Update Catalog. From the search bar at the top right corner of the screen, search for “4522355”.
- Now locate the correct version corresponding to your system type and click on the “Download button”.
- Now click on the link generated on the confirmation page to start the download.

Download Update - After the completion of the download, double-click on the “.msu installation package” and follow the on-screen instructions to install the Windows update.
- After the installation restart your computer and check if the error is eliminated.


Workaround:
Many users have reported that they managed to get around this error by installing an additional SATA disk to their computer and cloning their Windows to the other disk. If you have an extra hard disk slot in your computer, connect an additional hard disk to it and see if the error is removed.
Hopefully, the error must be gone till now. For further detail and information click here.