Error Code: Beaver: Destiny 2 [Fixed Completely]
Destiny 2 is an online shooting game developed by Bungie in order to fulfill the needs of gaming enthusiasts by providing them the role of guardians of the earth’s last safe city. Although it is a well-structured and reliable gaming platform, still the gamers come across some glitches while playing this game. Quite recently, many users have reported that they have encountered an error while connecting their console to another player’s console via the internet displaying an error message “Removed from the game world. Please try again”. To resolve this issue at the earliest, we have researched and illustrated the most efficient solutions in this article that will help you to eliminate error code beaver from your console.

What Causes the Error Code Beaver on Destiny 2: Shadowkeep?
After going through user’s complaints we came to know that there are numerous reasons that prevent you from connecting your console to another via the Internet.
- You might come across the error code beaver if multiple consoles are connected to a single router.
- If your router restricts certain NAT types, there is a high chance that you will encounter this issue.
- If your console is receiving weak Wifi coverage, the error code beaver might be encountered.
Pre-Tips:
In some cases, this error arises in your system due to a network connectivity issue. Mostly, network connectivity issues are temporary and can be rectified simply by restarting your router. Follow the steps indexed below:
- Disconnect your router and modem by detaching the cable connecting them both.
- Take out the adapter of your router from the power socket and wait for it to shut down.
- Change the location of your router or try to move other electronic devices away from the router to make sure that they don’t interrupt with the Wifi signals.
- After waiting for a couple of minutes, insert the power adapter back into the socket and wait till it displays full signal strength. Reconnect your router with the modem.
- Press the Reset button at the back of the router and see if the error is terminated.
What can you do to fix the Error Code Beaver on Destiny 2?
Solution 1: Switch to a wired connection
If you are encountering destiny 2 connection issues, then the most efficient remedy to terminate this is to increase the signal strength of your local internet connection. The most efficient approach to do this is to utilize a wired connection over a wireless connection. To carry this task out, disable wifi and connect your computer directly to the router with the help of an Ethernet cable. Now, refresh the game to check whether you got rid of this issue or not. If this solution doesn’t prove efficient for you then proceed to the next potential fix below.
Solution 2: Power cycle your console
There might be a chance that your console’s data and cache are responsible for the game issues hence, they need to be wiped out. In order to clear the data and cache, power cycle your console and see if the error is eliminated.
- Take the power adapter of your console out of the power socket and wait for it to shut down.
- After waiting for a couple of minutes, restart your console by inserting the power adapter back into the socket, and hopefully, the error would be gone by now.
Solution 3: Enable UPnP on your router
Universal Plug and Play (UPnP) is an essential feature integrated into the router that enables all the devices connected with the router to discover and communicate with each other. If you have connected multiple consoles with a common router and the UPnP is disabled, then most likely destiny 2 beaver issue will arise therefore follow the steps illustrated below to enable UPnP in your router and see if the error is terminated.
- Click the search button in the taskbar and type Command Prompt.

Search Command Prompt - Type the following command in the prompt and hit enter to execute it.
ipconfig
- Scroll down until you see a setting for Default Gateway under Ethernet or Wi-Fi.

Note down default gateway - Copy the router’s Default Gateway IP Address and paste it in your browser’s search bar to open your Internet Settings.
- Navigate to the Forwarding tab and select UPnP.
- Click on the Enable button parallel to UPnP to enable it.

Enable UPnP - Apply the changes and restart your router to see if the destiny 2 error code beaver still persists.


Solution 4: Apply port forwarding on your router
In most of the cases, gamers have reported that destiny 2 connection issues arise on your system if your NAT’s type is Strict instead of Open. Hence, proceed to your router’s settings and change your NAT type from strict to open and see if the glitch is rectified. Follow the steps below to carry this task out:
- Navigate to the Settings of your console and select Network Settings.
- Navigate to the IP Address section and note down the IP Address and the MAC address on a paper.
- Now start your computer and click the search button in the taskbar and open Command Prompt.
Type Command Prompt - Type the following command in the prompt and hit enter to execute it.
ipconfig
- Scroll down until you see a setting for Default Gateway under Ethernet or Wi-Fi.
Note down Default Gateway - Copy the router’s Default Gateway IP Address and paste it in your browser’s search bar to open your Internet Settings.
- In the internet settings, click on the Manual Assignment option and add the IP address and Mac address that you noted before from the console, and after typing in the addresses, click Add button.
- Now navigate to the Port Forwarding section and open the following ports.
For Xbox:
UDP: 80, 500, 1200, 3074, 3544, 4500
TCP: 3074For Play Station:
UDP: 3074, 3478, 3479
TCP: 1935, 3478, 3480
For PC:
UDP: 3074, 3097, 4380, 27000-27031, 27036
TCP: 2705 – 27030, 27036 – 27037 - In the Server IP Address option, enter the static IP address that we created.
- Apply the settings and power cycle your router. (Note: If you are playing the game on PC then proceed to the steps below)
- Now click on the search button in the taskbar, search for Windows Defender Firewall and select Advanced settings.

Advanced settings - From the left pane, click on Inbound Rules and select the New rule option from the right pane.

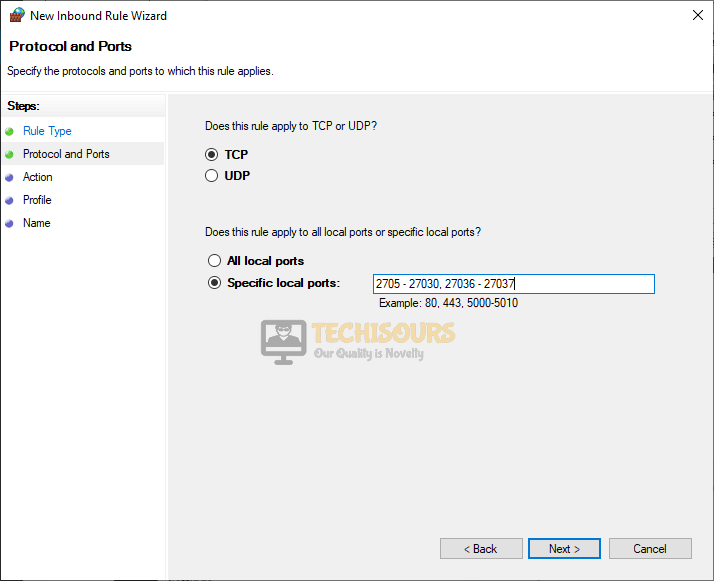
Choose New rule option - Check the button parallel to Port and select Next.

Select Port - Make sure that buttons parallel to TCP and Specific local ports are checked and enter the TCP port numbers in the input field and afterward click next and follow the onscreen instructions.
Setting ports - Follow the same procedure to enter the UDP ports.
- Now, click on the Outbound Rule in the Advanced Security window and select New Rule.
Outbound Rules - Add the UDP and TCP ports here by following the same procedure you followed for Inbound Rules.
- If you have an operational Anti-virus software, disable it and restart your computer to check if the error is eliminated.


Solution 5: Tweak protection settings
Your router has numerous security options embedded in it such as Firewall, Portscan, and DoS protection. These components are very essential to protect your network from cyber-attacks and from flooding your network with server requests. If you still encounter destiny 2 beaver error, disable these firewalls and see if the error is terminated.
- Click the search button in the taskbar and search for Command Prompt.
Search Command Prompt - Type the following command and hit enter to execute it.
ipconfig
- Scroll down until you see a setting for Default Gateway under Ethernet or Wi-Fi.
Note down Default Gateway - Copy the router’s Default Gateway IP Address and paste it in your browser’s search bar.
- Now go to the network logs tab and select Advanced settings.
- Now select WAN setup and check the box parallel to Disable Port Scan and DoS protection and hit and apply the settings.

Disable Port Scanning - In the same window, locate the Firewall option and disable it by unchecking the box parallel to the firewall button, and afterward, power cycle your router and see if the issue is resolved.

Solution 6: Contact your ISP
The error code beaver arises if your ISP is undergoing some problems while trying to connect you to the game server. There might be a large probability that your ISP router’s settings are not configured to run the game properly. If this is the case, the only thing you can do is contact your Internet Service Provider and explain the whole issue you are facing and wait for them to provide you with a solution.
Hopefully, the error might have gone by now but if you need further assistance, contact here.