Easily Fix Windows Update Error 0x800703f1 [Complete Guide]
If you have tried updating your Windows to the latest version out there using the Windows Update tool, you might be familiar with the Error 0x800703f1 that basically stops you from being able to download or install the updates. However, you don’t need to worry any longer because that is precisely why we have compiled this guide. In this article, we will be listing different solutions that you can apply to your computer to completely rid yourself of this issue.

In addition to that, we have researched this issue in detail and have jotted down the reasons due to which it occurs in the first place. Therefore, make sure to read through the reasons and then start implementing the solutions for better know-how of the issue.
What Causes the Windows Update Error 0x800703f1 on your Computer?
When we started investigating this issue, we tried out various solutions and started recording the ones that work for most of our users. From there, we reverse-engineered the solutions to identify the reasons due to which the issue occurs. As expected, different users might have different potential causes but we have highlighted the most prominent ones below.
- Glitched Windows Update: In some cases, it is possible that the Windows Update service might have gotten glitched due to which the Error 0x800703f1 might be occurring while trying to download new updates. To counter this, follow the solution below where we have used the troubleshooter to fix this issue.
- Antivirus Software: If the Antivirus software installed on your computer has been blocking the update service from being able to download the required update files, the Error 0x800703f1 might be seen. Therefore, we suggest that you try to temporarily disable this software as mentioned below to fix this issue.
- Damaged System Files: Some System files, if damaged, might prevent you from being able to connect to the Microsoft Servers and download the latest updates. Therefore, we suggest that you try to run some scans to check and verify if certain files are damaged and then fix them automatically using the solution that has been listed below.
- Firewall: The Windows Firewall can also prevent the updates from being downloaded by blocking the network packets coming from the update server. Therefore, temporarily disabling it to download the updates on your computer might be a good idea.
- Latest Update: The latest update that you might have installed on the computer might not have been installed properly or it might have glitched out. Therefore, we suggest that you try to uninstall it and then check to see if doing so fixes the Error 0x800703f1 issue.
Now that we have taken you through the reasons due to which this issue occurs, it is time that we finally move on towards implementing the solutions.
How to fix windows update error 0x800703f1 completely:
Fix 1: Troubleshoot Windows Update
- Press the “Window + I” keys combination from your keyboard to open the Windows setting.
- Click on the “Update & Security” option and select “Troubleshoot” from the left panel.
- After that click on “Additional Troubleshooters”, select “Windows Update” and afterwards click on the “Run the troubleshooter” option.

Start the Troubleshooting Process - Now the windows will automatically look for issues and resolve them.

Fix 2: Disable Windows Antivirus Temporarily
- Press “Window + I” keys simultaneously on your keyboard to open “Windows Settings”.
- Select “Update and Security” from the menu.

Choose Update and Security - Click on “Windows Security” from the left panel and then select “Virus & Threat Protection”.
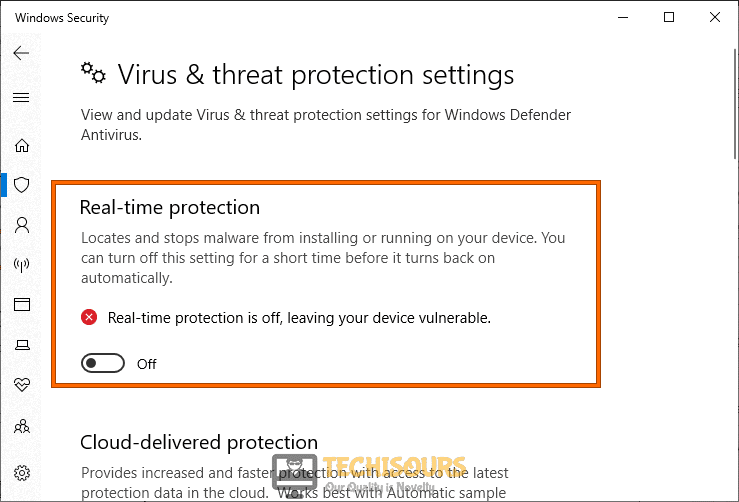
- After that click on “Manage Settings” under the “Virus and threat protection” option.
- Finally, turn “OFF” the “Real-time Protection” and see if the issue is resolved.

Disable Real-time protection

Fix 3: Update or Rollback Drivers
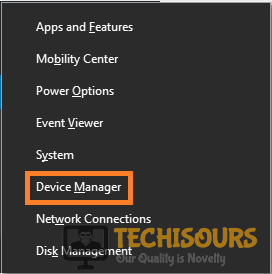
- Press the “Window + X” keys combination from your keyboard and click on “Device Manager”.

Open Device Manager - Now look for problematic drivers and right-click on them.
- Afterwards, right-click on the device and click on “Update Driver” from the context menu.
- Wait for few minutes, as Windows will search for the latest driver update and will install it to your system.
- Finally, restart your device and see if the error is resolved.
If the 0x800703f1 issue still persists even after updating certain drivers, you might need to roll back your current drivers because they might be incompatible with your system. To do that in Windows 10, follow the steps indexed beneath:
- Press the “Window + X” keys combination from your keyboard and click on “Device Manager”.
Open Device Manager - Find a problematic device driver and right-click on it.
- Select “Properties” from the drop-down menu, navigate to the Driver tab, and click the “Roll Back Driver” button.

Rollback driver

After restoring your drivers, restart your PC and check your Windows Update centre. If your updates keep getting stuck there is no need to panic, you should navigate to the following solution.
Fix 4: Run DISM and SFC scan
- Press the “Window + R” key combination from your keyboard to open the “Run” prompt box.
- Type “cmd” in the search bar and press the “Shift + Ctrl + Enter” keys combination to grant administrative privileges.

Typing in cmd - After that type the following command in the command window and hit the “Enter” key:
sfc/scannow
- Once the above command is executed successfully, type the following command in the command window and press the “Enter” key:
Dism.exe /Online /Cleanup-image /Restorehealth
- Finally, restart your device and check if the error is resolved.

Fix 5: Reset Your PC
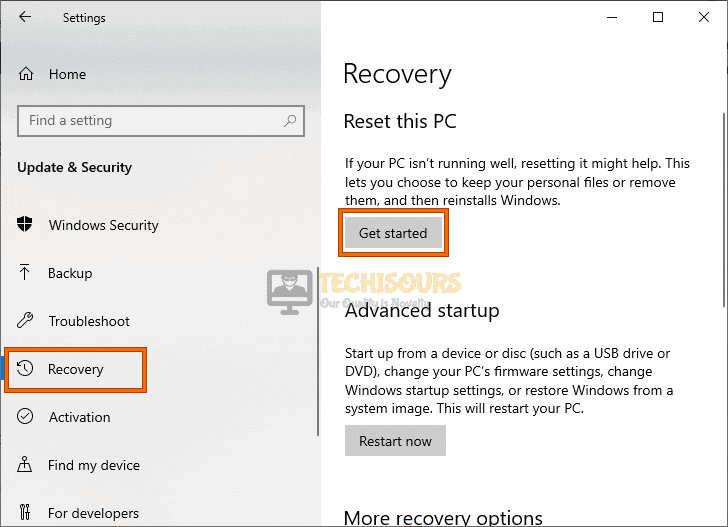
- Press the “Window + I” keys combination from your keyboard to open the “Windows Settings”.
- Click on “Update & Security” from the menu and select the “Recovery” option from the left panel.
Choose Update and Security - After that, click on the “Get started” option under the “Reset this PC” section.

Reset this PC - Finally, select “Remove everything” and now the Windows will reset every setting and give you a fresh start.
Fix 6: Disable Windows Defender Firewall Temporarily
- Click on the “Windows” icon located on the left bottom corner of the screen.
- Search “Defender” in the search bar and click on “Windows Defender Firewall”.
- After that, click on “Turn Windows Defender Firewall on or off” from the list of options located in the left column.

Clicking on the “Turn Windows Defender Firewall On or OFF” option - Afterwards, click on “Turn OFF Windows Defender Firewall” for both private and public networks.

Turn off Windows defender firewall - Save the changes by clicking “OK” and see if the error 0x800703f1 is resolved.


Fix 7: Restart Update Components
- Press the “Window + R” key combination from your keyboard to open the “Run” prompt box.
- Type “cmd” in the search bar and press the “Shift + Ctrl + Enter” keys combination to grant administrative privileges.
Typing in cmd - After that, type each of the following commands one by one and press the “Enter” key after typing every command:
net stop wuauserv

net stop cryptSvc

net stop bits

net stop msiserver

ren C:WindowsSoftwareDistribution SoftwareDistribution.old

ren C:WindowsSystem32catroot2 Catroot2.old

net start wuauserv

net start cryptSvc

net start bits

net start msiserver
- Finally, restart your PC to resolve the issue.
Fix 8: Check for Viruses and Malware
- Press the “Window + I” keys combination on your keyboard to access “Settings”.
- Click on “Update and Security” and select the “Windows Security” option.
Clicking Update and Security - Afterwards, click on “Virus & Threat Protection” then select “Scan Options”.
- Select the “Full Scan” button and let the defender search for malicious files.

Perform a full scan

Fix 9: Uninstall Latest Update
- Press the “Window + R” keys from your keyboard to open the “Run” Prompt.
- Type “appwiz.cpl” in the search bar and hit the “Enter” key.

Typing “appwiz.cpl” - Now select “View Installed Updates” from the top left corner.

View installed updates - After that right-click on the most recent update and select “Uninstall” from the context menu.

Uninstall Latest Windows Update


Fix 10: Restart Windows Update Service
- Press “Window + R” keys simultaneously on your keyboard to open the “Run” Prompt.
- Type “services.msc” in the search bar and hit the “Enter” key.

Typing in “services.msc” - Now locate “Windows Update” in the list, right-click on it and select “Restart” from the context menu and restart your PC.

Restart Windows Update Service


Fix 11: Reinstall NVIDIA Drivers
- First press the “Window + R” keys simultaneously on your keyboard to open the “Run” Prompt.
- Type “devmgmt.msc” in the search bar and hit the “Enter” key.

Typing devmgmt.msc in the Run prompt - Locate the “Display adapters” option and click to expand it.
- After that right-click on the “NVIDIA” graphics driver and select “Uninstall device” from the context menu.

Uninstall NVIDIA Graphics Driver - Now, checkmark the box associated with “Delete the driver software for this device” and click on “Uninstall”.
- Close all the windows and restart your device.
- Relaunch the device manager and click on the “Scan for hardware changes” option located at the top of the window.

Scan For Hardware Changes - Now the Windows will automatically search and install the new drivers.
- After installation, restart your PC again, and most probably error 0x800703f1 would be rectified.


Fix 12: Repair Windows Using Startup Repair
- Navigate to the Windows 10 Advanced Startup Options menu. On many laptops, hitting “F11” as soon as you power on will get you to the Windows 10 Advanced Startup Options.
- Once your computer has booted, select the “Troubleshoot” option.

Choose Troubleshoot - And then you’ll need to click “Advanced Options” click on “Startup Repair”.

Choose Startup Repair Option - Windows will take some time to attempt to fix the problem.


Fix 13: Install the Latest .NET framework
- Download and install the latest version of the “.Net” framework on your PC.
- Use the following link to download the latest version:
https://dotnet.microsoft.com/download/dotnet-framework
- After downloading it on your system follow the on-screen instructions to install it on your system.
Fix 14: Boot Into Safe Mode
- Press “Windows + R” to open the “Run” prompt dialogue box.
- Type “msconfig” in the search bar and click on the “OK” button.

Typing in “Msconfig” - A new window will open in front of you and from there click on “Services”.
- After that select “Hide All Microsoft services” on the bottom left corner of the window, and then click on “Disable all”.

Hide All Microsoft Services - After that, navigate to the “Boot” tab and check the box associated with “Safe boot”.
- Then select “Minimal” and save the changes made and restart your PC.
- Now, your PC will start in Safe Mode and finally try updating Windows again to see if the issue is resolved.


Fix 15: Manually Install Windows Updates
- Press the Windows key and type “View Update History” in the search bar.
- Open the update history from results and after that, click on the most recent update link. It will open in your browser.
- Note down the KB number and afterwards copy and paste the following link in your browser:
https://www.catalog.update.microsoft.com/Home.aspx
- Paste the copied “KB number” in the search bar of the website and finally download and install the latest version of Windows for your PC.
Fix 16: Install Windows Update Assistant
The Windows 10 Update Assistant downloads and installs feature updates on your device. Feature updates like Windows 10, version 1909 offer new functionality and help keep your systems secure.
- Click here to install Windows Update Assistant.
- You’ll get these updates automatically after installation of Windows Update Assistant and most probably error 0x800703f1 would be rectified by now.
Fix 17: Check Services Status
- Press “Window + R” keys simultaneously and type “services.msc” in the search bar.
Typing in “services.msc” - After that double click on the services mentioned below and set the “Startup type” status to recommended status below:
Background Intelligent Transfer Service –-> Manual

DCOM Server Process Launcher –-> Automatic

RPC Endpoint Mapper –-> Automatic

Windows Installer –-> Manual

Windows Update Service –-> Manual

Windows Update Medic Services –-> Manual

Cryptographic Services –-> Automatic
- Finally, restart your PC and see if the issue is resolved.
Fix 18: Clean Install Windows 10
- For this purpose, you will need to install the Media creation tool.
- Navigate to the following link and download the tool from there:
https://www.microsoft.com/en-us/software-download/windows10
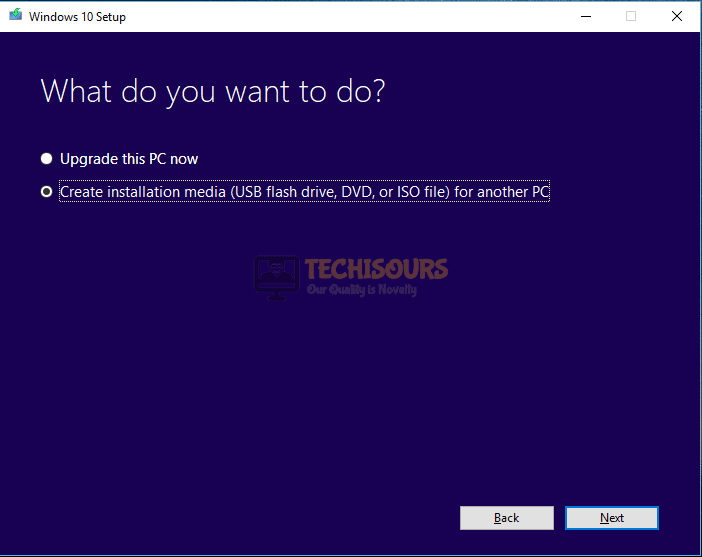
- After that, launch into the program and click on “Create installation media (USB flash drive, DVD, or ISO file) For another PC” and follow the on-screen instruction to download the ISO file for Windows 10.

Create installation media (USB flash drive, DVD, or ISO file for another PC - Now attach a USB drive to the PC and burn the file in it and after that remove USB.
- After that, the second step is the installation of the window hence, plug in the USB containing the ISO file and restart your PC.
- Then a window will read from USB and ask you for confirmation, press any key to continue the installation process.
- Now select your language preferences and other common settings and select “Install Windows”.
- Now follow the on-screen instructions, agree to license terms, and make sure you select the “Custom” installation option.
- Wait for the installation process to complete and see if the issue is resolved.
Hopefully, the error might have gone by now but if you need further assistance, Contact Us.