Fix: Windows can’t Communicate with the Device or Resource [Easy Instructions]
The Windows can’t communicate with the device or resource error is mostly triggered when the Windows is unable to connect to the primary DNS server that has been set in your internet settings. This error can be easily fixed by using some of the solutions that we have mentioned in this article so you should try each of them one-by-one until one of them works for you.

Also, keep in mind to read through the reasons due to which the error occurs in the first place and also be mindful of the exact order of the solutions so as to start small and work your way up to more complex solutions.
Why is Windows can’t communicate with the device or resource Error Caused?
After being taken through almost all the possible solutions, we concluded that the following must be the primary reasons due to which this error occurs in the first place.
- Adapter Settings: It is possible that you haven’t properly configured your Adapter settings due to which you are getting the Windows can’t communicate with the device or resource error. Therefore, as mentioned in the solution below, try to reconfigure some network adapter settings and check to see if doing so fixes this issue.
- Drivers Issue: Sometimes, your network drivers might be the issue because they might be glitched or outdated due to which your PC might not be able to properly access the internet. Therefore, we recommend updating or replacing these drivers.
- DNS Server: The DNS server to which your computer is trying to connect might be down or your PC might not be able to access it. Therefore, we recommend that you try to connect to another DNS server by changing some settings as listed below in the solutions.
- Malware: Sometimes, malware affects your computer and opens up backdoors on your PC. Therefore, we recommend that you try and clear your computer of malware and then check to see if doing so fixes the Windows can’t communicate with the device or resource(primary DNS Server) error.
- Outdated Operating System: If the operating system hasn’t been recently updated, you might run into the Windows can’t communicate with the device or resource error because it might be using some old Windows files and configurations that don’t sit well with its servers. Therefore, we suggest applying an update and then check to see if the issue goes away.
- DHCP: In certain cases, your router configuration might not have enabled DHCP due to which you are getting the Windows can’t communicate with the device or resource error. Therefore, we strongly suggest that you try to enable DHCP on your router as mentioned below and check to see if doing so fixes the error message.
Now that we have taken you through almost all the possible fixes, you can finally start implementing the solutions that have been listed below.
Before You Start:
Restarting a device can prove to be a very simple solution to all problems. Therefore you need to carry out this basic fix before implementing any other:
- Press the “Power” button at the back of your main router to turn it “OFF”, restart the router back after a few seconds and check if the problem got settled.
If restarting the router does not help you can try resetting it, to reset a router carry out these steps:
- Find the “Reset” button on your router, it will be a small hole with a button inside labeled as reset. To push the button you will require a “Needle-like” object.

Resetting Router - Once located “Push” the button with the router turned “ON”, press and keep holding the button until the lights on the router start blinking or go off, now let go “OFF” the button.
- Once your router is reset it will lose all customized settings that you’ve made as well as any SSID names and passwords. Make sure to secure your connections as soon as possible afterward.

Once you’ve tried implementing these basic troubleshooting steps and the error continues to stay you can move forward to carry out some other advanced solutions indexed below.
Fixing the windows can’t communicate with the device or resource windows 10 issue:
Solution 1: Change Adapter Settings
Sometimes your adapter settings can be faulty, and therefore this solution will help in changing your adapter settings. Proceed with the steps below:
- In the search bar near the Start menu type in “Control Panel” and press “Enter”.

Typing in Control Panel - When the Control Panel window opens up click on “Network and Internet” and afterward click on “View Network Status and Tasks” under “Network and Sharing Center”.

Select Network and Internet - When in the new window click on “Change Adapter Settings” in the left pane, once in the Adapters menu right click on your appropriate “Internet Adapter” and select “Properties” from the drop-down menu.
- In the Properties window scroll down through the list in the “Networking” tab to find “Internet Protocol Version 4 (TCP/IPv4)”, once located select it, and press the “Properties” button below.

Internet Protocol Version 4 (TCP/IPv4) - Now in the “General” tab choose the following options and then hit the “OK” button to save your changes:


Obtain an IP address automatically

Obtain DNS server address automatically
- Next, go back to the Property window of your Adapter and scroll down to find “Internet Protocol Version 6 (TCP/IPv6)”, once found select it and press the “Properties” button below.
- Select the same options for “IPv6” as well as selected in “Step 5”, once done click on “OK” to save all changes, and finally close all of the windows.
- Now proceed to check if the windows can’t communicate with the device or resource ethernet error got resolved.
Solution 2: Update/Roll Back Your Network Drivers
Out-dated network driver can cause connectivity issue, to manually update them follow the steps below:
- In the Cortana search bar near the Start menu type in “Device Manager” and hit “Enter”.

Typing Device Manager - When the Device Manager window opens up expand the section for “Network Adapters”, now you will see a list of Adapters, right-click on the appropriate “Adapter” in use and select “Update Driver” from the drop-down menu.

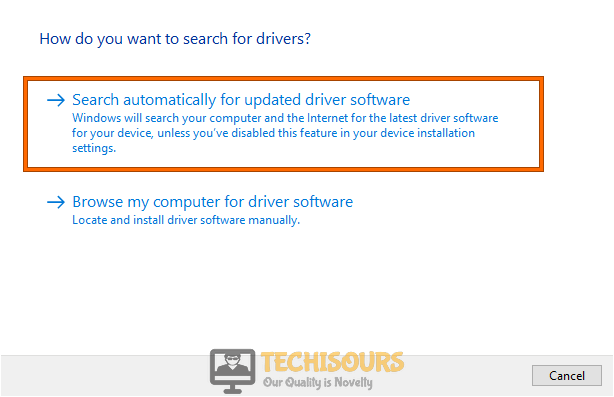
Update driver - In the pop-up window make sure to select “Search automatically for updated driver software”. Windows will now start looking for drivers online, once found they will be “Downloaded” and “Installed” automatically on your system.

Search automatically for updated driver

In order to roll back your drivers follow this procedure:
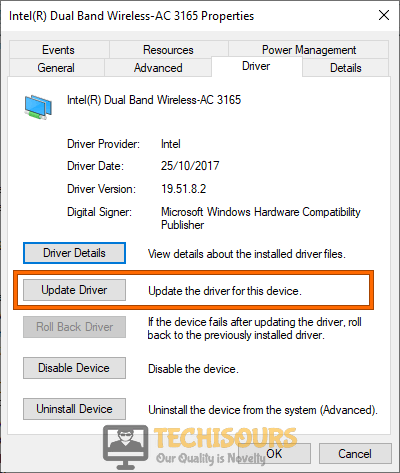
- Right-click on your appropriate “Network Driver” and select “Properties”, in the Properties window head over to the “Driver” tab.
- In the Driver tab click to select the “Roll Back Driver” option and confirm your selection by clicking on “YES”.
Solution 3: Edit Hosts Files
Some users suggested that editing your hosts file can help fix the issue too. Follow the steps below in order to implement this solution:
- Navigate to the “System32” folder on your computer by following the address below:
This PC > Windows (C:) > Windows > System32 > drivers > etc.
- Inside the “etc.” folder you will see a “Hosts” file, right-click on it and open it with a “Notepad”, once opened select all the content inside the Notepad using the “Ctrl + A” keys together on your keyboard and then press the “Delete” button.

Edit Hosts file - Once deleted click on the “File” menu at the top and then select “Save” from the drop-down menu, afterward close all of the windows now.

Solution 4: Switch to Public DNS
This time instead of choosing the DNS automatically we will enter the addresses manually and to carry out this fix you need to follow these steps:
- Start by implementing “Steps 1-4” as listed in “Solution 1”.
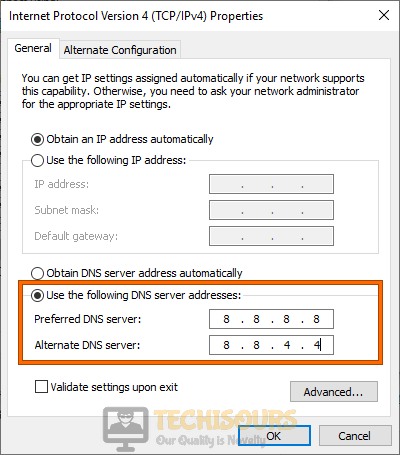
- Now Instead of choosing “Obtain DNS Server Address Automatically” for DNS address click on the “Use the Following DNS Server Addresses” option, once selected type in “8.8.8.8” in the “Preferred DNS Server” and “8.8.4.4” in the “Alternate DNS Server Address” box.

Use the following DNS server addresses - Once entered click on “OK” to save all the changes made and then proceed to check if it helped in removing the windows can’t communicate with the device or resource (ip address) error completely.
Note: These DNS addresses are Google’s public DNS addresses.
Solution 5: Clear the DNS Cache
If the above solution does not work you can try to clear the DNS cache to help make things work properly. For this you need to carry out these steps:
- Launch the “Command Prompt” window by typing in Command Prompt in the search bar near the Start menu, when appeared right-click on Command Prompt from the list of search results, and select “Run As Administrator”.

Run Command Prompt - When the Command Prompt window opens up type in the following commands and press “Enter” after each command to execute it, once all commands are executed close the window and “Restart” your computer afterward:

ipconfig/flushdns

ipconfig/registerdns

ipconfig/release

ipconfig/renew
Solution 6: Scan For Malware
Malware on your computer can cause some Windows functions to not work properly. Therefore to carry out a full system scan on your computer follow the steps below:
- In the search bar near the Start menu type in “Virus and Threat Protection”, and click to select it from the list of search results.

Search Virus and Threat protection - When the Virus and Threat Protection window opens up click to select the “Scan Options” below Current Threats, furthermore move on to select “Full Scan” from the list of Scan Options, and then click on the “Scan Now” button to start the process.

Perform a full scan - Once the scan is completed now verify whether the windows can’t communicate with the device or resource (www.microsoft.com) error got fixed or not.


Solution 7: Reset TCP/IP Using the NetShell Utility
Corrupted or buggy TCP/IP files can be the culprit behind the error, so to reset TCP/IP Microsoft offers us a tool known as “NetShell Utility”. Carry out these steps in this regard:
- Launch your browser and head over to the official Microsoft website to download “NetShell Utility”.
- Once the Utility is downloaded, double click to open the file and follow the on-screen instructions to complete the process.
You can also repeat the same process using the command prompt window as well:
- Search for the “Command Prompt” window in the search bar and right-click on it to select “Run As Administrator”.
- When the Command Prompt window opens up type in the following commands and make sure to press “Enter” after each:
nbtstat -r

netsh int ip reset or netsh int ip reset c:\resetlog.txt

netsh winsock reset
Solution 8: Reset Network Settings On Windows
There’s an option on Windows if you want to reset your Network settings to default and to fix this error you might need to carry out this method as well:
- On your keyboard press the “Window + I” keys together to open up “Settings”, in the Settings window click on “Network and Internet”.

Choose Network and Internet - Once inside the Network and Internet menu click to select the “Network Reset” option at the bottom, and in the following window click on “Reset Now”.

Reset Network


Solution 9: Disable Intel PROSet/Wireless Wi-Fi Connection Utility
- In the search bar near the Start menu type in “Control Panel” and press “Enter”, when the Control Panel window opens up click on “Network and Internet” and then click on “View Network Status and Task” under “Network and Sharing Center”.
- Here locate and click on “Intel PROSet/Wireless Tools”, once launched click on “Settings” in the new windows, and make sure to uncheck “Enable Intel Hotspot Assistant”.

Uncheck Intel Hotspot Option - Once done click on “OK” and “Reboot” your PC for the changes to take effect.

Solution 10: Make Sure DNS and DHCP Clients Are Running
- Press the “Window + R” keys together on your keyboard to open up the “Run” dialog box, then in the address bar type in “msconfig” and press “Enter”.

Typing in “Msconfig” - In the pop-up “System Configuration” window proceed to the “Services” tab and here scroll down to locate “DHCP Client” and “DNS Client”, to make sure they are running you will see “Running” in the status bar in front of each.

Running DHCP Clients - If the status bar is blank, right-click on “DHCP Client” and “DNS Client” one by one and select “Properties” from the drop-down menu, make sure the “Startup Type” is set to “Automatic” for both.
- Once done “Apply” all the changes made and click on “OK”.


Solution 11: Make Sure DHCP Is Enabled On Your Router
To make sure DHCP is enabled on your router follow the procedure below:
- Check the back of your main router for the “Login Address” along with the “Username and Password.
- Once you have all the information open up your browser on your computer and type the address in the browser’s search bar, now you will be asked for the login credentials type in the “Username” and “Password” found at the bottom of your browser.

Logging In Router - When you’re on the Router main page look for “DHCP” in the main tabs, once located click on DHCP and make sure it is “Enabled”, if not enable it and “Save” all the changes made.

Enable DHCP - Once saved “Restart” your router using the “System Tools” tab and then check if the windows can’t communicate with the device or resource (primary dns server) win 10 issue persists or not.


Solution 12: Check For Window Updates
You can try updating your Windows to the latest version to help fix any older bugs:
- In the search bar near the Start menu type in “Check For Updates” and press “Enter”.

Check For Updates - In the Windows Update tab click on “Check For Updates”, Windows will now look for any latest updates available, if found they will be “Downloaded” and “Installed” automatically on your system.
- When your PC gets updated check if everything works fine now.

Hopefully, the aforementioned solutions would be enough to take you through the resolution of this error but if the issue still persists feel free to Contact Us here for further help.