Easily Fix DNS_Probe_Finished_No_Internet on Google Chrome
Imagine trying to access your favourite website or search for something on Google and getting the “DNS_Probe_Finished_No_Internet” message with the cute dinosaur screen. Well, you don’t have to imagine because you have already run into that issue and are searching for a fix. If that is indeed the case, you have come to the right place because we have researched this issue and have written this article to fix it completely.

Internet issues are quite common among internet users but fixing them with one magic solution isn’t so common after all. There might be dozens of different reasons due to which the issue is occurring for you and dozens of different fixes that might work in specific situations. We have listed the reasons below and have then provided you with all of the solutions that you can use to fix the DNS_Probe_Finished_No_Internet issue.
What Causes the “DNS_Probe_Finished_No_Internet” Error on Google Chrome?
After sifting through some user forums and engaging with the users that are undergoing this issue, we concluded that the following must be the primary reasons behind this issue.
- Socket Errors: The socket that the browser is using to access the internet might have acquired some corrupted cache due to which the DNS_Probe_Finished_No_Internet error might be seen. Therefore, we suggest that you check to see if clearing the sockets fixes this issue.
- Outdated Chrome: If the browser has been outdated, it is possible that you might get the DNS_Probe_Finished_No_Internet error while trying to access certain websites. Therefore, we suggest that you update Chrome as soon as possible to get rid of any such possibility as we have mentioned below.
- Outdated Network Driver: In certain cases, the network driver that you might be using could be outdated which might prevent the browser from being able to effectively access the internet and get back to you in time. Therefore, we suggest updating the network driver and then checking if doing so fixes the issue.
- IP Address: Some IP Addresses might be banned from accessing the internet or from accessing certain websites due to bad traffic coming from them. Therefore, we suggest that you try to release the IP Address or renew it using the solutions below in order to fix the “DNS_Probe_Finished_No_Internet” error.
- Temporary Files: Some Temporary files being stored by your browser might be preventing it from accessing the internet due to corrupted configurations or corrupted cache. Therefore, clearing out this cache and the temporary files might prove to be the fix for this issue.
- DNS Server: If the DNS Server that you have configured your computer to send your internet traffic from is not properly responding to the requests, the DNS_Probe_Finished_No_Internet error might be seen. Therefore, we suggest that you try to change the DNS server and then check to see if doing so fixes the issue.
Now that we have familiarized you with the reasons behind this issue, we feel it is time that we move on towards implementing the fixes.
Before You Start:
- Click on the notification panel button on the bottom right corner of the taskbar.
- If the “Airplane Mode” button is highlighted as “ON”, click on it to switch it to the “OFF” state.
- Contact your current network providers via call or email and notify them about the issue. Wait for them to work on the issue and afterwards see if the issue is resolved.
How to fix dns_probe_finished_no_internet windows 10 issue:
Method 1: Recover Socket Errors
- Firstly, press the “Windows + R” keys combination from your keyboard to open the RUN prompt dialogue box.
- In the search box, type “CMD” and then press enter key. COMMAND PROMPT window will appear.

Typing in cmd - After that press the “Ctrl + Shift + Enter” keys combination to grant Administrator privileges.
- Now enter the following command in the command prompt window and press the “Enter” key:
netsh winsock reset
- Now, wait for few seconds until the process is complete.
- Finally, restart your computer to check whether the issue is resolved or not.

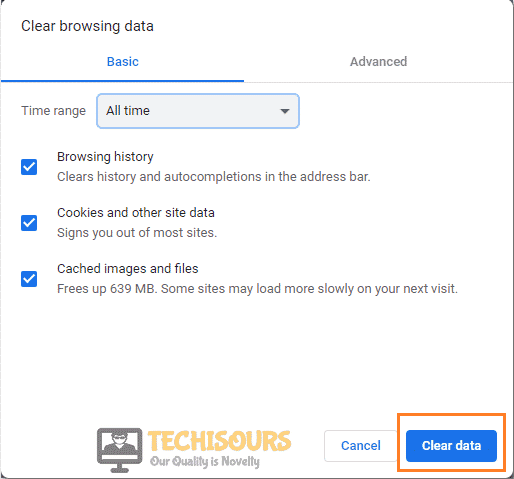
Method 2: Clear Google Chrome Cache and Browsing Data
- Launch into your chrome browser and press the “Ctrl + Shift + Delete” keys combination from your keyboard.
- The browsing history menu will appear in front of you and from there select the “Advanced” option.
- Several checkboxes will appear and from there click on the “Clear Data” option.

Clearing Data - Relaunch the browser and see if the dns_probe_finished_no_internet wifi issue is resolved.
Method 3: Update Google Chrome
- Double click on the Chrome browser icon on your desktop to launch chrome and type the following address in the search box of the browser and hit the “Enter” key:
chrome://settings/help
- After that click on the “Update” option if available, otherwise your browser is up to date.

Update Google Chrome

Method 4: Reinstall Google Chrome
- Press the “Windows + R” keys to open the Run prompt. Type “appwiz.cpl” in the search bar and press the “Enter” key.
- Windows will open a list of installed programs on your device, find Google Chrome, right-click on it and select Uninstall.

Uninstalling Chrome - Wait for few minutes for the process of uninstalling process to complete.
- Go to your current inbuilt browser and download the latest version of Google Chrome.
- Finally, install the new version of chrome and see if the dns_probe_finished_no_internet chrome issue is resolved.

Method 5: Disable or Uninstall web filtering software.
- Open your web browser, type the following address in the search bar and hit the “Enter” key:
192.168.10.1
- Fill in the Username and Password field written on the backside of your router.
- After that, proceed to the main menu settings.
- Then go to the following path “Block Sites -> Content Filtering” and a listed menu will appear.
- Scroll through the filters and click on the website displaying an error to disable it.
- After that click on the “Delete” or “Disable” option and afterwards click the “Apply” option to save your changes and then click the logout button.
- You will have immediate access to the websites that were previously being blocked by the internet filters.
Method 6: Power Cycle your Router.
- Press the “Reset” or” Reboot” button available at the back of router.

Reset Router - Wait for 2-5 minutes and restart the router.
- Open the browser and check if the error still exists or not.

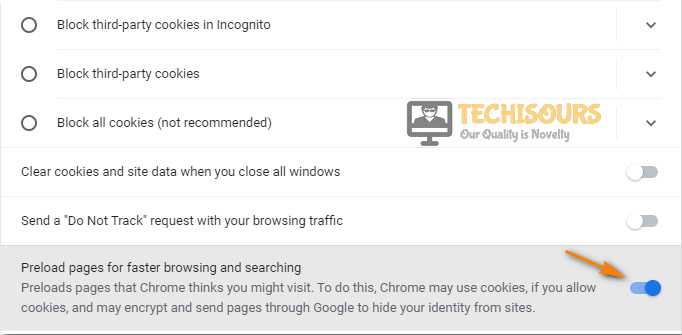
Method 7: Disable DNS Prediction Service.
- Open your browser and type the following address in the search box.
chrome://settings/privacy
- Select the option “Cookies and other site data” and find the option “Preload pages for faster browsing and searching” and disable it.

Disable Pre-Load Pages Option - Restart the browser and check if the dns_probe_finished_no_internet wifi error still exists or not.
Method 8: Change DNS to Google DNS
- Press the “Window + R” keys combination from your keyboard to open the Run prompt.
- Type “Control” in the search box and hit the “Enter” key. A Control panel window will appear in front of you.

Type Control in Run Box - After that, follow the following path “Network and Internet -> Network and Sharing centre -> Change adapter settings”.
- In the “Change Adapter Settings” menu right click on the connection you want to configure for Google Public DNS and select the “Properties” option from the context menu.
- After that, double click on the “Internet Protocol Version 4 (TCP/IPv4)” option. Select “Use the following DNS server addresses”. Enter the following DNS IP Addresses respectively:

. The Google Public DNS IP Addresses (IPv4) are as follow:
- 8.8.8.8
- 8.8.4.4

Switch to Static IP and DNS addresses

The Google Public DNS IP Addresses (IPv6) are as follow:
- 2001:4860:4860::8888
- 2001:4860:4860::8844
- Restart the browser and check if the error still exists or not.
Method 9: Check Internet Connectivity
- Press the “Window + R” key combination to open the Run prompt and type “cmd” and hit the “Enter” key to open Command Prompt.
Typing in cmd - Type command “ping -t 4.2.2.2” on Command Prompt and hit Enter key.
- If the message shows “Request Regular Out” then the web is not connected.
- Make sure that your wireless or wired connection is connected to your router and afterwards try accessing the internet and see if the dns_probe_finished_no_internet windows 10 issue is resolved.
Method 10: Re-Connect Your Internet
- Click on the Wi-Fi icon on the taskbar at the bottom right corner of your screen.
- Select your current Internet connection and click on the “Disconnect” button, wait for 2 minutes.

Disconnect Your Internet - After that click on the “Connect” button to connect again.
- Now go to your browser and see if the issue is resolved.

Method 11: Reset Google Chrome
- First, go to your browser and type the following command in your search bar and hit the “Enter” key:
chrome://flags/
- After that, you will see the “Reset All” button on the top right side of your screen, click the button.

Clicking on Reset All Button - A message will prompt at the bottom of your screen “Your changes will take effect the next time your relaunch Google Chrome”.
- Finally, click on the “Relaunch” button and see if the issue is resolved.

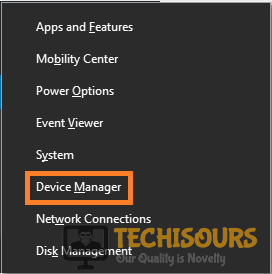
Method 12: Update Your Network Driver
- Press the “Windows + X” keys combination on your keyboard, from the list of options, click on the “Device Manager”.

Open Device Manager - Now find the “Network Adapters” and click on it so you can access and see all the installed drivers.
- Right-click on your “Network Adapter” option and select “Update Driver” from the context menu.

Update Network Driver - Wait for few minutes, as Windows will search for the latest driver update and will install it to your system.
- Finally, Restart your device and see if the dns_probe_finished_no_internet Chromebook issue is resolved.

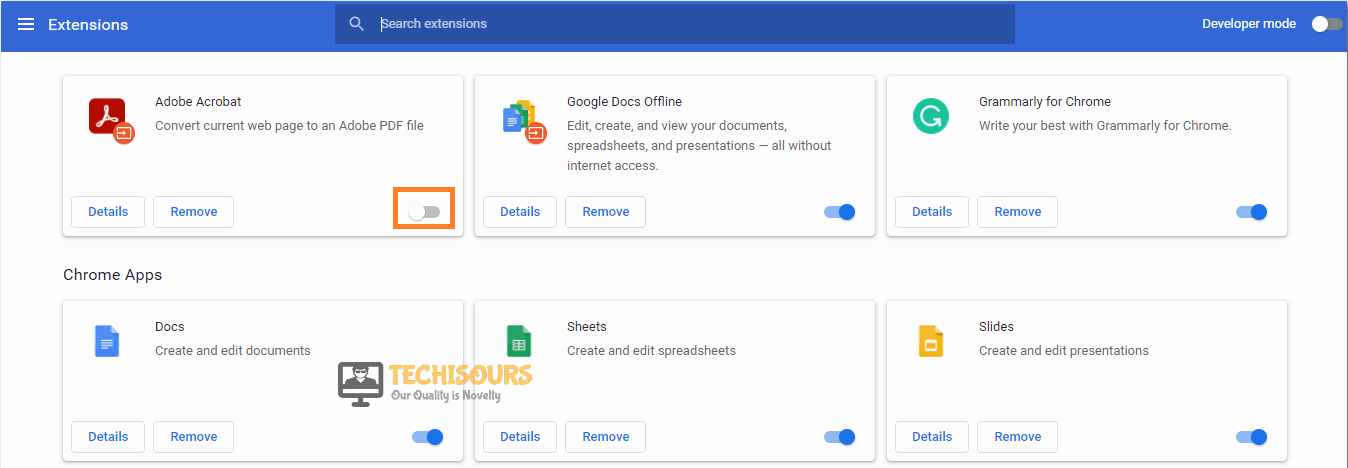
Method 13: Disable Browser Extensions
- Click on the search bar of Google, type the following address and press “Enter”.
chrome://extensions
- Click on “Remove” to delete the extension or you can click the toggle button to disable the extension.

Disable Chrome Extensions
Method 14: Reset App Preferences Android
- For this purpose, click on “Settings” and select “Apps”.
- Click on the “Three-dot icon” button on the top right corner and select “Reset app preferences” and see if the issue is resolved.

Reset App Preferences

Method 15: Disable Antivirus Software and Firewall Temporarily
- Click on the “Windows” icon on the right bottom corner of the screen.
- Search “Defender” in the search bar and click on “Windows Defender Firewall”.
- After that, from the list of options in the left column, click on “Turn Windows Defender Firewall on or off”.

Clicking on the “Turn Windows Defender Firewall On or OFF” option - Afterwards, click on “Turn OFF Windows Defender Firewall” for both private and public networks.

Turn off Windows defender firewall - Save the changes by clicking “OK” and see if the issue is resolved.


Method 16: Reset Your Network Settings
- Press the “Windows + I” keys combination on the keyboard to access settings.
- Click on “Network & Internet” on the main page menu.

Choose Network and Internet - Scroll down and click the “Network Reset” button and after that click on “Reset now”.

Click on Reset now - Wait and see if the issue is resolved.


Method 17: Troubleshoot Your Network
- Press the “Windows + R” keys combination on the keyboard and type “control” to open Control Panel.
Type Control in Run Box - Select “Network and Internet” and select “Network and Sharing Center”
- After that, click on “Troubleshoot problems” and troubleshoot window will open.
- Select “Additional troubleshooters” and select “Internet Connections” from the new window.

Clicking on Additional Troubleshooters - Finally, click on “Run the Troubleshooter” and wait for the issue to resolve.

Method 18: Release and Renew IP Addresses
- Firstly, press the “Windows + R” keys combination from your keyboard to open the RUN prompt dialogue box
- In the search box, type “CMD” and then press enter key. COMMAND PROMPT window will appear.
Typing in cmd - Press the “Ctrl+ Shift+ Enter” keys combination to provide Administrator privileges.
- Now type the following command in the command prompt one by one and press the “Enter” key after execution of every command.
ipconfig/release

ipconfig/all

ipconfig/flushdns

ipconfig/renew

netsh int ipset dns

netsh winsock rest
- Restart your computer after execution of all the commands, restart your browser and check whether the dns_probe_finished_no_internet windows 10 issue persists.
Method 19: Restart DNS Client
- First press the “Window + R” keys combination to open the RUN prompt.
- Now in the search bar of Run Prompt type “services.msc” and click “OK”. A new “Services” window will open in front of you.

Typing in “services.msc” - Find DNS client service, then right-click on it and select the “Restart” option.
- Restarting process will take some time to be completed and afterwards finally open the browser to check if the issue still persists.

Method 20: Close Background Processes
- Press “Windows + R” keys simultaneously to open the Run prompt.
- In the search box type “taskmgr” and then click on the “OK” button.

Type in taskmgr - Task manager window will appear on the screen.
- Select the running processes one by one and then click on the “End Task” option located at the bottom.

Ending Steam Processes - After few seconds restart the browser and check that the issue has been resolved.


Method 21: Scan Your Computer
- Press “Window + I” keys to open settings and after that select the “Update & Security” option.

Click on Update and Security - Now select the “Windows Security” option from the left column menu and afterwards click on “Open Windows Security”
- Now click on the “Virus and Threat Protection” and click on “Quick Scan”.

Choose Quick Scan - After that windows security will scan your computer and provide you with the results.


Method 22: Delete Temporary Files
- Press the “Windows + R” keys combination from your keyboard to open the RUN prompt.
- Type “%temp%” in dialogue box and click “OK”.

Typing in “%temp%” - Now you will come across a list of temporary files hence, select all the temporary files and delete them.
- Finally check the browser and see if the issue is resolved.

Method 23: Clear Chrome Host Cache
- Launch into your chrome browser and type the following address in the search bar:
chrome://net-internals/#dns
- Click on “Clear Host Cache” and restart your browser.

Clearing Host Cache - Check to see if doing so fixes the DNS_Probe_Finished_No_Internet issue.

Method 24: Tweak Network Adapter Settings
- Press the “Window + R” keys combination from your keyboard to open the Run prompt.
- Type “Control” in the search box and hit Enter key. A Control panel window will appear.
Type Control in Run Box - After that, follow the following path “Network and Internet -> Network and Sharing centre -> Change adapter settings”.
- In the “Change Adapter Settings” menu right click on your Local Ethernet connection and select “Properties”.

Change adapter settings - Now click on “Configure” and then navigate to the “Drivers” tab.
- Now select “Update Driver” and click on “Browse My Computer” and afterwards click on “Let me pick from list”.
- After that select “Have Disk”. Now you have to find the “.inf” driver file and click on “OK”.
- Select “Broadcom Netlink (TM) Gigabit Ethernet” and click on “Next”.
- Finally, refresh your PC 4-5 times and most probably the issue would be resolved by now.

Hopefully, after following all of the above-mentioned methods you would be able to get rid of the dns_probe_finished_no_internet windows 10 issue but if the problem still exists you can reach out to us here.