17 Fixes for Corsair Void Pro Mic Not Working Issue
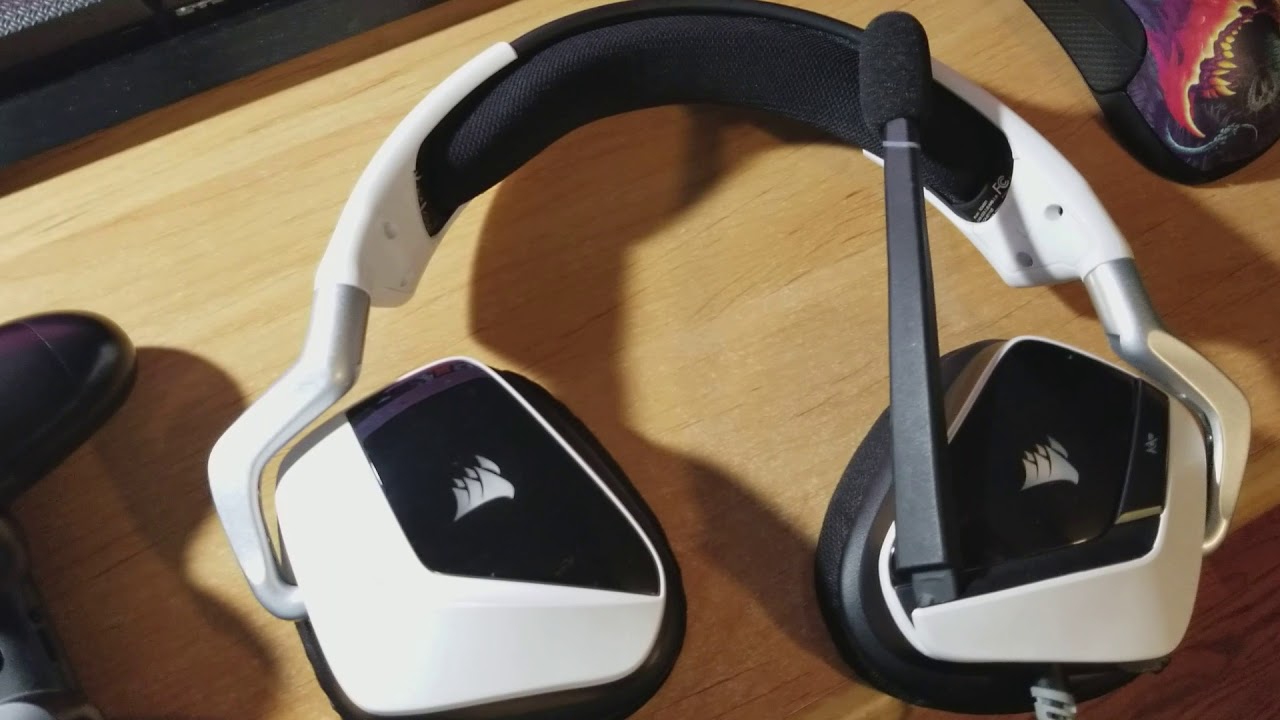
The Corsair Void Pros are some of the more convenient choices for gamers and they are a solid one as well. However, we have received some reports from our users that they were facing the Corsair Void Pro Mic not working issue with Discord and other VoIP applications and sometimes in-game as well. Therefore, in this article, we have listed in detail the steps that you can take to completely get rid of this issue.
Why is the Corsair Void Pro Mic Not Working Issue Triggered in the first place?
After having to go through the different solutions and fixes for our tests, we concluded that the following must be the most crucial reasons due to which the issue occurs.
- Misconfigured Settings: It is possible that your Microphone hasn’t been configured with the best settings and due to this, the Corsair Void Pro Mic not Working issue is being triggered. Therefore, we suggest that you reconfigure your settings using the steps below.
- Microphone Access: Sometimes, the computer might not have been granted access to the microphone due to privacy reasons and this can affect the functionality of the microphone from being utilized by the applications.
- Driver Issue: In certain cases, the audio driver that you are using might be outdated or it might be glitched due to which the error can be generated. Therefore, we suggest that you try to reinstall the driver using the solutions that we have mentioned below.
Now that you have been made familiar with these, it is time that we move on towards the solutions.
Before You Start:
Before looking for any software-related issues, you should first check hardware issues, hence follow the guide below:
- Double-check your headphone connections for loose or broken cables and incorrect jack insertion. Connecting your headphone device to a different jack will solve the problem.
- Another basic cause of this problem is a dirty headphone jack as a little film of oil or dirt will disrupt the connections of the audio jack and this will lead to the unresponsiveness of the microphone, therefore, wipe the audio jack with isopropyl alcohol to clean it thoroughly.
- Perform a soft reset that will also solve your issue, therefore, check to see if your headset is plugged in and double-check if your headset is turned “OFF”, after that, press and hold the mute button for 15 seconds and then press and hold the power button till the headset powers “ON”.
- If you own a USB version of this headset, then the USB ports of your PC are the cause of the problem. If you were previously using a “USB 2.0” port for your headset, then now plug into the “USB 3.0” port of your PC, similarly, if you were using a USB 3.0 port, so now plug into a USB 2.0 port to see if it works.
How to fix the Corsair Void Pro Mic problem Completely:
Fix 1: Change Microphone Settings
This is a pretty basic mistake but this will also be the cause of your inconvenience, so, see if you have mistakenly turned “ON” the mute button of your microphone, then after you have switched the button “OFF”, follow the instructions below to test your microphone:
- Firstly, open “Settings” by pressing the “Windows” button, navigate to the “System” option, and afterward click on the “Sounds” option.

Accessing Sound Settings

- Now, check if your microphone is selected in the “Choose your input device” option under the “Input” heading.

Selecting the Headset option

- Finally, hit the “Test your microphone” option and speak into the microphone in order to inspect it.

Tapping on the Microphone Option

Fix 2: Allow Access to Microphone
- Initially, press the “Windows” key and type “Microphone” in the search box, then select “Microphone privacy settings” from the results.

Typing in the Search Box - When the microphone settings appear, click on the “Allow apps to access your microphone” toggle to switch it “ON”, so as a result apps can access your PC’s microphone.

Tapping the ON Option - Finally, scroll down to the “Choose which apps can access your microphone” section, then check if the toggle for your app whose microphone you are using is also turned “ON”.

Allowing Apps Access to Microphone


Fix 3: Automatically Update Audio Drivers
- Initially, after you have downloaded “Driver Easy” from their website, start “Driver Easy” and hit the “Scan Now” button, this will cause “Driver Easy” to scan your PC for any problems with your drivers.

Scanning through Driver Easy - All the outdated drivers will be detected and shown into a list so you can click “Update all” to download, then install the drivers automatically.

Driver Easy Detecting Drivers - Lastly, reboot your PC for the changes to take effect and check to see if your microphone is working properly now.


Fix 4: Tweak Audio Settings
- Firstly, right-click on the “Speaker” icon on the lower-right of your PC home screen and select the “Sounds” option.

Selecting the Sounds option
NOTE: The “Headset Microphone Corsair VOID Wireless Gaming Dongle” will not appear in the device list. To find it, right-click on the empty space and select the “Show Disabled Devices” option. Now right-click on “Microphone Device” as it appears and hit the “Enable” button.
- Now, access the “Recording” tab, then select “Headset Microphone Corsair VOID Wireless Gaming Dongle” and hit the “Set Default” button.

Setting Headset as Default - After you have set the headset as default, click on the “Headset Microphone Corsair VOID Wireless Gaming Dongle” icon and afterward choose the “Properties” option.

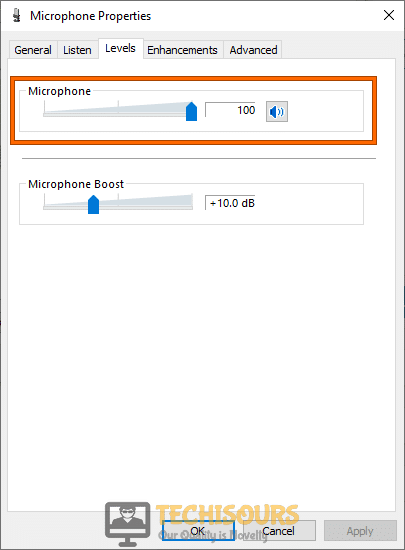
Tapping on Headset Properties - After accessing the “Levels” tab, drag the slider of “Microphone” all the way to the maximum level and hit the “OK” button.

Adjusting Microphone Sensitivity - Finally, press the “Apply” button to save changes and then hit “OK”.

Fix 5: Troubleshoot Sound Problems
A simple solution is to perform a troubleshoot in “Sound” settings, therefore, follow the guide below:
- Initially, right-click on the “Speaker” icon on the bottom right of the Windows taskbar and select the “Troubleshoot sound problems” option.

Tapping on Troubleshoot option - In the case, that troubleshooting detects any errors, follow the on-screen instructions to completely resolve them all.

Fix 6: Reinstall iCUE and Corsair Drivers
The latest iCUE software update will interfere with the already installed Windows build. If your Windows build version is “1903” or later, it will not let the Corsair audio device drivers to work, hence, follow the steps mentioned below:
- Firstly, press the “Windows key” and type “Control panel” in the search box, after that, open “Control panel” and then access “Device Manager”.

Accessing Device Manager - Now, click on the “Audio inputs and outputs” option and expand them, then right-click on the “Corsair headset drivers” and select the “Uninstall Device” option.

Uninstalling Audio Drivers - After you have uninstalled the drivers, unplug your Corsair headset from your PC and reboot your computer, afterwards, access the “Control panel” again through settings, then click on the “Apps and Features” option on the left panel.

Accessing Apps and features - Track down Corsair iCUE software to “Uninstall” it, then again, reboot your PC, download and install the latest version of iCUE software through their website.
- Reboot your PC for the final time and when your PC boots up, ensure that iCUE is running, after that, plug in your headset to see if it works.


Fix 7: Run Audio Troubleshooter
- Initially, press the “Windows button” and access “Windows Settings”, then navigate to the “Update & Security” option.

Accessing Update & Security option - Now, click on the “Troubleshoot” option located on the left menu list and under the “Update & Security” options.


- Look through the page for any troubleshooting options but if you don’t see any, press the “Additional troubleshooters” option.

Clicking on the Additional Troubleshooters option - Navigate to the “Recording audio” option, click to expand it, and then hit the “Run the troubleshooter” option.

Hitting the Troubleshooter option - Any problems present in your PC will be automatically scanned by Windows, therefore, the scan will take a while so you have to hold on, after that, you will have to follow the on-screen instructions in order to fix your microphone.


Fix 8: Update Audio Drivers
- Firstly, click on the start menu and type “Device Manager” in the search box, then access it.

Typing in the Search Box - Now, click on the “Audio inputs and outputs” tab to expand it and the Corsair headset will appear, right-click on it and hit the “Update drivers” option.

Updating Microphone Drivers - Lastly, click on the “Search automatically for drivers” option, then your PC will search for the latest drivers for your headset.

Search Automatically for Drivers - Check to see if doing so has fixed the Corsair Void Pro Mic Not Working issue.


Fix 9: Update Device’s Firmware
- Firstly, press the “Start” icon and search “iCUE” in the search box, then launch iCUE software and click on the “Settings” option in the app window.
- Lastly, access the “Updates” settings from the left menu list and hit the “Check for updates” option in order to update the device firmware.
Fix 10: Repair Corsair iCUE
- Firstly, right-click on the “Start” icon and hit the “Run” option from the menu.

Clicking on the Run option - Now, type the following command in “Run” and click on “OK” to launch the “Device Manager”:
devmgmt.msc

Typing Command in Run Prompt - In the Device Manager window, click on “Human Interface Devices” to expand the section, then right-click on “Corsair composite virtual input device” and hit the “Uninstall” option.

Uninstalling Corsair drivers - After you have uninstalled that, download the iCUE installer file from their website and install it again completely.

Downloading iCUE Software - Finally, hit the “Repair” option at the iCUE setup window, and choose the “Next” option, then the iCUE repair tool will scan for driver issues.


Fix 11: Turn Off Windows Exclusive Mode
- Firstly, right-click on the “Speaker” symbol on the right-bottom of the taskbar and hit the “Sounds” option from the menu.
Selecting the Sounds option - Now, access the “Recording tab” from the window and locate your headset’s microphone, then hit the “Properties” option.

Tapping on the Properties Button - Access the “Advanced tab” and under the “Exclusive mode” heading, uncheck the two boxes.

Unchecking Exclusive Mode Boxes - Lastly, press the “Apply” button and then click on the “OK” button, after that, reboot your computer and check if your microphone works.


Fix 12: Set Headset as Default
Your PC will sometimes use the old/built-in microphone even after plugging in new ones as it is not set as a default recording device, therefore, set your headset as the default recording device by following this guide below:
- Initially, right-click on the “Speaker” symbol on the bottom right of your screen and access the “Sounds” window, then navigate to the “Recording” tab.

- Now, click on your Corsair headset icon that will enable the “Set as default” button and press this button, then check if your microphone works.
Tapping on Set Default Button - Check to see if this has fixed the Corsair Void Pro Mic Not Working issue.
Fix 13: Change Microphone’s Default Format
- Firstly, right-click on the speaker symbol located and access “Sounds”, then navigate to the “Recording” tab in the “Sounds” window.
- Now, click on your Corsair headset icon that would enable the “Properties” button, then press this button.

- After accessing the properties, navigate to the “Advanced” tab and look for the “Default Format” section, then click on the dropdown menu to extend the options.

- Finally, try different qualities and sample rates in order to find out the one that works best for your headset.

Tapping on Default Formats - After Configuring the best setting, check to see if the Corsair Void Pro Mic Not Working issue is fixed.

Fix 14: Use Y-splitter for Audio Jack
If you have the “3.5mm” headphone jack version of the Corsair void pro headset, then this is the cause of the issue. A single audio jack handles sounds from the speakers and also the sounds from the microphone, so in order to fix this, follow the instructions below:
- Firstly, switch the ports of the audio jack, then get a Y-splitter for your headset’s audio jack and plug it into your PC’s audio port, the purpose of a “Y-splitter” is to provide a separate connection for the speakers and the microphone.

- Your headphone jack will require quite a lot of force to be inserted into the Y-splitter, so, to avoid any loose connections that will lead to this problem, hence make sure that the audio jack is completely inserted into the Y-splitter. Finally, after performing the above steps, check if your microphone is working now.
Fixes For Discord Users:
Fix 1: Enable Push-to-Talk Option
- Initially, open “Discord”, then on the homepage, access “User settings” located on the bottom left of the screen.

Accessing Discord Settings - From the left menu list, click on the “Voice & Video” option under the “App Settings” heading.

Accessing Voice & Video Settings - Now, change the input method and set it from “Voice Activity” to “Push-to-Talk” by clicking on the “Push-to-Talk” checkbox.

Tapping on Push to Talk option

Fix 2: Reset Discord Voice Settings
- Initially, press the “Windows” key and type “Discord” in the search box, after Discord launches access the “Settings” located in the bottom left of the app window.

- Now, access the “Voice & Video” options located in the left menu list and after scrolling to the bottom of the settings, click on the “Reset voice settings” option, therefore “Discord” will reboot.

Fix 3: Adjust Input Sensitivity Settings
- On “Discord’s” homepage, access “User settings”, then open the “Voice & Video” settings on the left.

- Now, scroll down and you will see the “Input sensitivity” bar under the “Input Mode” option.

- Lastly, toggle the “Automatically determine input sensitivity” switch option “ON” and speak through the microphone, if the see-through bar below changes into “Solid Green”, then your microphone is working.

- If the last step didn’t work, toggle the “Automatically determine input sensitivity” switch option “OFF” and then click to drag the manual slider of the “Input sensitivity” to the centre or a little further, therefore, see if the bar moves from its place when you talk, which should mean that the microphone is working.

Tapping on the Switch option - Check to see if this has fixed the Corsair Void Pro Mic Not Working issue.

If you are still unable to resolve this issue, Contact Us for further assistance.