Your Browser was Told to Deny us Microphone Access? Fix it Here
You can easily manage your games using Steam, a unique online game platform. This platform will let you have a wonderful gaming experience. You might, however, run into several errors and problems, including the “oops looks like your browser was told to deny us microphone access” error and Steam Client WebHelper high CPU, etc.

The oops looks like your browser was told to deny us microphone access steam issue is most probably triggered due to the incompatible microphone’s privacy settings. Furthermore, the browser denied microphone access Steam issue is caused by a corrupt browser cache, insufficient Mic access permissions, and it also due to antivirus software interference.
Before You Start:
Before looking for any software-related issues, you should first check hardware issues, hence follow the guide below:
- Double-check your headphone connections for loose or broken cables and incorrect jack insertion. Connecting your headphone device to a different jack will solve the problem.
- Another basic cause of this problem is a dirty headphone jack as a little film of oil or dirt will disrupt the connections of the audio jack and this will lead to the unresponsiveness of the microphone, therefore, wipe the audio jack with isopropyl alcohol to clean it thoroughly.
Fixing the Your Browser was told to Deny us Microphone Access:
Fix 1: Tweak Microphone’s privacy settings
The “Steam chat browser deny microphone access” error can be fixed by adjusting the microphone privacy, as many Steam players have demonstrated. You must here grant apps access to your microphone in Settings hence follow these steps to do that:
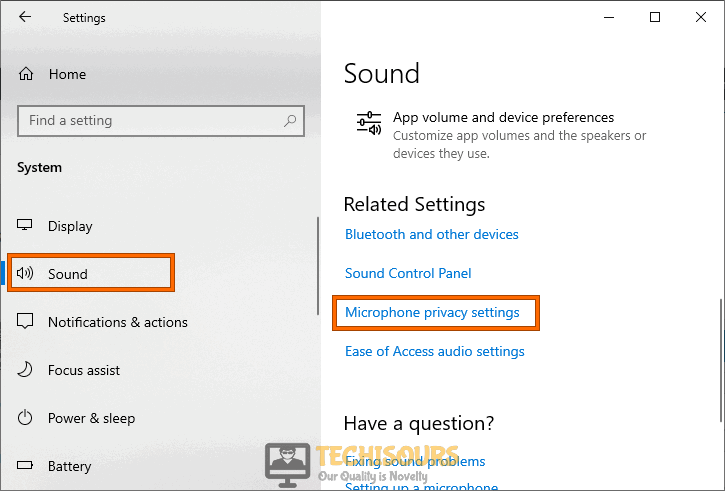
- Initially, press the “Windows” key and type “Microphone” in the search box, then select “Microphone privacy settings” from the results.

Microphone Privacy Settings - When the microphone settings appear, click on the “Allow apps to access your microphone” toggle to switch it “ON”, so as a result apps can access your PC’s microphone.

Clicking on “Allow Apps to Access your Microphone” toggle - Finally, scroll down to the “Choose which apps can access your microphone” section, then check if the toggle for your app whose microphone you are using is also turned “ON”.
- Scroll down to the “Choose which Microsoft Store apps can use your microphone” area and ensure that both the Xbox Console Companion and Xbox Game Bar choices for microphone access are switched “ON”.

Fix 2: Clear Steam Cache
- Launch Steam on your computer and sign in to your account.
- From there, click on the “Steam” option at the top left side and select “Settings” from the list.
- After that, click on the “Web Browser” button from the left side and select the “Delete Web Browser Cache” & “Delete All Browser Cookies” and click on “OK” to confirm the operation.

Delete Web Cache - Reboot your system so that the changes could take effect and hopefully oops looks like your browser was told to deny us microphone access problem could be resolved.

Fix 3: Set Microphone as Default Input Device
- Right-click on the Start icon and navigate to the “Settings” option.
- Locate the “System” option, click on it, and afterward select the “Sound” option from the left pane.

Choose Sound Option - Click on the “Sound Control Panel” option located on the right side of the window.
- A window will appear in front of you, navigate to the “Playback” tab, right-click on the speaker/headset you are currently using from the list and click the option “Set as Default Device”.

Set as Default Device - Now in the Playback tab, select every other audio output device except the one that you are currently using, right-click on it, and select the option “Disable”.
- Afterwards, head to the “Recording” tab, right-click on the microphone you are currently using from the list, and click the option “Set as Default Device”.

Set Microphone as Default Device - Now in the Recording tab, select every other audio output device except the one that you are using, right-click on it, and select the option “Disable”.
- Finally, click on the “OK” button, launch the game and check if the oops looks like your browser was told to deny us microphone access issue has been resolved.


Fix 4: Add Steam Exception in Firewall
- Press “Windows” + “R” to launch into the Run prompt, type in “Firewall.cpl” and press “Enter” to launch into the Firewall Control Panel.

Typing in “firewall.cpl” - Here, click on the “Allow an app or feature through firewall” option on the left side of the window.
- After doing so, click on the “Change settings” option and then select the “Allow another app” option.
- From here, click on “Browse”, navigate through the locations, and double click on your “Steam.exe” file that is usually by default in the “C:\Program Files (x86)\Steam” address.
- In the end, click on the “Add” button at the bottom of the window and save the changes made.
- Restart your computer and check to see if doing so has fixed the “Your Browser was told to Deny us Microphone Access” issue.

Fix 5: Monitor Browser Settings
You may experience the Steam microphone problem if your internet browser is configured to prohibit microphone access. As a result, we recommend that you check your browser settings:
- Open your web browser and select “Site Settings” from the menu by clicking on the “Lock” icon next to the URL.

Opening “Site Settings” for the Microsoft Teams Web Version - Proceed to the “Permissions” tab and choose the “Allow” option located next to the Microphone section.

Fix 6: Disable your antivirus temporarily
- Press “Windows + I” to launch into the settings, click on the “Update & Security” option and select the “Windows Security” button from the left side.

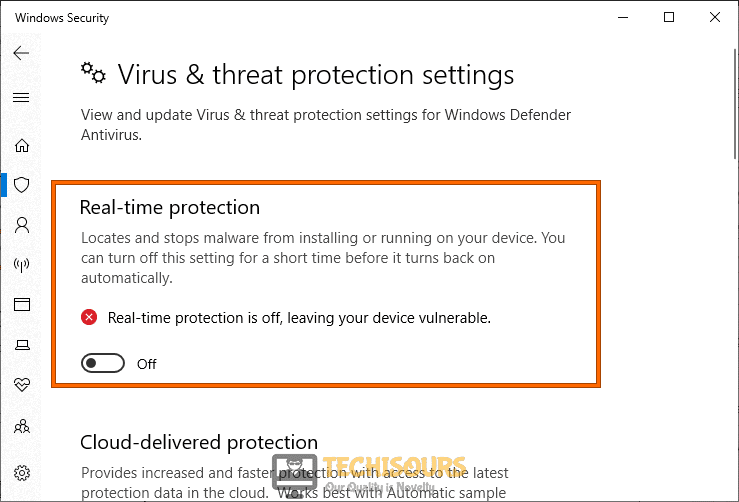
Choose Update and Security Option - After this, click on the “Virus & Threat Protection” option from the right side and click on the “Manage Settings” button under the “Virus & Threat Protection” button.
- Now, from here, make sure to disable the toggle under the “Real-Time Protection” option.

Disable Real-time protection - Now that the Real-Time protection has been disabled, install the app and check to see if the microphone access error has been fixed.

If oops looks like your browser was told to deny us microphone access issue still occurs, contact us for further troubleshooting of the issue.