Easily Fix Windows Update Error 0x8024401C
Some users have been getting the “There were some problems installing updates. Error 0x8024401c” on your computer, we would like to let you know that you have come to the right place. We were getting this same error on some of our computers and after implementing some solutions, we were able to fix it completely for our own computer and that of our users.

The solutions varied according to the different triggers due to which the issue was being caused. Therefore, we have listed the most efficient methods that you can apply on your computer to completely fix the 0x8024401c error and in addition to that, we have also listed the reasons due to which the error probably occurs on your computer.
Why is the Windows Update Error 0x8024401C seen on your Computer?
After having to investigate this issue in detail, we concluded that the following were some of the most important reasons due to which they were triggered in the first place.
- IPV6: It is possible in some cases that the IPV6 connection that you are using is unable to connect to the Windows Servers. Therefore, we suggest that you disable IPV6 on your Windows computer and check to see if the 0x8024401c error is fixed.
- Glitched Update Services: Sometimes the update services that are responsible for downloading and installing the update on your computer might be glitched and this might be causing the 0x8024401c error for you. Therefore, we suggest troubleshooting this particular reason by following the steps that we have mentioned below.
- Background Services/Apps: Background services or applications might prevent the updates from being installed by using certain system resources or by interfering during the process. Therefore, we suggest that you try to minimize the background apps and services by following the methods below.
Now that we have taken you through most of the reasons behind the issue, we can finally start implementing the solutions.
Fixing the Windows Update Error 0x8024401C:
Fix 1: Disable IPV6
- Press “Windows + R” to launch the Run prompt, type in “ncpa.cpl” and press “Enter” to launch the network control panel.

Typing ncpa.cpl - From there, Right-click on your Wifi connection and select “Properties“.
- After that, make sure to uncheck the “Internet Protocol Version 6 (TCP/IPV6)” option.
- Click on “OK” to save your changes and exit out of the window.
- Restart your computer and check to see if the error 0x8024401c has been fixed.

Fix 2: Switch Connections
It is sometimes possible that the internet connection that you are using is blocking you from being able to properly connect to the update servers. Therefore, we suggest that you try to switch your connection and check to see if doing so fixes the 0x8024401c error while downloading the update.
Fix 3: Troubleshoot Windows Update
- Press “Windows + I” to launch the settings, click on the “Update & Security” option and select the “Troubleshoot” button from the left side.
- Click on the “Additional Troubleshooters” option and select the “Windows Update” option from the next window.

Clicking on Additional Troubleshooters - Click on the “Run the Troubleshooter” option and wait for the troubleshooting process to be completed.
- Check to see if troubleshooting the Windows update fixes the 0x8024401c error on your computer.

Fix 4: Reconfiguring Windows Registry
- Press “Window + R”, type in “Regedit” and press Enter on your keyboard to launch the registry editor.
Typing “regedit” - From there, navigate through the following path.
HKEY_LOCAL_MACHINE\Software\Policies\Microsoft\Windows\WindowsUpdate
- Select “AU” that will be inside the “WindowsUpdate” folder and look for “UseWUServer” on the left side
- Double click on the “UseWuServer” entry and set its value to “0”.
- After doing that, navigate to the following path.
Computer\HKEY_LOCAL_MACHINE\SOFTWARE\Microsoft\Windows\CurrentVersion\WindowsUpdate\Auto Update
- Look for “EnableFeaturedSoftware”, if it exists then ensure that its value is set to 1, if not then double click it and set its value to “1” and “Base” to “Hexadecimal”.
- If “EnableFeaturedSoftware” does not exist, then select “Edit” and click “New”.
- Choose “DWORD (32-bit) Value” and set its name as “EnableFeaturedSoftware”.
- Double click it and change its value to “1” and its “Base” to “Hexadecimal”.
- After that, head to the following location.
HKEY_LOCAL_MACHINE\SOFTWARE\Microsoft\WindowsUpdate\UX
- Double-click “IsConvergedUpdateStackEnabled” and set its value to “0”
- After that, head to the following location inside the registry editor.
HKEY_LOCAL_MACHINE\SOFTWARE\Microsoft\WindowsUpdate\UX\Settings
- Double-click “UxOption” and se its value to “0”.
- In the end, navigate through to the following location on your computer.
HKEY_LOCAL_MACHINE\SOFTWARE\Policies\Microsoft\SystemCertificates
- Look for “CopyFileBufferedSynchronousIo”, if it exists then ensure that its value is set to 1, if not then double click it and set its value to “1” and “Base” to “Hexadecimal”.
- If “CopyFileBufferedSynchronousIo” does not exist, then select “Edit” and click “New”.
- Choose “DWORD (32-bit) Value” and set its name as “CopyFileBufferedSynchronousIo”.
- Double click it and change its value to “1” and its “Base” to “Hexadecimal”.
- Restart your PC and see if the error 0x8024401c has been fixed.

Fix 5: Performing System and Disc Scans
- Press “Window + R”, type in “cmd” and press “Shift + CTRL + Enter” to launch with admin permissions.

Typing in cmd - After that, type in the following commands one by one and press “Enter” after each to execute them on the computer.
sfc /scannow

DISM /Online /Cleanup-Image /CheckHealth

DISM /Online /Cleanup-Image /ScanHealth

DISM /Online /Cleanup-Image /RestoreHealth

chkdsk c:/f

chkdsk c: /f /r
- Once the process is complete, restart your PC and see if the issue is resolved.

Fix 6: Updating in Clean Boot State
Some services or apps that startup with Windows might be conflicting with the Windows functionality and causing different issues. Follow the steps below to disable all startup apps/services:
- Press “Windows + R” to launch into the Run prompt, type in “msconfig” and press “enter’ to launch into the configuration panel.

Typing in “Msconfig” - From here, click on the “Services” tab and make sure to check the “Hide All Microsoft Services” option.
- After doing that, click on the “Disable All” button to disable the services and then click on the “Startup” tab.
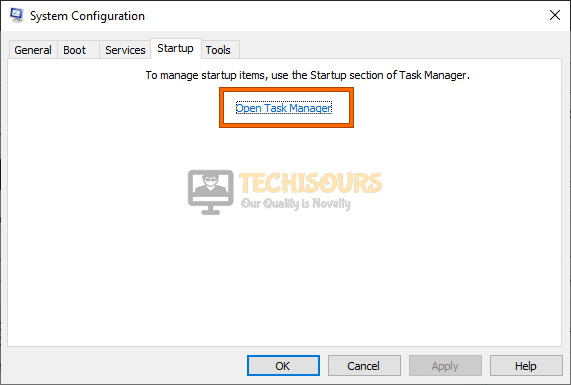
- From there, click on the “Open Task Manager” button to launch into the task manager.

Open Task Manager - After that, click on the enabled apps to select them and select the “Disable” button to prevent them from launching at startup.
- Now, try to install the updates and check to see if doing so fixes the 0x8024401c error during the update.

Fix 7: Reverting Driver Changes
- Press “Windows + R” to launch into Run, type in “devmgmt.msc” and press “Enter” to launch into the device management window.

Typing devmgmt.msc in the Run prompt - From here, under the “Help” tab, click on the “Scan for Hardware Changes” icon and the recently installed software will be removed.
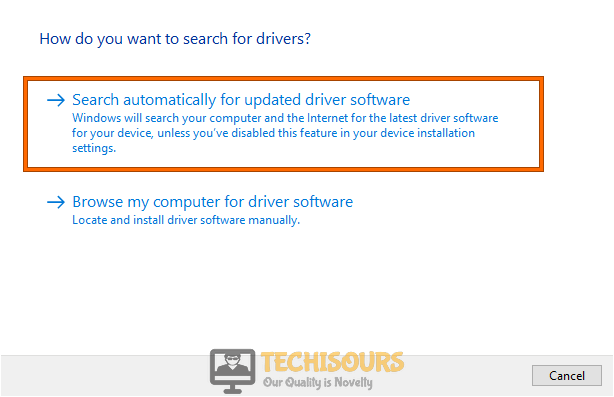
- Now, right-click on each of the mentioned drivers and select the “Update Driver” option and then click on the “Search Automatically for Updated Driver Software” option.

Search automatically for updated driver - Do the same for the “Network Adapters” installed on your computer and update their drivers as well from the device management window.
- Check to see if doing so helps in fixing the issues.

Fix 8: Turning Off Firewall
- Press “Windows + R” to launch run and type in “Firewall.cpl” and press “Enter” to launch into the Firewall control panel.
Typing in “firewall.cpl” - From here, click on the “Turn Windows Defender Firewall ON or OFF” option and make sure to select the “Turn OFF Windows Defender Firewall” button for both the Private and the Public Network settings.
- Now, click on “OK” and restart your computer.
- After that, press “Windows + S” to launch the search panel, type in “Firewall & Network Protection” and press “Enter”.
- From here, click on the “Restore Firewalls to Default” option and confirm the prompt ahead.

Selecting “Restore Firewalls to Default” - Check to see if doing so fixes the issue.


Fix 9: Remove Recently Installed Applications
- Press “Windows + R” to launch Run, type in “appwiz.cpl” and press “Enter” to launch into the application wizard.

Typing in “Appwiz.cpl” in the Run box. - Click on the “Installed On” dropdown to sort the apps by their installation date.
- Now, remove any software that might have caused this issue from your computer by right-clicking on its name and selecting the “Uninstall” button.
- After uninstalling, check to see if the issue is now fixed.

Fix 10: Remove Recent Windows Updates
- Press “Window + R”, type in “appwiz.cpl” and press Enter on your keyboard.
Typing “appwiz.cpl” - Select “View installed updates” from the options on the left.
- Click “Installed” and the latest should appear first now.
- In the “Microsoft Windows” category, double click the recent update and click “Yes”.
- Restart your PC and see if the issue is resolved.

Fix 11: Remove USB Devices
It is recommended that while installing an important update, remove all the USB devices that are connected to your computer except the keyboard and the mouse. This is because the USB devices might sometimes cause the update to glitch and prevent it from being processed properly.
Fix 12: Restarting Windows Services
- Press “Window + R”, type in “services.msc” and press Enter on your keyboard.

Typing in “services.msc” - Look for “Windows Update”, “Background Intelligent Transfer Service”, “App Readiness” and “Network List Service”, right-click it and select “Stop”.
- Right-click them again and select “Start”.
- Restart your PC and see if the 0x8024401c issue is resolved.

Fix 13: Reconfiguring Group Policy
- Press “Windows + R” to launch into the Run prompt, type in “gpedit.msc” and press “enter” to launch the group policy editor.
Typing “gpedit.msc” - From there, navigate through the following path.
Computer Configuration > Administrative Templates > Windows Components > Windows Update
- Now, click on the “Configure Automatic Updates” option and choose “Enabled” from the dropdown.
- Click on “Apply” and then on “OK” to exit out of the window.
- Now, restart your computer and check to see if the 0x8024401c issue is fixed.

Fix 14: Perform Complete Virus Scan
- Press “Windows + I” to launch into the settings, click on the “Update & Security” option and select the “Windows Security” button from the left side.

Choose Windows Security Option - After that, click on the “Virus and Threat Protection” button from the right side and click on the “Scan Options” button from the next window.
- After that, check the “Full Scan” option and click on the “Scan Now” button to start the scan.

Fix 15: Reset Windows Update Components
- Press “Window + R”, type in “cmd” and press “Ctrl + Shift + Enter” on your keyboard.
Typing in cmd - Type in the following commands in cmd and press Enter after each to execute it on your computer.
net stop wuauserv

net stop cryptSvc

net stop bits

net stop msiserver

ren C:\Windows\SoftwareDistribution SoftwareDistribution.old

ren C:\Windows\System32\catroot2 Catroot2.old

net start wuauserv

net start cryptSvc

net start bits

net start msiserver
- Restart your PC afterward and see if the 0x8024401c issue is resolved now
Fix 16: Checking Disk Space
It is possible that the update cannot be applied to your computer because there isn’t enough space on it. Therefore, we suggest running the disk cleanup to ensure that enough space is available.
- Press “Windows + E” to launch into File Explorer, right-click on the partition on which Windows is installed and select “Properties”.
- From the properties, click on the “Disk Cleanup” option and then select the “Clean up System Files” button.

Clicking on “Cleanup System Files” option - After this, make sure to completely run the cleanup and remove any extra files on the computer.
- Click on “OK” to close the window after running the cleanup and check to see if the issue has been fixed.

Fix 17: Clearing Update Cache:
- Press “Window + R”, paste the following address into it and press “Enter”.
%windir%\SoftwareDistribution\DataStore
- Press “CTRL + A” to select all contents inside it and press “Shift + Delete” to remove them from the computer.
- Check to see if doing so fixes the 0x8024401c error on the computer.
Fix 18: Disable Metered Connection
- Press “Window + S”, type in “Network status” and press Enter on your keyboard.
- Click “Properties” under “Ethernet” look for the “Set as Metered connection” heading.

Set as metered connection - Turn the toggle “Off” and exit out of the window.
- Restart the computer and check to see if the 0x8024401c error is now fixed.

Fix 19: Change DNS Server
- Press “Windows + R” to start the Run prompt, type in “ncpa.cpl” and press “Enter”.
- Now, right-click on your connection and select “Properties”.
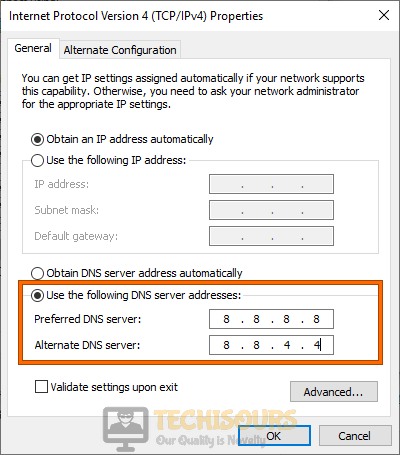
- After that, double-click on the “Internet Protocol Version 4 (IPv4)” option and click on the “Use the Following DNS Server Addresses” option.

Use the following DNS server addresses - In here, type in “8.8.8.8” in the preferred and “8.8.4.4” in the alternate address column.
- Click on “OK” to save your changes and close out of the Window.
- Check to see if the Microsoft Store is now working normally.
Fix 20: Perform System Restore
- Press “Window + R”, type in “sysdm.cpl” and press Enter on your keyboard.
Typing “sysdm.cpl” - In the “System Protection” tab, select the drive with Windows installed and click “System Restore”.
- Choose an earlier point and click “Next”. Follow the on-screen instructions and wait for the process to be completed.
- Check to see if the issue is fixed after restoring the computer.

Fix 21: Reset PC
- Press “Windows + I” to launch into the settings, click on the “Update & Security” option and select “Recovery” from the left side.

Update and Security - From here, click on the “Get Started” button under the “Reset this PC” option.
- After that, follow through with the on-screen instructions to completely reset your computer.
- After resetting the computer, check to see if the error is fixed.

If none of the fixes works for you, we recommend that you Contact Us for further troubleshooting of the issue.