Easily Fix Windows Update Error Code 0x80070490 [Complete Guide]
If you have been encountering the Windows Update Error Code 0x80070490 on your computer while trying to install an update, you are not alone. This issue was faced by hundreds of users and we decided to fix it using some common workarounds and solutions. We have listed all of the viable methods to fix the issue in this article. Therefore, follow the steps until one of the solutions works for you.

What Causes the Error Code 0x80070490 during Windows Update?
After investigating the issue, we concluded that the following must be the primary reasons due to which this particular issue is triggered.
- Windows Defender: The Windows Defender can sometimes prevent the update from being applied by raising false positives about the update files or simply by using up too much of the disk resources. Therefore, disabling the Windows Defender might be a good option.
- Corrupted Component: Sometimes the update components for the Windows Update Service might have been corrupted or glitched due to which the Windows Update Error Code 0x80070490 issue is being triggered.
- Corrupted Files: If the Update files are corrupted or glitched, the error code 0x80070490 might be seen while trying to install the update. Therefore, we recommend that you try to remove these corrupted files in order for them to be refreshed.
- System Drives: The System drive might have been damaged or it might have acquired some corrupted sectors due to which the Windows Update Error Code 0x80070490 sccm is being seen. We recommend that you try to scan and fix the drives as mentioned in the solution below.
Now that you have come to know of the reasons, it is time that you implement the solutions to fix the issue.
Fixing the Error Code 0x80070490 on Windows:
Method 1: Disabling Windows Defender
It is possible in some rare cases it is possible that the Windows Defender might be preventing you from being able to read or write in certain locations on the computer. Therefore, we recommend that you try to disable it on your computer.
- Press “Windows + I” to launch into the settings, click on the “Update & Security” option and select the “Windows Security” button from the left side.
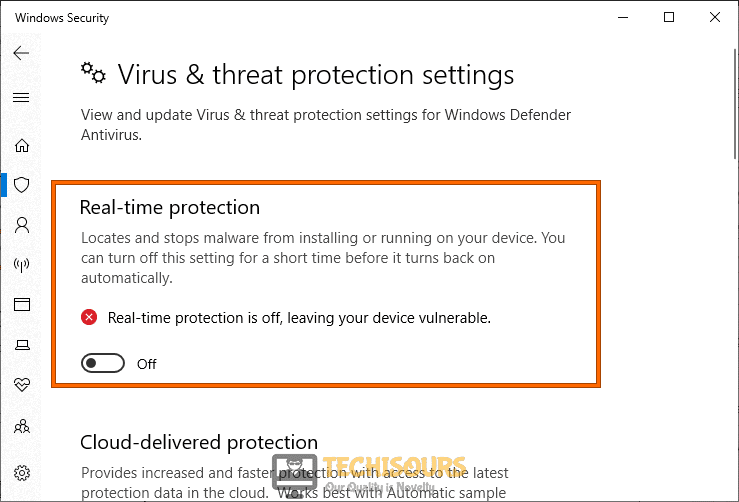
- After this, click on the “Virus & Threat Protection” option from the right side and click on the “Manage Settings” button under the “Virus & Threat Protection” button.
- Now, from here, make sure to disable the toggle under the “Real-Time Protection” option.

Disable Real-time protection - Now that the Real-Time protection has been disabled, check to see if the Error Code 0x80070490 has been fixed.
Method 2: Perform Repair Scans
- Press “Windows + R” to launch the RUN prompt, type in “cmd” and press “Shift + CTRL + Enter” to launch with admin permissions.

Typing in cmd - From here, type in the following commands one by one and press “Enter” after each and wait until they finish executing before executing the next one.
sfc /scannow

Dism /Online /Cleanup-Image /RestoreHealth
- Now, try to install the update and check to see if the issue is fixed.

Method 3: Restart Windows Update Service
- Press “Windows + R” to launch into the Run prompt, type in “Services.msc” and press “Enter” to launch into the service management window.

Typing in “services.msc” - From here, right-click on the “Windows Update” service and select the “Restart” option.
- After the service has been restarted, check to see if the Update is installed properly and the Error Code 0x80070490 is fixed.

Method 4: Completely Reset Windows Update Components
- Press “Windows + R” to launch the RUN prompt, type in “cmd” and press “Shift + CTRL + Enter” to launch with admin permissions.
Typing in cmd - Inside the command prompt, type in the following commands one after the other and press “Enter” after each to execute them on your computer.
net stop wuauserv

net stop cryptSvc

net stop bits

net stop msiserver

ren C:\Windows\SoftwareDistribution SoftwareDistribution.old

ren C:\Windows\System32\catroot2 Catroot2.old

net start wuauserv

net start cryptSvc

net start bits

net start msiserver
- After executing these commands, make sure to exit out of the command prompt and restart your computer.
- Check to see if the issue has been fixed.
Method 5: Perform System Restore
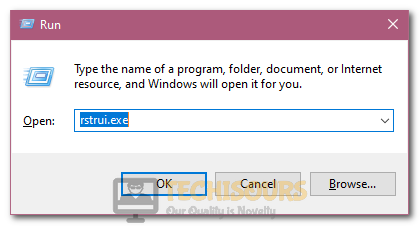
- Press “Windows + R” to launch into the Run prompt, type in “rstrui.exe” and press “Enter” to launch into the Windows restore window.

Launching rstrui.exe to restore our computer - From here, click on the “Choose a Different Restore Point” option and select “Next”.
- Click on the “Show more Restore Points” option if available to see all the different points that you can restore to.
- From here, select the restore point that was created before the date on which this issue started occurring and click on “Next” after selecting.
- Check to see if by doing so, the Error Code 0x80070490 is fixed.
Method 6: Create a New Account
- Press “Windows + I” to launch into the settings, click on the “Accounts” option and from the left side, select the “Family and Other Users” button.
- From the right side, select the “Add Someone Else to this PC” button and select the “I don’t have this person’s Sign-in Information” button.
- From the next screen select the “Add a user without a Microsoft Account” button and follow through with the on-screen instructions to complete the creation of this account.

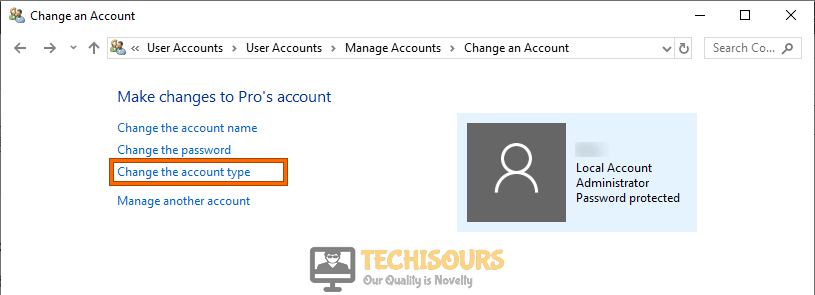
Add a user without a Microsoft account - Now, navigate back to the “Family and Other users” window and click on the created account.
- Select the “Change Account Type” option and select the “Administrator” button to make this user an administrator on the computer.

Change Account Type - Log into this newly created account and check to see if you can go through the update process without encountering the Error Code 0x80070490 during the installation of the update.

Method 7: Run Windows Update Troubleshooter
- Press “Windows + I” to launch into the settings, click on the “Update and Security” option and from the left side, click on the “Troubleshoot” button.
- From the right side, select the “Additional Troubleshooters” button and click on the “Windows Update” button on the next window.

Clicking on Additional Troubleshooters - Select the “Start the Troubleshooter” button and follow through with the on-screen process to complete the troubleshooting process.
- Check to see if doing so has fixed the Error Code 0x80070490 on your computer.

Method 8: Run System Scan
- First of all, make sure to undo the changes that we made in the first method to ensure that the Windows Defender is enabled on your computer.
- Press “Windows + I” to launch into the settings, click on the “Update & Security” option and from the left side, click on the “Windows Security” button.
- Click on the “Virus and Threat Protection” button and select “Scan Options” from the next window.

Scan Option - Check the “Full Scan” option and click on the “Scan Now” button to complete the scanning process.
- Wait for the scan to be finished and check to see if the issue has been fixed.

Method 9: Deleting USER ID Folder from Registry
- Press “Windows + R” to launch the Run prompt, type in “regedit” and press “Enter”.

Typing “regedit” - Now, navigate through the following address
Computer\HKEY_LOCAL_MACHINE\SOFTWARE\Microsoft\Windows\CurrentVersion\Appx\AppxAllUserStore
- In this address, locate the “S-1-5-21-1505978256-3813739684-4272618129-1016″ folder that is named like this, it might differ in some numbers but it should look similar to the one mentioned above.
- Select all folders that are named in this way, right-click on them and select the “Delete” option.
- Closeout of the registry editor and ensure that the Error Code 0x80070490 has been fixed on your computer.

Method 10: Remove Software Distribution Folder
- Press “Windows + R” to launch into RUN, type in “cmd” and press “Shift + CTRL + Enter” to launch with admin permissions.
Typing in cmd - From here, type in the following commands one by one and press “Enter” after each to execute them.
net stop wuauserv

net stop bits

net stop cryptSvc

net stop msiserver
- After executing these commands, navigate to the following address and make sure to replace the drive letter with the one on which Windows has been installed.
C:\Windows\SoftwareDistribution
- In here, press “Ctrl + A” to select all the files and press “Shift + Delete” to remove them from your computer.
- After removing these files, launch into the command prompt again using the above steps and execute the following commands.
net start wuauserv

net start bits

net start cryptic

net start msiserver
- Try to install the update on your computer and check if the Windows Update Error 0x80070490 is fixed.
Method 11: Updating in Safe Mode
- Press “Windows + R” to launch the RUN prompt, type in “msconfig” and press “Enter” to launch into the ms configuration panel.

Typing in “Msconfig” - From here, click on the “General” tab from above and ensure that you check the “Selective Startup” option.
- After that, ensure that only the “Load System Services” option is checked and the rest are unchecked.
- After doing that, click on the “Services” tab and from there, check the “Hide all Microsoft Services” option and then click on the “Disable All” button.

Hide All Microsoft Services - Click on “Apply” to save your changes and “OK” to close out of the Window.
- Restart your computer and it will be booted into the safe mode.
- In this mode, try to install the update and check to see if doing so fixes the error while updating.
- Undo all the changes that we made after updating and restart the computer to boot out of the Safe mode.


Method 12: Replacing Storage Device
It is possible in some cases the SSD or the HDD that you are using to store your operating system and other files contain some corrupted sectors due to which the update cannot be installed on the computer. Therefore, we recommend that you try to replace the SSD or the HDD on your computer and then check to see if the issue is fixed.
Method 13: Ensuring Update Services are Running
- Press “Windows + R“, type in “Services.msc” and press “Enter” to launch into the service management window.
Typing in “services.msc” - In here, right-click on the following services one by one and select “Properties”.
BITS

Cryptographic

MSI Installer

Windows Update
- From the properties, ensure that you select the “Start” option to start running these services on your computer.
- Check to see if running these services fixes the issue.
Method 14: Installing the Update Manually
In certain cases, it is possible that the issue might be getting triggered because your Windows installation has a glitched update service. To outrun this issue, you can download the updates from the Microsoft Website manually and then install them on your computer like you would any application.
If all of these methods weren’t able to fix the error for you, contact us for further troubleshooting.