Fix: WMI Provider Host (WmiPrvSE.exe) High CPU Usage [Complete Guide]
If you have been seeing the WMI Provider Host or the WmiPrvSE.exe process in your task manager consuming High CPU resources, don’t worry, because, in this comprehensive guide, we have listed exactly what this process does on your computer and how you can circumvent the High CPU Usage by it.

What is WMI Provider Host (WmiPrvSE.exe) on your Computer?
Windows Management Instrumentation Provider Host or WMI Provider Host is a Windows Service that is responsible primarily for the operation and functionality of the applications installed on your computer. The service must always be running on your computer to ensure that all the programs are working properly and it should have little to no impact on your system resources.
However, some users have been reporting the WMI Provider Host using high CPU resources and in this article, we have geared ourselves towards fixing that issue. For that, we will be applying several fixes and workarounds that are aimed at fixing this high usage of resources.
Fix WMI Provider Host High CPU Usage:
Fix 1: Restarting System Services and Reconfiguring WMI Startup
- Press “Windows + R” to launch into Run, type in “cmd” and then press “Shift + CTRL + Enter” to launch with admin permissions.

Typing in cmd - After that, execute the following commands one by one and press “Enter” after each to execute them on the computer.
net stop iphlpsvc

net stop wscsvc

net stop Winmgmt

net start Winmgmt

net start wscsvc

net start iphlpsvc

sc config Wmi start= demand
- After having executed the commands, restart your computer and check to see if doing so fixes the WMI Provider Host high CPU issue.

Fix 2: Restarting WMI Service
- Press “Windows + R” to launch into the Run prompt, type in “Services.msc” and press “Enter” to launch into the service management window.

Typing in “services.msc” - From here, right-click on the “Windows Management Instrumentation Service” and select the “Restart” option.
- Restart your computer and check to see if the issue has now been resolved.

Fix 3: Check for Windows Updates
- Press “Windows + I” to launch into the settings, click on the “Update & Security” option and select the “Windows Update” button from the left side.
- After that, click on the “Check for Updates” button and wait for the checking process to be completed.

Check for updates - After that, select the “Download & Install” button to download and install the latest Windows updates on your computer.
- Check to see if doing so fixes the WMI Provider Host High CPU usage on your PC.

Fix 4: Booting in Clean State
- Press “Windows + R” to launch into the Run prompt, type in “msconfig” and press “enter’ to launch into the configuration panel.

Typing in “Msconfig” - From here, click on the “Services” tab and make sure to check the “Hide All Microsoft Services” option.
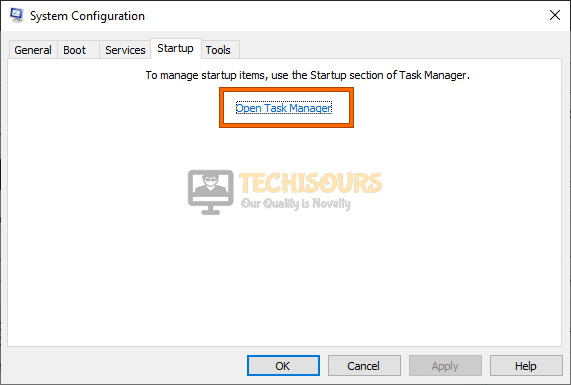
- After doing that, click on the “Disable All” button to disable the services and then click on the “Startup” tab.
- From there, click on the “Open Task Manager” button to launch into the task manager.

Open Task Manager - After that, click on the enabled apps to select them and select the “Disable” button to prevent them from launching at startup.
- Restart your computer and check to see if the WMI Provider Host High CPU Usage issue is fixed.
- If it is, it probably means that a background app or service was spiking its usage. Now, start enabling the services and apps one by one as we disabled them above and check to see which one makes the issue come back.
- After isolating the root of the issue, you can either keep the service disabled or reinstall its associated application.

Fix 5: Identify Process from Event Viewer
- Press “Window + X” from your keyboard and select the “Event Viewer” option.

Clicking on the “Event Viewer” button - Click on the “View” button and select the “Show Analytic and Debug Logs” option.
- After that, navigate through the following path.
Applications and Services Logs > Microsoft > Windows > WMI-Activity
- Click “Operational” and look for any errors. If there is an error, click it, and in the bar at the bottom left look for “ClientProcessId”, note down the number.
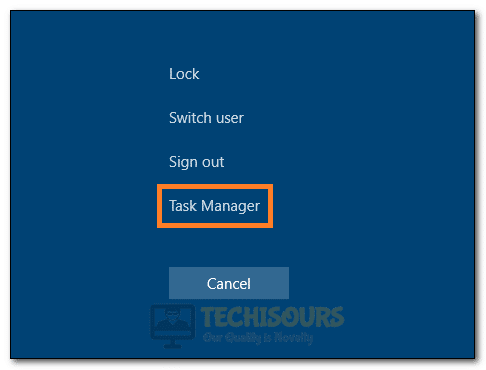
- Now, press “Ctrl + Shift + Esc”, click on Task Manager, and go to the “Services” tab.

Launching Task Manager - Look for the same PID which you noted down earlier, right-click that process, click “Go to details” and right-click the highlighted service and click “End Task”.

Fix 6: Performing SFC and DISK Scans
- Press “Windows + R” keys on your keyboard, type in “cmd” and press “Shift + CTRL + Enter” to launch with admin permissions.
Typing in cmd - After that, type in the following commands one by one and press “enter” to execute them.
sfc /scannow

DISM /Online /Cleanup-Image /CheckHealth

DISM /Online /Cleanup-Image /ScanHealth

DISM /Online /Cleanup-Image /RestoreHealth
- After executing these commands, restart your computer and check to see if the WMI Provider Host High CPU usage issue has been fixed.
Fix 7: Remove Virus/Malware
- Press “Windows + I” to launch into the settings, click on the “Update & Security” option and select the “Windows Security” button from the left side.

Update and Security - After that, click on the “Virus and Threat Protection” button from the right side and click on the “Scan Options” button from the next window.
- After that, check the “Full Scan” option and click on the “Scan Now” button to start the scan.

Perform a full scan - After the scan has been completed, restart your computer and check to see if the issue is now fixed.


Fix 8: Troubleshoot in Safe Mode
- Press “Window + R”, type in “msconfig” and press Enter on your keyboard.
Typing in “Msconfig” - In the “Boot” tab, tick “Safe boot” and choose “Network”.
- Click “Apply” followed by “OK” and then click “Restart”.
- Once in safe mode press “Window + X”, and select “Windows PowerShell (Admin)”.

Clicking on the “Windows Powershell Admin” option - Type in “msdt.exe -id MaintenanceDiagnostic” and press Enter.
- Click “Next” and wait for the troubleshooting process to end. If any issues are found, they will be highlighted, and possible solutions will be suggested.
- Now, type in “msdt.exe /id PerformanceDiagnostic” in the PowerShell Window and press Enter.
- Follow the same procedure and after the troubleshooting ends follow back through Step 1, and just untick the “Safe boot”.
- Restart your PC and see if the issue is resolved.

Fix 9: Reconfiguring Registry Settings
- Press “Window + R”, type in “Regedit” and press Enter on your keyboard.

Typing “regedit” - After that, navigate through the following path.
HKEY_LOCAL_MACHINE\SYSTEM\CurrentControlSet\Control\Session Manager\Memory
- On the left side, double-click on the “ClearPageFileAtShutDown” entry and change its value to 1 from 0.
- Restart your PC and see if the issue is resolved now.

Fix 10: Run System Diagnostic
- Press “Window + R”, type in “msdt.exe -id MaintenanceDiagnostic” and press Enter on your keyboard.
- Follow the on-screen instructions and reboot your PC afterward.
Fix 11: Repair WMI Service
- Press “Window + R”, type in “Winmgmt /salvagerepository %windir%\System32\wbem” and press Enter on your keyboard.
- Now type in “Winmgmt /resetrepository %windir%\System32\wbem” and press Enter.
- Restart your PC and check to see if the WMI Provider Host High CPU Usage issue has been fixed.
If the issue still persists, Contact Us for further troubleshooting.