Fix: Unable to Update the Minecraft Native Launcher [Complete Guide]
A lot of people have recently reached out to us concerning the Unable to Update the Minecraft Native Launcher error and we have recently gotten around to collecting and compiling the solutions to this issue. Basically, there are many possible factors at play due to which this error might be seen on your computer. In this article, we will be going through them all in order to analyze and identify a possible fix.

Make sure to read through the reasons due to which this error is triggered in the first place and also ensure that you start implementing the solutions one-by-one in the order in which they have been presented until one of them works for you.
What Causes the Unable to Update the Minecraft Native Launcher Error to be triggered?
After going through many user-mentioned solutions and workarounds, we came to the conclusion that the following must be the primary reasons due to which this error occurs.
- Damaged Installation: It is possible that your Minecraft installation might be damaged due to which you are running into the Unable to Update the Minecraft Native Launcher error while trying to update it on Windows or on Mac. Therefore, we suggest that you try and repair it to see if it ends up going away.
- Antivirus Issue: Sometimes, the Antivirus that you are using on your computer might be preventing the game from being able to run properly. Therefore, we suggest that you try and disable the Antivirus at least temporarily in an attempt to fix the error.
- Outdated Java: If you are getting the Unable to Update the Minecraft Native Launcher curseforge error on your computer, we strongly suggest that you try and update your Java to the latest available version out there and check to see if doing so fixes the issue.
- Outdated GPU Drivers: If the GPU drivers on your computer have been outdated, you will run into the error message while trying to update Minecraft. Therefore, we suggest that you check for the latest available drivers for your GPU and install them to fix the Unable to Update the Minecraft Native Launcher error.
- Temporary Files: Sometimes the temporary files built up on your computer’s cache mighe be affecting the updating process of the game and due to this, you might get the error message. Therefore, we suggest that you try and erase out these temporary files to fix the issue.
- Mods: Some mods can also affect the running of the game and therefore, we suggest that you try and remove all mods from your game and check to see if doing so has fixed the Unable to Update the Minecraft Native Launcher issue.
Now that you have been taken through almost all the mentioned solutions, we can finally start by implementing the solutions.
Fix Unable to Update the Minecraft Native Launcher Issue:
Solution 1: Repair Minecraft
Windows offers a repair tool for all applications and we are going to use it here as a first troubleshooting tip for Minecraft:
- Open up the “Run” dialog box using the “Window + R” keys together on your keyboard, in the address bar then type in “appwiz.cpl” and press “Enter”.

Typing “appwiz.cpl” - In the pop-up Programs and Features window scroll down to locate “Minecraft”, once located right click on it and select “Repair” from the drop down menu, then follow on-screen instructions to complete the process.

Repair Minecraft Launcher - Once done now see if the unable to update the Minecraft native launcher curse error message still exists or not.


Solution 2: Download Minecraft Directly From Minecraft.net
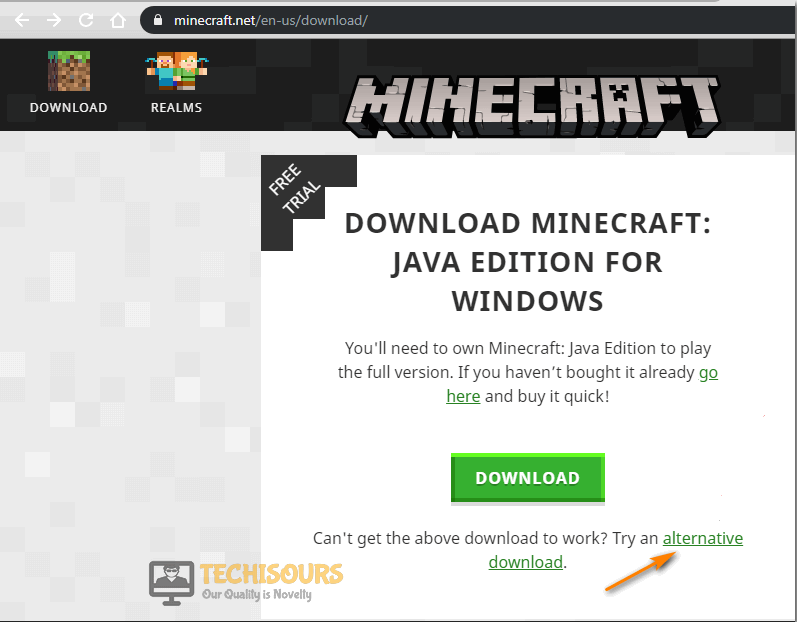
- Proceed to the official Minecraft download website, below the big green Download button click on “Alternative Download”, then follow up to the next page and select Windows alternative download type.

Try Minecraft Alternative Download - With this method you can also try deleting the Minecraft cache folder, to do so type in “%appdata%” in the Windows search bar and press “Enter”.
- In the new folder that opens up, right-click on the “Minecraft Folder” and select “Delete” from the drop-down menu, once deleted launch the file that you downloaded earlier.
Solution 3: Temporarily Disable Your AntiVirus
Sometimes the anti-malware service that you use can block programs from working properly, for that reason we will temporarily try turning off the anti-virus software. To disable Windows 10 Defender you can follow these steps:
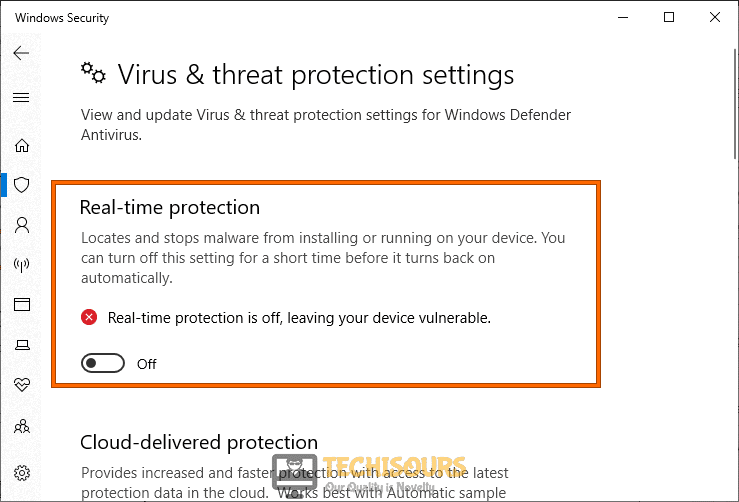
- In the search bar near the Start menu type in “Virus and Threat Protection” and press “Enter”, in the pop-up window select “Manage Settings” below Virus and Threat Protection Settings.

Virus and Threat protection - Then click on “Real Time Protection” and turn it “OFF” using the toggle button in front, press “YES” if any administrative privileges are asked.

Disable Real-time protection

Solution 4: Run the Compatibility Troubleshooter
- On your desktop right-click on the “Minecraft Shortcut” and select “Open File Location” from the drop-down menu.
- In the following window now locate the “Minecraft Launcher.exe” and right-click on it to select “Troubleshoot Compatibility” from the drop-down menu, next follow the on-screen instructions to complete the process and select the “Use recommended compatibility settings” option at the end.
Solution 5: Update Java
Some users were able to solve the issue after they updated their Java to a newer version. To do so proceed with the steps below:
- In the Windows search bar type in “Apps and Features” and press “Enter”, in the pop-up window scroll down in the list of installed programs to locate “Java”.
- Once Java is located, select it and press the “Uninstall” button. Next, follow on-screen instructions to complete the process.

Uninstall Java - Once uninstalled, go to the official Java website and download its latest version.

Solution 6: Update Graphic Drivers
If your Video-Card drivers are out of date, you can experience the error. So, try updating your graphic drivers in this regard:
- In the windows search bar type in “Device Manager” and press “Enter”, in the pop-up window extend the menu for “Display Adapter”.

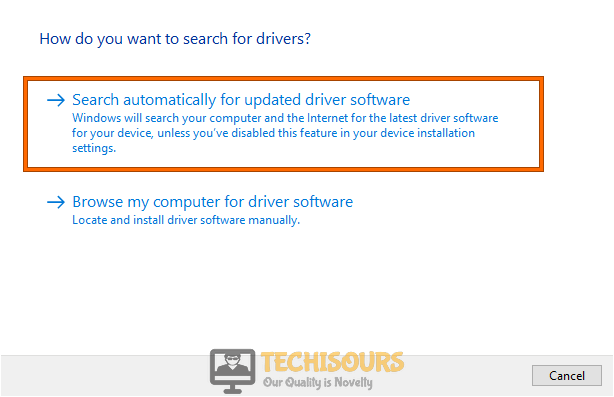
Type Device Manager - In the Display Adapters menu right click on your “Graphics Card” and select “Update Driver” from the drop down menu, in the following window then select “Search Automatically For Updated Driver Software”.

Search automatically for updated driver - Windows will now start looking for drivers on the internet and will install them automatically on your system and after updating drivers most probably unable to update the minecraft native launcher windows issue would be rectified.

Solution 7: Remove Mods
If you use Mods on Minecraft, try deleting them. It’s because mods can cause a lot of issues in your game especially if they don’t belong to a well-known Modder.
Solution 8: Run Minecraft In Admin Mode
- Right-click on the “Minecraft Shortcut” on your desktop and select “Open File Location” from the drop-down menu, in the Minecraft folder now locate the “Minecraft Launcher.exe”.
- Once located right click on the “.exe file” and select “Properties”. In the Compatibility tab now check the box in front of “Run This Program As Administrator”.
- When completed “Apply” all the changes made and click on “OK”.
Solution 9: Update Your Windows
An older version of Windows can be defective and for a newer version of an app, try to keep your Windows up to date to make sure all your programs work smoothly. For this carry out these steps:
- In the Windows search bar type in “Check For Updates” and press “Enter”, when the new window opens up click on the “Check For Updates” button at the top.

Check For Updates - Windows will now start looking for the latest updates, if any updates are found they will be “Downloaded” and “Installed” automatically on your system.

Solution 10: Uninstall Troublesome Applications
If you’ve started getting the error recently after installing a new program, there’s a chance that the new application is messing with your Minecraft Launcher and causing errors. In this regard you can use the method below to uninstall the troublesome program:
- Open up the “Run” dialog box using the “Window + R” keys together on your keyboard, in the address bar then type in “appwiz.cpl” and hit the “Enter” key.
Typing “appwiz.cpl” - In the pop-up Programs and Features window scroll down the list to locate the “Troublesome Application”, once located right-click on the program and select “Uninstall” from the drop-down menu, then follow the on-screen instructions to complete the process.
Solution 11: Delete Temporary Files
Junk files are stored on your computer in a folder named temp, you should routinely delete files inside the Temp folder to avoid having any such errors.
- In the Windows search bar type in “%temp%” and press “Enter”.
Typing in “%temp%” - In the pop-up Temp window, select all the content using the “Ctrl + A” keys together and then press the “Shift + Del” keys to permanently delete all of the files.

Solution 12: Add Minecraft To the Exception List Of Windows Defender
Instead of disabling your Anti-Virus, you can add Minecraft to the exception list of your Anti-Virus, this will make your Anti-Virus ignore scanning Minecraft for malware.
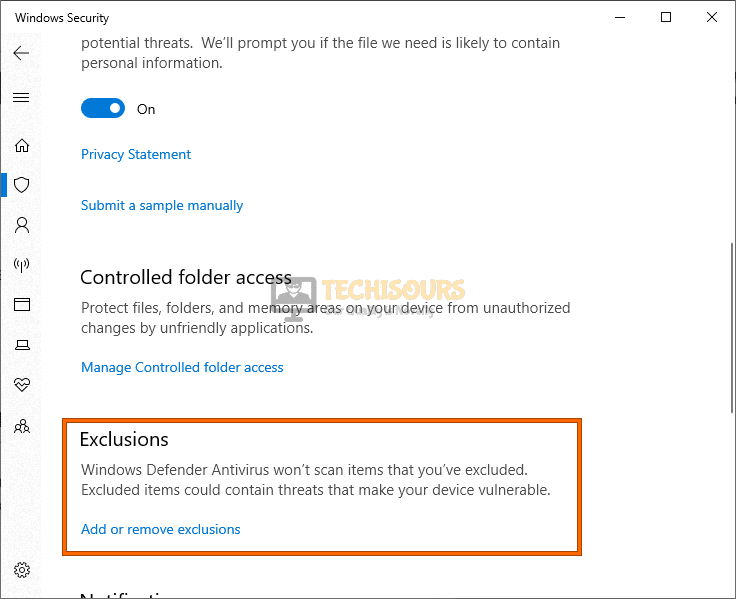
- In the search bar type in “Virus and Threat Protection” and press “Enter”, in the new window select “Manage Settings” under Virus & Threat Protection Settings.
- In the Manage Settings page scroll down to locate “Exclusions”, under Exclusions click on “Add Or Remove Exclusions”.

Add or remove exclusion - Then click on “Add An Exclusion”, browse to the Minecraft Folder and add it to the exception list.
Solution 13: Update Minecraft Manually
- Navigate to the “Minecraft Folder” on your PC, in the resource folder open the “Second Link” to download the binary files for Minecraft. To download the files select the appropriate version of your Minecraft.
- The link will provide you with the jar file but we also need to get the json file, if it is not listed you have to make your own link then. To make your own link rename the first link you used to download the jar file to something like this:
jar link:

http://s3.amazonaws.com/Minecraft.Download/versions/b1.6.6/b1.6.6.jar
json link:

http://s3.amazonaws.com/Minecraft.Download/versions/b1.6.6/b1.6.6.json
Note: The difference between these links is that we only renamed the jar to JSON.
- Once both files are downloaded, go to the “Minecraft Folder” and then into the “Versions Folder”, now you can make a new profile or just edit an existing one.
- To make a new profile, right-click on an empty area and create a new “Folder”, rename the folder to anything you want. Now paste both the downloaded files inside the newly created folder.
- Once both files are pasted go back to the Minecraft folder and locate “launcher_profiles.json”. Right-click on the file and open it in “Notepad” or “Notepadd++”.
- In the Notepad paste the following code under the profile line:
"[Edit Me]": {

"name": "[Edit Me]"

},
To use an existing profile just replace the jar and JSON files inside the existing profile folder.
- Once all changes are done open up the “Launcher” and choose the profile you made/edited and then click on “Edit Profile”.
- In the “Version Selection” choose the appropriate and then select the “Version” from the drop-down menu, once done click on “Save Profile” at the end to save all the changes.
Solution 14: Reinstall Minecraft
If none of the methods worked for you all you are left with now is to Reinstall Minecraft. For this do the following steps:
- Open the “Run” prompt using the combination of “Window + R” keys and in the search bar type in “appwiz.cpl”.
Typing “appwiz.cpl” - In the Programs and Features window scroll through the list of programs to locate “Minecraft”.
- Once located right-click on it and select “Uninstall” from the drop-down menu.
- When Minecraft gets completely uninstalled, download its latest version from the official Minecraft website and install it.
Hopefully, until now you’d be able to fix your problem but if you still have any further questions or queries then feel free to Contact Us here for help.