Easily Fix Steam Stuck on Allocating Disk Space Issue [Complete Guide]
While installing a new game or an update, Steam users are reportedly facing the “Steam Stuck on Allocating Disk Space” issue, and in this article, we have managed to address it in detail. Not only have we provided a plethora of different users that have worked for our users, but we have also provided a detailed insight as to why this issue occurs in the first place.

What causes the Steam Stuck on Allocating Disk Space Error?
After having to go through most of the solutions that were effective for different users, we came to the conclusion that the following must be the most important reasons due to which this error occurs in the first place.
- Download Region: It is possible in some cases, that the error is being triggered because the Download region that you have selected is facing issues with its servers. Therefore, we recommend that you try to switch the download region as we have mentioned below in order to get around this issue.
- Firewall/Antivirus: In certain cases, the Firewall or the Antivirus that you are using on your computer might be preventing the network packets from reaching your computer or it might be constantly scanning the download location due to which the Steam Stuck on Allocating Disk Space issue is being triggered.
- Overclocking: For some users, overclocking can turn out to be a nightmare with software compatibility and that might actually be the case for you. Since overclocking your hardware means running it beyond its recommended or factory default setting, it might raise software incompatibility issues.
- Corrupted Cache: The download cache that is built up by Steam might have gotten corrupted in some cases due to which the Steam Stuck on Allocating Disk Space error might be triggered. Therefore, we suggest that you try to fix it by clearing it out and having Steam regenerate it to fix the steam install stuck on allocating disk space issue.
Now that we have taken you through the reasons behind this issue, it is time that we start implementing the fixes.
Before you Start:
- Restart your Computer: In some cases, it might be the case that your computer didn’t start properly. Therefore, we suggest that you click on the “Windows” icon at the bottom left side, click on the “Power” icon and then hold down shift while you press the “Shut Down” button. This will completely shut down your computer and get rid of the launch configurations. After this, check to see if the issue still occurs after starting the computer back up.
- Run Steam as Administrator: Right-click on the “Steam.exe” on your desktop or from the Steam installation folder and click on the “Run as Administrator” button. After this, check to see if the Steam Allocating Disk Space process goes smoothly.
Fixing the Steam Stuck on Allocating Disk Space Issue:
Solution 1: Changing Download Region
- First of all, Run Steam as administrator as indicated in the 2nd step above and make sure that you log into your account.
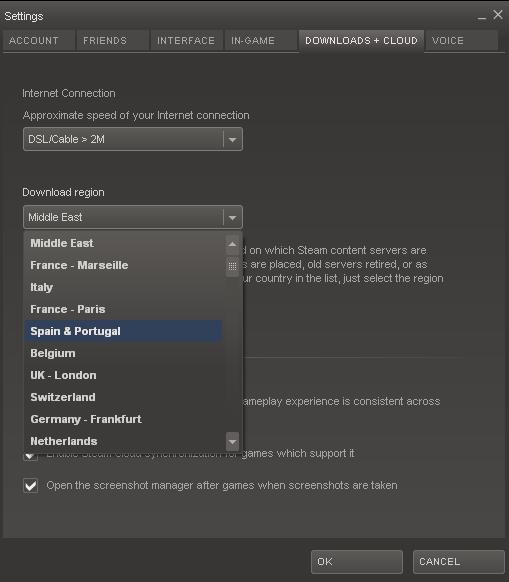
- Click on the “Steam” button at the top left side and from there, click on the “Settings” option.

Steam Settings - Select the “Download” button and under the “Download Region” dropdown, select a different region than the one that has been currently selected.

Switch the Download Region - Check to see if doing so helps you in bypassing the Steam Stuck on Allocating Disk Space issue.

Solution 2: Refresh Steam Installation
- Press “Windows + R” on your keyboard to launch the Run prompt, type in “Taskmgr” and press “Enter” to launch into the task manager.

Typing in “taskmgr” - Inside the task manager, click on the “Processes” heading and from the list of processes running on the computer, click on the “Steam” process or any related process and select the “End Task” button to end them.

Ending Steam Processes - After ending all of the processes, make sure to navigate to the Steam installation folder which is most commonly the “C: /Program Files(x86)/Steam” location.
- In here, select all the folders and files except the “Steamapps” and “Steam.exe” files.
- After selecting all the other folders, press “Shift” + “Delete” on your computer to remove them permanently.
- Confirm any prompts and wait for the deleting process to be finished.
- Double-click on the “Steam.exe” executable and it will automatically reinstall all of the missing files.
- Check to see if doing so fixes the Steam Stuck on Allocating Disk Space error.


Solution 3: Disable the Windows Defender Firewall
- Press “Windows + R” to launch into the Run prompt, type in “Firewall.cpl” and press “Enter” to launch into the Firewall control panel.

Typing in “firewall.cpl” - Inside here, click on the “Turn Windows Defender On or OFF” button on the left side.
- From there, make sure to check the “Turn OFF Windows Defender Firewall” option for both the Public and Private Network heading.

Turn off Windows defender firewall - Click on “OK” to make sure that your changes are saved and exit out of the window.
- Check to see if doing so helps in fixing the Allocating disk space issue with Steam.


Solution 4: Disable Overclocking on your Computer
Sometimes this issue might just be a side effect of overclocking on your computer. While overclocking can push your hardware to its limits to extract more performance out of it, it can also make your computer more prone to glitches and errors due to certain software configuration limits. Therefore, we would suggest you temporarily turn off overclocking on your computer and then check to see if the Steam Stuck on Allocating Disk Space issue is fixed.
Solution 5: Clear the Download Cache
- Right-click on the “Steam.exe” from your desktop and select the “Run as Administrator” option.
- After running Steam as an administrator, click on the “Steam” option at the top right side and select the “Settings” button from there.
- In the settings, click on the “Download” tab and select the “Clear Download Cache” button.

Clear download cache - Click on “OK” and exit out of the Steam application.
- Check to see if doing so fixes the issue.

Solution 6: Register Game as Installed
- Press “Windows + R” keys on your keyboard, type in “Taskmgr” and press “Enter” to launch into the task manager.

Type in taskmgr - From the task manager, select the “Processes” heading, click on the “Steam” process or any related process and click on the “End Task” button to end them.
- Navigate here and note down the App ID of your game from the list.
- Now, navigate to the folder in which the game is being downloaded, typically, the address should look like the following.
C:\Program Files (x86)\Steam\steamapps\downloading
- Inside this folder, make sure to right-click on the folder that matches the game’s App ID that we noted down before.
- Select the “Rename” option and changes its name by adding a number or a couple of numbers in front of it.
- Open the folder, press “CTRL + A” to select all files and press “CTRL + C” to copy them.
Note: We will discuss where to paste them later. - After changing the name and copying the files, move to the following address.
C:\Program Files (x86)\Steam\steamapps\common
- Inside this folder, create a new folder and name that is similar to the game that you are facing the issue with while installing.
- Now, inside this folder, paste the files that we copied in the 7th step.
- After that, move out to the “Steamapps” folder, right-click anywhere and click on the “New > Text Document” option.
- Name this new text document as “appmanifest_(AppID that we noted down without brackets)“. For example, if the game’s AppID was 5067, you would name this file as “appmanifest_5067”.
- Open this newly created file and paste the following text inside of it. Remember to replace “5067” and the “(GAMEFOLDERNAME) entries with the App ID and the name of the game folder that we created respectively.
"AppState" { "appid" "5067" "Universe” "1" "installdir" "C:\Program Files (x86)\Steam\steamapps\common\(GAMEFOLDERENAME)" "StateFlags" "4" } - After entering the information properly, click on the “File” button at the top left side and select the “Save As” option.
- Click on the “File Type” dropdown and select “All Files” and then save the document as “appmanifest_(AppID of the game).acf“.

Creating ACF file - After saving the above document, launch Steam and click on the “Library” option and you will see the game listed in your game library.
- Right-click on the game, select “Properties”, click on the “Local Files” tab and select the “Verify Integrity of Game Files” option.
- Wait for the scanning and the downloading process to be finished and check to see if you are able to fix the Steam Stuck on Allocating Disk Space error on your computer.


Solution 7: Disable Steam Cloud
- Right-click on the “Steam.exe” on your desktop and select “Run as Administrator” to launch Steam in admin mode.
- Click on the “Steam” button at the top left and select the “Settings option.
- In the settings, click on the “Cloud” option on the left side and uncheck the “Enable Steam Cloud Synchronization for Applications which Support it” option.

Unchecking the Steam Cloud Sync Option - Click on “OK” to save your changes and check to see if the Steam Stuck on Allocating Disk Space issue has been fixed.

Solution 8: Perform Corruption and Harddrive Scans
- Press “Windows + R” to launch into the Run prompt, type in “cmd” and then press “Shift + CTRL + Enter” to launch with admin permissions.
- Type in the following commands one by one to run the scans on your computer.
sfc /scannow

chkdsk /f C:

sfc / scannow - After the scans finish running, check to see if the error message still occurs.

Solution 10: Delete Scheduled Task
- Press “Windows + R‘ to launch into the Run prompt, type in “taskschd.msc” and press “Enter” to launch into the task scheduler.
Typing “taskschd.msc” - From the left side, expand the “Task Scheduler Library” dropdown and then go to “Microsoft” and then click on “Windows”.
- In here, search for a folder that contains the “ehdrminit” file which is usually the “Media Center” folder.
- Right-click on the file and click on the “Delete” option and check to see if you are able to fix the error.
- Restart your device to check if the issue is solved or not.

Solution 11: Delete Small Files
- On your computer, open the following path.
C: /Program Files(x86)/Steam/steamapps/common
- In here, locate every file that has “0 KB” as its size and remove it from your computer.
- Restart Steam and check to see if you are able to fix the error message.
Solution 12: Disable the Write Protection on your Disk
- Press “Windows + R” to launch into the Run prompt, type in “cmd” and then press “Shift + CTRL + Enter” to launch with admin permissions.

Typing in cmd - Type in the following commands one by one and check to see if the error is fixed.
Diskpart

List disk

Select disk 1 (REPLACE 1 With NUMBER OF DISK)

Attributes disk clear readonly

Remove disk read only attributes
- Once the process is completed, simply relaunch your steam client and check if the error still exists or not.

Solution 13: Repair the Steam Library Folder
- Right-click on the “Steam” icon on your desktop and select the “Run as Administrator” option.
- Click on the “Steam” option at the top left side and select the “Settings” button from it.
- Click on the “Downloads” option from the left side and select the “STEAM LIBRARY FOLDERS” button from the right.
- Right-click on the folder where you are looking to install the game and select the “Repair Library Folder” button.

Clicking on the “Repair Library Folders” option - Wait for the process to be finished and check to see if the Steam Stuck on Allocating Disk Space error is fixed.

Solution 14: Disable Real-Time Protection
- Press “Windows + I” on your keyboard, click on the “Update and Security” option and then select the “Windows Security” button from the left side.
- Select the “Virus & Threat Protection” option and then click on the “Manage Settings” option under the “Virus & Threat Protection” heading.

Manage Settings - From here, make sure to turn off the “Real-Time Protection” toggle to disable the Antivirus on your computer.
- After doing so, check to see if you are able to fix the issue and enable the Antivirus again.

Solution 15: Change/Upgrade Hardware
It is sometimes possible that the hardware being used is out of date due to which the error is being seen. Therefore, we recommend that you try to switch out the hardware and then check to see if doing so fixes this issue for you.
If the issue still occurs, feel free to Contact Us for further troubleshooting.