Easily Fix Steam Corrupt Disk Error [Complete Guide]
Steam users have been recently coming to us with the Steam Corrupt Disk while Downloading an error that shows them the “An error occurred while updating Game (Disk Read Error)” or any other error message with the Steam Corrupt Disk Error. This is mostly triggered due to any interruption or failure while Steam is downloading a game or an update.

In this article, we have dedicated ourselves to fixing this error and have also listed the reasons due to which it is triggered in the first place. Also, we have listed the fixes that the user can implement on their own which will allow them to completely get rid of the error from their PC.
What Causes the Steam Corrupt Disk Error?
After going through a bunch of different users’ feedback, we concluded that the following must be the most prominent reasons due to which this error occurs in the first place.
- Steam Installation: It is possible that your Steam installation has been corrupted due to which you are running into the Steam Corrupt Disk Error and to circumvent this, you can try to relocate the Steam installation and to do this, follow the steps that have been mentioned below.
- Outdated Operating System: The Operating system, if outdated, can also cause this error message. Therefore, we recommend that you try and install the latest available updates to the operating system and then check to see if doing so fixes the Steam Corrupt Disk issue.
- Outdated Drivers: It is also possible that the Drivers installed on your computer might have been outdated and they can sometimes cause this issue because Steam can face errors while trying to scan your Storage device. Therefore, we recommend that you install all the available updates.
- Antivirus Issue: The Antivirus installed on your computer might not be allowing the Steam app from being able to properly read your drives. Therefore, we recommend that you either let the app through your Antivirus or disable it temporarily to fix the Steam Corrupt Disk Error.
- Game File Integrity: The integrity of your game files might be damaged due to which you are getting this issue. Therefore, we recommend that you try and check your game file integrity as mentioned in the solution below and check to see if verifying it lets you fix this issue.
- Steam Beta: The Steam app might be running in the beta mode which uses some unconfirmed updates from Steam to test out new features and this can sometimes cause this error message. Therefore, we recommend that you opt-out of beta and check to see if doing so fixes the issue.
- App Cache: The App cache folder that contains all the cache created by the applications installed on your system might have acquired some corrupted cache. Therefore, we recommend that you clear out the app cache folder and then check to see if doing so fixes your issue.
- Steam Library Folder: The Steam Library folder might not be set properly due to which this error might be triggered. Therefore, we recommend that you repair this folder and confirm that you are able to fix the Steam Download corrupt Windows 10 issue.
- Driver Issue: The Drivers installed on your system might be interfering with some Steam features and due to this the error message can sometimes be seen. Therefore, we recommend that you rollback or reinstall certain drivers that are known to cause conflicts with Steam.
Now that you have been taken through almost all the reasons behind this error, we can finally move on towards implementing the solutions.
Fixing the steam corrupt disk while downloading issue:
Solution 1: Relocate Steam Installation and Game Files
- First, launch the “Steam Client” and click on the “Steam tab” in the upper left corner. Click on the “Settings” option and navigate to the “Downloads” in the left menu pane.
- Click on the “Add Library Folder” option and select a new location for your Steam on your Hard drive. Once selected, click on “Move Folder” to move all your files.

Add library folder - Now press the “Window + E” keys together on your keyboard, and switch to “This PC”. Navigate to the folder where Steam is downloaded. By default, you can find it at “C:\Program Files (x86)\Steam.”
- Now leaving the “SteamApps, UserData and .exe files and folders,” delete all the other content present in the directory.
- Then press the “Ctrl + X” keys simultaneously on your keyboard to cut the files. Navigate to the new directory of Steam and press “Ctrl + V” to paste these files.
- Afterward, “Restart“ your computer and launch Steam again to check if the corrupt disk steam error got removed.

Solution 2: Update Your Windows
- Go to the “Start Menu” located on the bottom left of the screen, here search for “Settings” and click to select it from the list of search results.
- Then proceed to select “Updates and Security” and in the following window click to select the “Windows Update” option.
- Here click on the “Check For Updates” option available and install any latest updates available if they are present and afterward restart your computer.

Check for updates - When your PC gets updated now proceed to verify if the steam corrupt disk error got resolved.

Solution 3: Update Your Graphics Cards Driver
For this step, you have to know the graphics card you are using on your PC. If you already know this, skip Step 1 and Step 2.
- Press the “Window + R” keys together on your keyboard to open up the “Run” prompt. In the Run prompt type in or paste “devmgmt.msc” to open the “Device Manager” window.

Typing devmgmt.msc in the Run prompt - Here locate the “Display Adapters” option and double click on it to extend it further. This will show you the particular graphics card installed on your PC.
- Once you know your graphics card, open your browser and type in “[your graphics card name] drivers.” Fill in the bracket with the name of your graphics card. If you are directed to your graphics card manufacturer website, navigate to the “Drivers & Utility or Drivers & Support” section, browse for your Graphics Card and download the latest driver present.
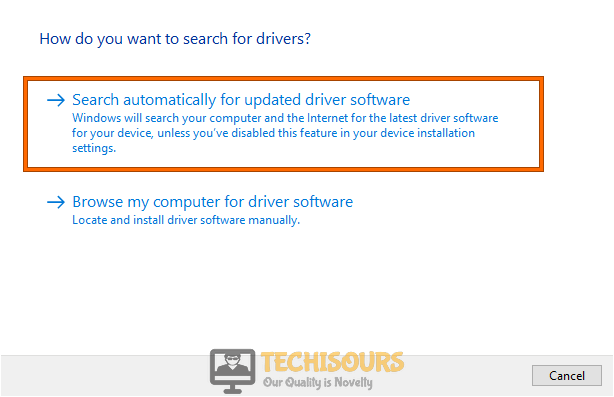
- Once downloaded, get back to the “Device Manager” and right-click on your “Graphics Card,” and proceed by clicking on “Update Drivers” in the menu. Then proceed by clicking on “Search Automatically For Updated Driver Software” and wait for a while until the computer finds and installs the updated drivers.

Search automatically for updated driver - It is recommended to “Restart” your computer and try running the game after it restarts.

Solution 4: Disable Antivirus Temporarily
- Open your desktop and right-click on the antivirus icon.
- From the popup context menu, choose to select “Disable”.

Disable antivirus - Once disabled, you can then “Install” or “Update” your game and enable the antivirus back once complete.

Solution 5: Whitelist Steam In Windows Firewall
- Press the “Window + R” keys together on your keyboard to open up the “Run” dialog box. In the Run prompt type in “control firewall.cpl” and press “Enter” to open “Windows Defender Firewall”.

Typing Control firewall Command - Next click on “Allow An App Or Feature Through Windows Defender Firewall” in the menu pane on the left.
- Then click on the “Change Settings” option in the “Allowed Apps” window. Click to select “YES” if you come across any permission prompts.
- Next click on “Allow Another App” at the bottom of the window in the “Allowed apps” and browse the “Steam.exe” file in the “Add An App” window. Typically it is located in “C:\Program Files\Steam\bin.” Do the same with the .exe file of the game causing the problem.
- Then check the “Private and Public” boxes of both of the entries and click to select “OK”.
- Get back to the “Windows Defender Firewall” window and click on “Advanced Settings” in the menu pane on the left. Click on “YES” if you come across any permission prompts.
- Navigate to click the “Inbound Rules,” located on the left side of the window, and under the “Inbound Rules” drop-down menu on the left proceed to select “New Rule” under the “Actions” menu.

Clicking on the “New Rule” option - The “New Inbound Rule Wizard” dialogue box will open up. Click on the “Port” option and click on “Next.”
- At the “Protocols and Ports” step, choose the “TCP” option and then select the “Specific Local Ports” option.
- Now paste the following ports in the order as listed and select “Allow the Connection” each time you press “Next”. Do this for all the following entries:
27015--27030

27036

27015
- Similarly, add another rule for UDP and select the “UDP” and “Specific Local Ports” option instead of “TCP,” this time following the same previous steps:
27015--27030

27000--27100

27031-2703

4380

27015

3478

4379

4380
- Once all the ports are added, click on “Next” and make sure that all three options, “Domain,” “Public,” and “Private,” are checked.
- Hit “Next” and name your rules. Proceed by clicking on “Finish” and finally restart your computer.


Solution 6: Verify Integrity of Game Files
- Right-click on Steam and unselect “Run As Administrator.” Then navigate to the game that failed to update in the “Steam Library.”
- Right-click on the game, select “Properties,” and move to the “Local Files” tab. Click to select the “Verify Integrity of Game Files.”

Verify Integrity of the Game Files - Launch and play the game like normal and check to see if the steam corrupt disk reddit error got eradicated.

Solution 7: Repair Partitions
- Press the “Window + E” keys simultaneously on your keyboard to open up the “File Explorer” window and navigate to “This PC”.
- Right-click on each of the storage drives and select “Properties” from the drop-down menu.
- Move to the “Tools” tab and click on “Check” to start the Error Checking process. Then click on “YES” if you receive any system permissions.

Clicking on Check Option

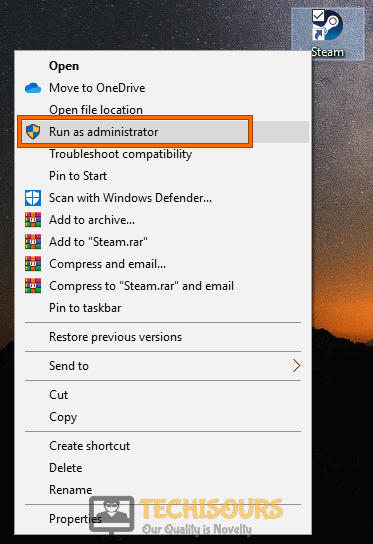
Solution 8: Run Steam In Admin Mode
- Open the “Steam directory” where you have downloaded Steam, typically the location is “C:\Program Files (x86)\Steam.”
- Locate the executable file named “steam.exe” and right-click on the file to select “Properties” from the drop-down menu.
- Switch to the “Compatibility” tab and check the “Run This Program As Administrator” option under the “Settings” tab.

Run Steam as administrator - Click on “Apply” for the changes to take effect and now click on the same “steam.exe” file to see if the steam download corrupt windows 10 problem is resolved.
Solution 9: Update the Steam To Beta Client
- First, launch the “Steam client” and click on the “Steam tab” in the upper left corner.
- Next, click on the “Settings” option and navigate to the “Accounts” tab in the left menu pane.
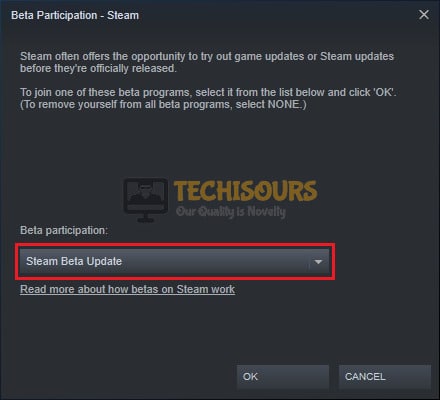
- Under the “Beta Participation” section click to select the “Change” button.
- Then choose the “Steam Beta Update” option in the context menu and click on “OK”.

Choose Steam Beta Update - Finally, click on the “Restart Steam” option to allow the settings to take effect.
Solution 10: Opt Out Of Steam Beta
- First, launch the “Steam client” and click on the “Steam tab” in the upper left corner.
- Click on the “Settings” option and navigate to the “Accounts” tab in the left menu pane.
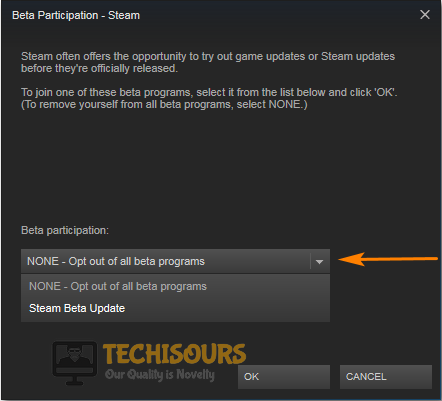
- Under the “Beta Participation” section click on the “Change” button.
- Choose the “NOTE – Opt-out of all beta programs” option in the context menu and click to select “OK”.

Opt-Out Of All Beta Programs - Restart your computer which will save you from the hassle of ending all steam-related tasks (Steam Client Bootstrapper, Steam Client Web helper, Steam Client Service) individually from the task manager.
- Once your computer has been restarted, open the “Steam Client” again and launch your game from the “Library” tab again.
Solution 11: Delete the Contents Of Downloading Folder For CSGO
Though this only works for CSGO players, you can try the same for any Steam game that is giving you this error. Follow the below-listed steps:
- Press the “Window + E” keys together on your keyboard to open up the “File Explorer” window and navigate to “C:\Program Files (x86)\Steam\steamapps\downloading”.
- Select all the contents from the “Downloading” folder and hit the “Shift + Delete” keys together on your keyboard to delete that folder. You can also name it “download.old” and delete it later after updating.
- Open Steam again and try to update “CSGO” back again. If the error still persists, then you are advised to “Restart” your PC.
- Upon reboot, launch Steam again and try to update. This will re-download the complete “CSGO Update”.
- Once the update is finished, “Verify Integrity of Game Files” by following the steps in “Solution 6” above and then launch CSGO.
Solution 12: Change Download Region and Delete Local Content
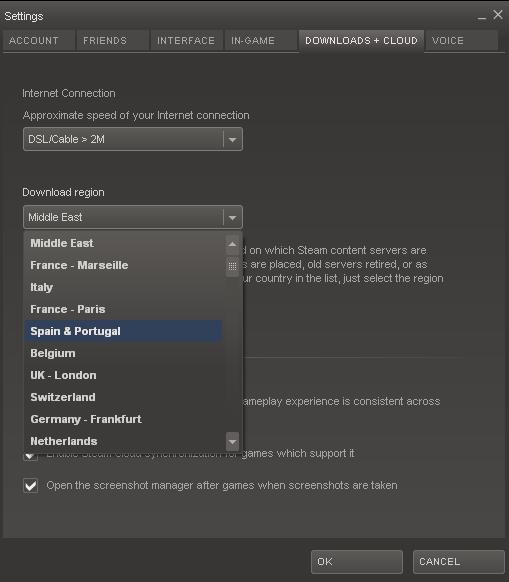
- First, launch the “Steam client” and click on the “Steam tab” in the upper left corner. Click on the “Settings” option and navigate to the “Downloads” in the left menu pane.
- Select the region “Closest to You” under the “Download Region” section. Or you can test out different regions to find out what region gives you the best download speed.

Select the Download Region - Also, scroll to the bottom and click on the “Clear Download Cache” button.
- Now move over to the “Steam Library” and right-click on the problematic game.
- Next, click on “Delete Local Content” from the context menu and select “Delete” to confirm.

Delete Local Content - Now select the game again and redownload it once again. Don’t forget to “Verify Game Files” afterward as mentioned in “Solution 6” above.

Solution 13: Run CHKDSK Command to Check Disk Error
- Right-click on the “Windows icon” and select “PowerShell (Admin)” from the drop-down menu.
- Paste the command “chkdsk /f /r” ” in the window and hit the “Enter” key.
- Lastly, “Restart” your computer to see if the error exists or not.
Solution 14: Delete the App cache Folder
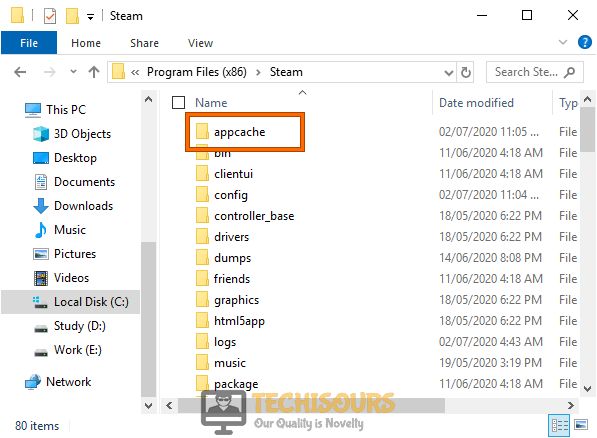
- Press the “Window + E” keys together on your keyboard, and switch to “This PC”. Navigate to the “appcache folder”. By default, you can find it at the “C:\Program Files (x86)\Steam” location.
- Locate and delete the “appcache” folder and restart your computer.

Delete the appcache folder - Upon restart, launch Steam again and try updating the problematic game.
- Check to see if the Steam Corrupt Disk Error is gone.
Solution 15: Tweak Power Setting
- Press the “Window + R” keys simultaneously on your keyboard to open up the “Run” dialog box. Here paste or type “powercfg.cpl” in the dialog box and press “Enter” to open up the “Power Options”.

Typing in “powercfg.cpl” - Then click on the “Change Plan Settings” in front of your selected “Power Plan” and then click on the “Change Advanced Power Settings” from the “Edit Plan Settings” window.
- In the pop-up “Power Options” window click on the “Hard Disk” to expand it and then click on “Turn Off Hard Disk After”.
- Now change this value to “Never” and follow the same steps for each “Power Plan” present on your computer.
- Once done now proceed to verify if the steam corrupt disk while downloading error got removed completely.

Solution 16: Backup and Reinstall Steam
Backup Steam:
- First, launch the “Steam client” and click on the “Steam tab” at the upper left. Then click on the “Settings” option, navigate to the “Downloads” in the left menu pane and click on “Steam Library Folders” under the “Settings” window. This will tell you all the libraries you have to backup.
- Next press the “Window + E” keys together on your keyboard, and switch to “This PC.” Locate the “Downloading” folder inside the “steamapps” folder. By default, it is present in “C:\ program files (x86)\Steam\ steamapps”.
- Select the steamapps folder and right-click on it to select “Copy” from the context menu.
- Navigate on the desktop or in a drive to make another folder. Right-click on your desired location and select “New > Folder” from the context menu. Name the folder as “Steamapps Backup”.
- Repeat the same process for all your game libraries.
Reinstall Steam:
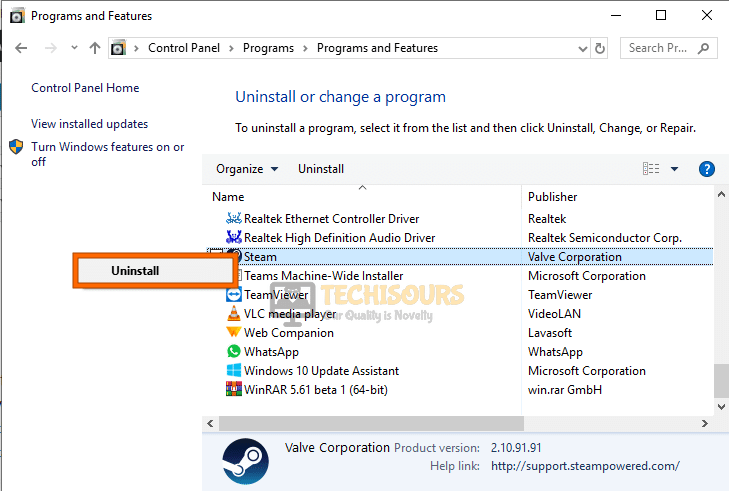
- Press the “Window + X” keys together on your keyboard and in the pop-up menu, click on “Apps and Features/Programs and Features”.
- In the “Apps and Features/Programs and Features” window, locate “Steam”.
- Right-click on it and select “Uninstall or Uninstall/Change”. Click to select “YES” on the “permission prompt” and follow the onscreen instructions to uninstall.

Uninstall Steam - Once uninstalled, click on “Finish” to exit the “Uninstallation Wizard” and download Steam again.
- Execute the “steam.exe” file from the downloaded folder and follow the onscreen instructions to reinstall it.
- After successful installation “Log In” back, launch your game and hopefully steam corrupt disk issue would be resolved by now.
Solution 17: Repair Steam Library Folder
- First, launch the “Steam client” and click on the “Steam tab” at the upper left. Click on the “Settings” option and navigate to the “Downloads” in the left menu pane.
- Click on “Steam Library Folders” located under the “Content Libraries Option.”

Steam library folder - In the “Steam Library Folder” dialogue box, right-click on the default folder and click on “Repair Library Folder.”

Repair Library Folder - Once scanned, try downloading the games again to check whether the steam corrupt disk problem still exists.


Solution 18: Roll Back Your Drivers
- Press the “Window + S” keys simultaneously on your keyboard to open up the “Search” menu. Type or paste “Device Manager” in the search bar to open up the “Device Manager” window.

Typing in Device Manager - Locate the “Display Drivers” menu and double click on it to extend it further. Right-click on the extended option which would technically be your “Graphics card” and then proceed to “Properties”.
- Switch to the “Driver” tab on the “Properties” window, click on “Roll-Back Drivers” and press “OK”.
- Check to see if doing so lets you fix the Steam Corrupt Disk Error.

Solution 19: Turn Off Windows Defender Firewall
- Open the “Start menu” on the bottom left corner of your screen or simply press the “Windows” button on your keyboard. From here locate and open “Settings.”
- Once in the Settings window locate the “Update and Security” option and click to select it. Then select the “Windows Security” from the left menu pane.

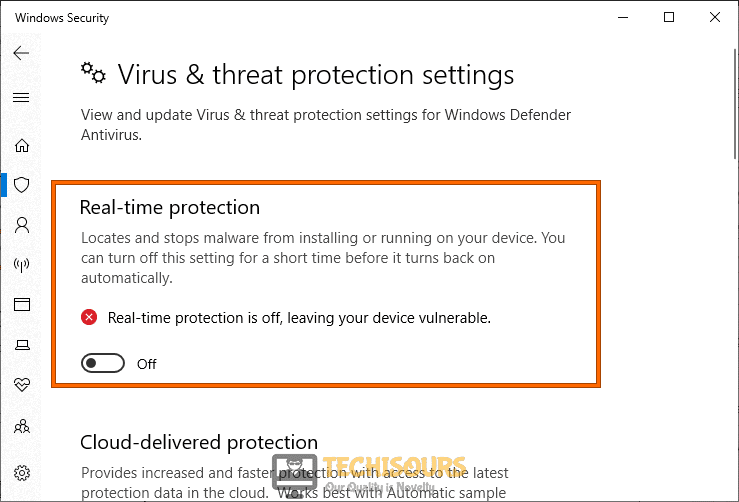
Choose Update and Security - Then proceed to “Virus and Threat Protection” under the “Protection Areas” section. In the new dialogue box, navigate to “Virus and Threat Protection Settings” and click on “Manage Settings.”
- Now turn “OFF” the button located under the “Realtime Protection.” Click on “YES” when the permission dialogue box pops up, and you’re good to go.

Disable Real-time protection

Solution 20: Delete 0 kb Files
- Press the “Window + E” keys together on your keyboard, and switch to “This PC”. Navigate to the “steamapps folder”. By default, it is present in “C:\ program files (x86)\Steam\ steamapps.”
- Once you have reached the “steamapps folder”, delete any files having “0 Kb” size. You can check it by looking into the “Size” column.
- Afterward, check to see if the steam download corrupt disk error got fixed.
Solution 21: Uninstall the Problematic Software
Any recently installed software might be interfering with Steam and causing it to crash. To avoid such instances, simply uninstall any program that has recently been installed on your computer.
Hopefully, the list of detailed fixes indexed above would be enough to get through the error easily but still if you face any difficulty in resolving it completely you may Contact Us here for assistance.