Easily Fix Samsung Internet Keeps Opening by Itself [Complete Guide]
The Samsung Internet Browser is the default one on most Samsung devices and a lot of users have been complaining that Samsung Internet Keeps Opening by Itself. Therefore, in this article, we have set out to provide you with different solutions that you can apply to your device to get rid of this issue permanently. We have also compiled the reasons due to which this might be happening on your device.

Why Does Samsung Internet Open Randomly on your Device?
After getting to know of the issue, we started digging deep about the reasons due to which such an issue might be triggered and after some careful investigation, we were able to conclude that the following are the primary reasons behind it.
- Corrupted Website Data: It is possible that the website data has been corrupted due to which the Samsung Internet Keeps Opening on your device. We suggest that you try to clear out this data and the application’s cache which can help in fixing this issue.
- Third-party applications: Some third-party applications are also known to be causing the Samsung Internet Keeps Opening issue and therefore, we suggest that you follow the solution below and remove them from your computer.
- Malware: In certain cases, your device might be affected by malware due to which Samsung Internet Keeps Opening and to fix this, you will have to completely scan and remove it from your device. You can do this by following the solution below.
Now that we have informed you of most of the reasons behind the occurrence of this issue, we can finally start implementing the solutions.
Before You Start:
Hold the power button of your Samsung device and then select the “Power OFF” option. Now wait for few minutes before restarting your device and see if it helps in rectifying the problem.
Fixing the Samsung Internet Keeps Opening by Itself Issue:
Method 1: Clear All Cookies and Website Data
- Launch into your Chrome browser and click on the 3 dots at the top right corner of the screen.
- Select “Settings” from the list of options and afterwards click on the “Privacy & Security” option.
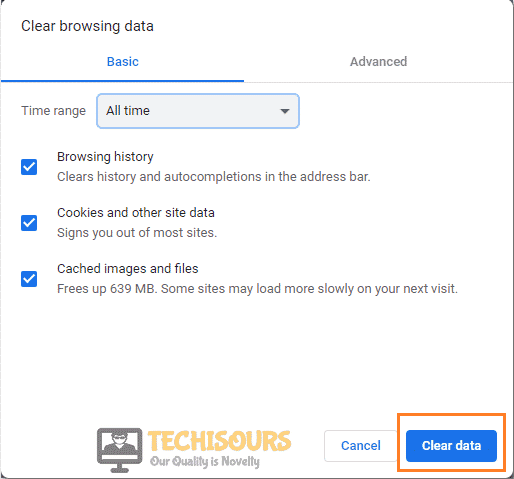
Clicking on the Privacy and Security Option - After that, tap on “Clear browsing data” and checkmark the “Cookies and site data” box.
- Finally, click on the “Clear data” button and see if the issue is resolved.
Tap on Clear Data
Method 2: Use Safe Mode to Verify Apps Interference
- Press and hold the power button until power options are displayed on the screen and keep on holding the button for few more seconds.
- Now your device will show the “Safe mode” option on your screen. Select this option and your device will now reboot into the Safe Mode.
Restart in Safemode - Now try browsing anything on your browser and see if the ads pop up on your screen. If not, then most probably the third-party application is the reason behind the occurrence of this issue.
- Finally, exit from Safe Mode. Press and hold the power key for few seconds and select the “Restart” option.
Method 3: Uninstall Certain Applications
- For this purpose, launch into your device settings by tapping on the “Settings” gear icon. Scroll down to the “Apps & Notifications” option and afterward select “All Apps”.
Choose All Apps Option - After that go through every app and see if the application source is Google Play Store or Galaxy Store. If not, then click on the “Uninstall” button and remove that app.
Method 4: Scan your device for Malware
- Unlock your device and open the “Smart Manager” application on your device.
- After that, select the “Device Security” option and tap on the “Scan Device” button.
Scan Your Device - Wait patiently until the scanning process is completed and afterwards remove any potential threats if shown.
Method 5: Remove Pop-ups in Samsung Internet
- First, open the “Samsung Internet” application on your device.
- After that, click on the menu button and select “Internet Settings” at the bottom left corner of the screen.
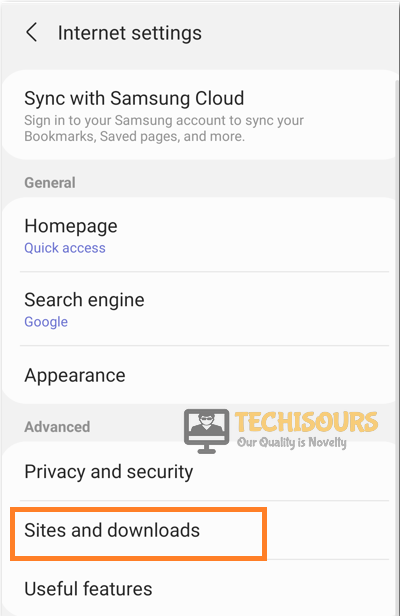
- Now go to the “Advanced” section and click on the “Sites and downloads” option.
Clicking on Sites and Downloads Option - Finally, enable the “Block pop-ups” option and save the settings.
- Check to see if doing so fixes the Samsung Internet Keeps Opening issue.
Method 6: Clear Samsung Internet Cache
- Click on the “Settings” gear icon on your device and scroll down to the “Apps” option.
- After that, tap on the “All Apps” option and select the “Samsung Internet” option from the list.
Choose All Apps Option - Now click on the “Storage” option and finally tap on the “Clear Cache” button.
- Wait for few seconds and restart the device to see if the issue is resolved.
Method 7: Uninstall Samsung Internet Application
- Launch the “Settings” of your device and scroll down to the “Apps” section.
- After that, tap on the “All Apps” option and select the “Samsung Internet” option from the list.
Choose All Apps Option - Now simply click on the “Uninstall” button to remove the Application.
Uninstall Samsung Internet Application - Use a different browser instead like Chrome, Firefox, or Edge, etc for browsing.
- You can also temporarily disable the application by clicking on the “Disable” button.
Method 8: Delete Third-party Apps
- Launch “Google Play Store” on your device and tap on your profile picture icon at the top right corner of the screen.
- Now from the list of options, select “Manage apps and device” and navigate to the “Manage” tab.
Choose Manage Apps and Devices Option - After that, tap on the “Installed” option to view the installed apps on your device, and afterwards click on the sort button and select “Last Used” from the list of options.
- Uninstall the most recent application installed from the list because that might be the backbone of Samsung internet keeps opening issue.
Method 9: Disable ‘Install Unknow App’ Option
- Long press on your Samsung internet application and select the “App info” option.
- Scroll down to the “Install Unknow apps” option and select “Not allowed”.
- Now remove all the apps from the background and see if the issue is resolved.
Method 10: Uninstall Apps Without Name
- Launch the “Settings” on your device and scroll down to the “Apps” option.
- After that, tap on “All Apps” and scroll down to the bottom of the page.
Choose All Apps Option - See if there is any application installed without a name and logo. If so, then uninstall that app and restart your phone.
Hopefully, the after following above methods the error might have gone by now but if you need further assistance, Contact Us.


