Fix the ms-windows-store:PurgeCaches The App didn’t Start Error [Complete Guide]
We have been receiving a lot of complaints lately about the ‘ms-windows-store:PurgeCaches The App didn’t Start‘ error and we started working on devising some solutions for this error. After some intense brainstorming and troubleshooting, we compiled this guide which will take you through the step by step process involved in completely eradicating this error from your computer.

Basically, the ms-windows-store:PurgeCaches is a feature that comes pre-installed in the settings which let users clear and purge the cache for Microsoft Store which can often end up fixing some issues.
Make sure to follow all the instructions in this article carefully and accurately in order to completely rectify this error from your computer. Also, have a glance at the reasons due to which this error occurs in the first place so that you can develop a better understanding of what exactly this error means.
There are a couple of different forms of this error, sometimes, the error message might state ‘Windows cannot find ms-Windows-store purge caches’ and in some cases, the error window might state ‘ms-Windows-store:purge caches not found Windows 10’. Therefore, we have made sure to include the solutions for every variant of this error.
What Causes the ‘ms-windows-store:PurgeCaches The App didn’t Start’ Error?
After going through some troubleshooting techniques commonly involved in fixing this error, we concluded that the following must be some of the most important reasons due to which it occurs in the first place.
- Packages Permissions: If you haven’t properly assigned permissions to the packages folder inside your registry, you will get the ‘ms-windows-store:PurgeCaches The App didn’t Start Error’ error while trying to clear out the cache for Microsoft Store.
- Windows Glitch: It is possible that there is some issue with internal Windows configurations due to which you are unable to purge the Microsoft Store cache. If this is the case, you can try to run some troubleshooting tasks which can sometimes help isolate and fix such issues.
- Health Damage on the Storage Device: It is sometimes the case that the storage device that your Windows has been installed on has either been damaged or it has acquired some bad sectors due to which you are getting the ms-windows-store:PurgeCaches The app didn’t start error while trying to purge Windows Store Cache.
- Default Apps Misconfiguration: Sometimes, the default apps such as the Microsoft Store are improperly configured due to which you get this particular error. A simple and quite effective workaround to this should be just reinstalling the default app with which you are getting this issue.
- Outdated Windows: If you haven’t updated Windows in a while, it can lead to the occurrence of such errors and issues. The best way to work yourself around this should be to update your Windows to the latest available version from Microsoft as some updates offer bug fixes.
- Account Issue: The account that you are using might have some misconfiguration issues in the permissions department due to which you are getting the ms-windows-store:PurgeCaches the app didn’t start error while trying to purge Windows Store cache.
- Antivirus Blockage: Sometimes, the antivirus that you are using might also prevent Windows from being able to clear the Microsoft Store cache due to file permission or usage error. Therefore, the best bet would be to just turn off your Antivirus for a while and check if you are able to properly clear out the cache.
Now that you have been made familiar with most of the reasons due to which this error occurs, we can finally move on towards the solutions.
Fixing the ms-windows-store:PurgeCaches The App didn’t Start Issue:
Solution 1: Changing Permissions via Registry Editor
- Press the “Win + R” keys, type “Regedit” and hit enter.

Typing “regedit” - After that, navigate to the following path.

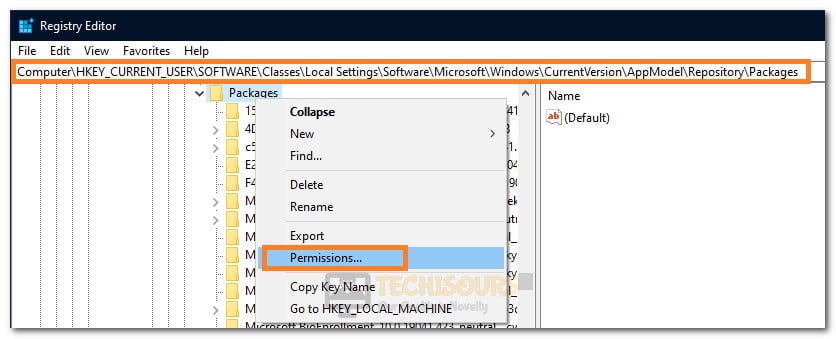
HKEY_CURRENT_USER\Software\Classes\Local Settings\Software\Microsoft\Windows\CurrentVersion\AppModel\Repository\Packages
- Now right-click on the folder named “packages” and select “permissions” from the menu.

Selecting “Permissions” for Packages Folder - After that, click on the “Advanced” option.

Clicking on the “Advanced” button inside Security Permissions Setting - Now click on the “Change” button in front of the “Owner:” listing and type “SYSTEM” in the “Enter the object name to select” box.

Clicking on the “Change” button and then entering the name - Then click on the “Check names” button and in the end, select the “OK” button to exit out of this window.
- Now, go back to the advanced security settings for packages and checkmark the box associated with “Replace all child object permission entries with inheritable permission entries from this object”.

Checking the “Replace all Child Object Permissions” box - Make sure you save changes by clicking on “Apply” then on “OK”.
- Finally, restart your PC and see if the issue has been resolved.


Solution 2: Troubleshooting Windows Store Apps
- Press the “Win + I” keys simultaneously to open windows settings.
- After that navigate to “Update and Security->Troubleshoot->Additional Troubleshooters”.

Clicking on Additional Troubleshooters - Now scroll down and click on “Windows Store Apps” and select “Run the Troubleshooter”.

Windows Store Apps: Run the Troubleshooter - Restart your PC and check to see if the ms-windows-store:PurgeCaches the app didn’t start issue is resolved.


Solution 3: Run DISM Command
- Press the “Win + R” keys simultaneously, type “cmd” in the Run prompt and press “Shift+Ctrl+Enter” to launch the command prompt.

Typing in cmd - Type in “wsreset.exe” and hit enter.

Typing in wsreset.exe - See if the issue is resolved. If not, then follow the steps below.
- Type in the following command and press “Enter”.
sfc /scannow

sfc / scannow - Windows will now find the defective files and repair them automatically.
- If no corrupted files were found, then proceed to the next step.
- Again run the command prompt with administrative privileges.
- Now enter the following command and press the enter key.
DISM.exe /Online /Cleanup-image /Scanhealth


- Once the above command is executed successfully, enter the following command, and press the enter key.
DISM.exe /Online /Cleanup-image /Restorehealth

DISM SCAN - After executing this command, restart your computer and check to see if the issue still persists.

Solution 4: Execute PowerShell Command
- Press the “Win + R” keys and type “Powershell”.

Launching Powershell - Press “Shift + Ctrl +Enter” to open with admin permissions.
- After that, copy-paste the following command and press the enter key.
$manifest = (Get-AppxPackage Microsoft.WindowsStore).InstallLocation + ‘\AppxManifest.xml’ ; Add-AppxPackage -DisableDevelopmentMode -Register $manifest

Executing the PowerShell Command - Now, restart your PC to see if the ms-windows-store:PurgeCaches The App didn’t Start Error is resolved.


Solution 5: Reinstall Default Apps
- Click on “This PC” and navigate to “Local Disk C”.
- After that, look for a folder named “WindowsApp” in the “Program Files” folder.
- Once you’ve found it, right-click on it and select “Properties” from the menu.

Clicking on Properties - Navigate to the “Security” tab and select the “Advanced” option.
- Now click on the “Change” button in front of the “Owner:” listing and type your user account name in the empty box named “Enter the Object Name to Select:”.
- Click on the “Check Names” option and then select “OK”.
Clicking on the “Change” button and then entering in the name - Now go back to the properties window and click on “Edit”.
- Now select your account to set the ownership.
- Finally, change permissions to “full control”.
- Make sure you save changes by clicking on “Apply” and then on “OK”.
- After the above steps are performed successfully, we will proceed to reinstall these apps.
- Press the “Win + R” keys and type “Powershell”.
- Press “Shift + Ctrl +Enter” to open with admin permissions.
- After that, copy-paste the following command and press the enter key.
Get-AppXPackage | Foreach {Add-AppxPackage -DisableDevelopmentMode -Register $($_.InstallLocation)\AppXManifest.xml}

- Now refresh 4-5 times and restart your PC to see if the ms-windows-store:PurgeCaches The App didn’t Start Error has been fixed.
Solution 6: Switch Account
- Press the Windows key on your keyboard or click on the start icon.
- Now click on the account display picture and select “Change Account Settings”.

Clicking on the “Change Account Settings” option - After that, click on “Sign in with local Account Instead”.
- After that, enter your login credentials and click on “Next”.
- Restart your PC and see if the issue has been resolved.
- If this method doesn’t work properly then go to Microsoft’s official website and create a new account.
- After that sign in to your device using this newly created account.

Solution 7: Reset Permissions Using CMD
- Press the “Windows + R” keys and type “cmd”.
Typing in cmd - Press “Shift + Ctrl +Enter” to open with admin permissions.
- Now copy-paste the following command and press the enter key.
icacls "C:\Program Files\WindowsApps" /reset /t /c /q
- Restart your computer and check to see if you were able to fix this error.
Solution 8: Update windows
- For this purpose, press “Windows + I” to open windows settings.
- After that, look for a tile named “Update & Security”.

Clicking on “Update and Security” - Now click on “Check Update”.
- If an update is available, then click on “Download” and then install it on your computer.

Solution 9: Enable Antivirus
- Press “Windows + I” to open windows settings.
- After that, click on the “Update & Security” tile.
Clicking on “Update and Security” - Select “Windows Security” from the left panel then select “Open Windows Security”.
- Then select “Virus and Threat Protection” from the left panel.
- Now select “Manage Settings” under “Virus and Threat Protection Settings”.

Manage Settings - Now turn on all the protection modes in that window.
- Check to see if now you are able to fix this error.

Solution 10: Install Media Pack
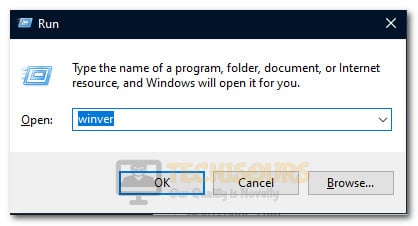
- Press the “Win + R” keys to open the Run prompt, type in “winver” and hit enter.

Typing in Winver - Remember your windows version and architecture type.
- Navigate to this link.
- Now select your windows version and download the software.
- Once the software is downloaded, run the executable to install it on your computer.
- After installing this software, run the ms-windows-store:PurgeCaches command and check to see if it works normally.
Solution 11: Clean Disk
- Press the “Windows + R” keys to open the run prompt and type “Cleanmgr” to launch the disk cleanup function.

Typing in “Cleanmgr” - Select “C:” from the dropdown and click on “OK”.
- Once the scan is complete, select “Cleanup System Files”.

Clicking on the “Cleanup System Files” option - Now checkmark all the boxes under the “Files to Delete” option.
- Click on “OK” and close all the windows.


Solution 12: Reset MS store
- Press the “Windows + I” keys on your keyboard and click on a tile named “Apps”.
- Select “Apps and Features” from the left side and then find the “Microsoft Store” app in the list and click on it.

Apps and features - Now select “Advanced Options” and click on the “reset” button in the next window.

Selecting “Advanced Options” for the Microsoft Store app - Finally, select the “Reset” option from the next window under the “Reset” heading.
- After the store has been reset, check to see if the ms-windows-store:PurgeCaches the app didn’t start error still occurs.


Solution 13: Reset Cache Folder
- For this purpose, press the “Windows + R” keys simultaneously to open the run prompt, type in the following location, and press “Enter” to open the folder.
%LocalAppData%\Packages\Microsoft.WindowsStore_8wekyb3d8bbwe\LocalState\

Opening the folder - Now look for a folder named “Cache” and delete it or rename it to anything else.
- Then create a new folder named “Cache” and close all the windows.
- Restart your PC and check to see if you are able to fix the issue.

If you aren’t able to fix this issue despite all of these solutions, contact us for further advice on troubleshooting.