Easily Fix Internal Exception java.io.ioexception with Minecraft
If you have been getting the “Internal Exception java.io.ioexception” error while trying to connect to a Minecraft server, you have come to the right place. In this article, we have gathered and listed all the solutions and fixes that you can implement to completely fix this issue. Therefore, make sure to follow the steps listed below carefully and stop only when a solution works for you.

Before You Start:
The initial troubleshooting steps towards resolving this error include simply restarting your computer and Minecraft both. Close the game and then shut down your PC as well as you do normally. After a while “Restart” your machine and then again launch the game. Hopefully, this simple “Restart” trick will get you out of the problem easily. If you do not succeed in it, then try implementing some advanced solutions listed below.
How to fix internal exception java.io.ioexception operation timed out error:
Solution 1: Power Cycle Your Router
Simply unplug the “Power Cable” from your router and let it turn OFF completely. Leave it unplugged for a few minutes and then plug it back in and “Restart” your router. This will potentially fix any internet issues, now start playing the game again and see if the error occurs again or not.
Solution 2: Enable Java Native Sandbox
Enabling the Java Native Sandbox will let you start all of the Java applications including Minecraft in a restricted environment which will bypass any sort of issues you might be encountering prior to enabling this option. In order to enable it, proceed with the below-mentioned steps:
- Press the “Window + R” keys together to open up the Run prompt, here type “Control Panel” in the dialog box, and hit the “Enter” button.

Open Control panel - In the Control Panel window proceed to click on the “Java” option.
- The Java Control Panel will appear up now, here proceed to the “Advanced” tab from the top and scroll down to locate the option of “Advanced Security Settings” and click on it.
- Now locate the option of “Enable the Operating Systems Restricted Environment (Native Sandbox)” and make sure it is check marked. Next, hit the “Apply” button and click “OK”.

Enable the system’s restricted environment - Finally, “Restart” your computer to let the changes have their effect and then see if the internal exception java.io.ioexception Minecraft realms error got resolved.


Solution 3: Switch DNS To Google DNS
- In the search bar near the Start menu type in “Control Panel” and hit the “Enter” key.
Open Control panel - In the pop-up window click on “Network & Internet > Network & Sharing Center > Change Adapter Settings” options respectively.
- In the following window right-click on the specific network connection you want to configure for “Google Public DNS” and select “Properties” from the context menu.
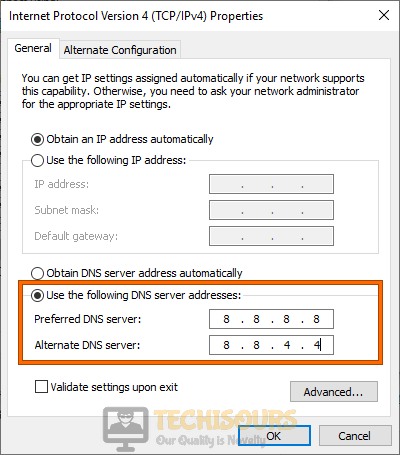
- After moving on to the next window, double-click on “Internet Protocol Version 4 (TCP/IPv4)” and next select the option of “Use the Following DNS Server Addresses”.

Use the following DNS server addresses - Now enter “8.8.8.8” and “8.8.4.4” in the Preferred DNS Server and Alternate DNS Server boxes respectively.
- After entering the above Google Public DNS Addresses (IPv4) “Restart” your PC and see if the error got removed.
Solution 4: Update the Minecraft Launcher
This error might occur if the Minecraft launcher of your system is outdated which in turn can cause several compatibility issues between the server and the launcher. In order to remove this you need to update the Minecraft launcher to the latest version available, to do so follow the steps below:
- On your system open Minecraft Launcher and in front of the Username click on “Options”.
- Then click on the “Force Update” button and select “Done”.

Clicking on Force Update Option - Once updated, relaunch the Minecraft launcher and see if the internal exception java.io.ioexception error persists or not.

Solution 5: Flush the DNS Cache
If the DNS cache of your system gets corrupted it may also lead to the occurrence of this error, in such a case you need to try clearing out the DNS cache of your system. Follow the steps below in order to do so
- In the search bar near the Start menu type in “Command Prompt” and from the pop-up results right-click on it to select the “Run As Administrator” option.

Run command Prompt - In the Command Prompt window execute the following commands one by one:
ipconfig / flushdns

ipconfig / release

ipconfig / renew
- Once done close the Command Prompt window and see if the error exists or not.

Solution 6: Disable Server Resource Pack
Although using the resource pack the player can customize a lot many settings including music, textures, models, etc but it can also cause hindrance in the client-server communication thus giving rise to this error. Therefore, try disabling this option and then see if it resolves the problem. Proceed as below:
- Open your PC and launch “Minecraft Launcher”.
- Then select “MultiPlayer”, next click on the “Problematic Server” and after that hit the “Edit” button.
- Further click on the “Server Resource Packs” option in order to set them to “Disabled”. Then click on “Done” and check if the error gets rectified now.

Choose Server Resource Packs Option

Solution 7: Remove Any Conflicting Application
If your PC encounters any such application which is causing hindrance to the proper functioning of Minecraft this error may also appear. In such a case try uninstalling the conflicting app from your system. Initially, you may Clean Boot your PC in order to check out the problematic application and then proceed to uninstall it. In this particular case many users reported that Hamachi VPN was the one out there causing all of the trouble so here we will show you how to uninstall it:
- In the search bar near the Start menu type in “Settings” and press the “Enter” button.
- From the Settings window, locate the “Apps” option and click to select it.
- In the Apps & Features window find “LogMeIn Hamachi” and click to expand it.
- Next press the “Uninstall” button and follow the on-screen instructions to uninstall the app completely.

Uninstall Hamachi VPN - Afterwards “Restart” your PC and see if the problem got settled.

Solution 8: Reinstall Minecraft And Java
The problem can also arise due to the corrupt installation of Minecraft, in which case reinstallation of it will be the only solution. In order to repair/reinstall Minecraft proceed with the steps below:
- In the search bar near the Start menu type in “Control Panel” and press “Enter”.

Open Control Panel - Now click on the “Programs > Programs and Features” option respectively.
- In the following window go through the list of programs to find “Minecraft” and click on it.
- Then select “Repair” and follow the on-screen instructions to repair Minecraft.

Repair Minecraft Launcher - Restart your PC now and see if the error got removed and if the problem persists then try uninstalling both i.e. “Minecraft” and “Java”.
- Then Restart your PC finally and upon restart press the “Window + R” keys together to open up the Run prompt.
- Here enter “AppData” in the dialog box and in the pop-up window open each of the folders i.e. “Local”, “LocalLow” and “Roaming” and delete all of the Minecraft folders in them one by one.
- Once completed download the latest available version of both Java and Minecraft.
- Then install Java as an “Administrator” and afterward “Reboot” your PC.
- Upon Reboot again install Minecraft as an “Administrator” and later Restart your computer.
- Finally, proceed to see if the internal exception java.io.ioexception connection reset by peer Minecraft error got settled now.


Solution 9: Reduce the Render Distance In Minecraft
Decreasing the render distance in Minecraft might also help solve this error because if Minecraft isn’t able to render all of the video blocks due to some sort of network connection issues this error might pop up and in such a case cutting down the render distance can help fix problems. Follow the below-mentioned procedure in order to do so:
- Launch Minecraft on your desktop PC and open the “Options” window.
- Then select “Video Settings” from the menu and slide the “Render Distance” to the lowest possible value.

Decrease Render Distance - If it helps you remove the error then you can also increase the render distance to your desired value afterwards.

Solution 10: Update Java To Latest Version
- In the search bar near the Start menu type in “Control Panel” and press the “Enter” button.
- Look for the “Java” in the control panel window and click on it. Afterwards, proceed to the “Update” tab and click on the “Update Now” button.

Update Java - If an update is available “Apply” it and then see if the error gets resolved.

Solution 11: Edit the Java Path
- Press the “Window + R” keys simultaneously to open up the Run dialogue box.
- Here type in the following command in the dialogue box and press the “Enter” button:
\Program Files (x86)\
- In the pop-up Program Files window move to the “Java” folder and then head towards the latest version of Java installation folder.
- Next, open up the “Bin” folder and copy its address from the address bar.
- Now launch Minecraft and select the “Edit Profile” option.
- Then checkmark the option of “Executable” under Java Settings (Advanced) and afterwards paste that copied address in the dialogue box in front of it. The path should somewhat look like this:
C:\ Program Files (x86)\ Java\ jrel.8.0_291\bin\javaw.exe
- Lastly, apply the changes made and then see if the error persists or not.
Solution 12: Disable Firewall Temporarily
Sometimes this error may also occur if Windows Defender Firewall blocks access to a resource pack essential for the operation of Minecraft. In this scenario, the first thing you need to do is disable the Firewall temporarily. If it works you can skip a couple of next solutions otherwise move on to trying them as well in order to resolve the Firewall related issues. Proceed with the steps mentioned below to disable Windows Firewall temporarily on your system:
- Press the “Window + R” keys together to open up the Run prompt, here type “Control Panel” in the dialogue box, and hit the “Enter” button.
Open Control panel - Then alter the selection of View By located on the top-right of the screen to “Large Icons” and next select the “Windows Defender Firewall” option.
- In the following window select the “Turn Windows Defender Firewall On Or Off” option from the left menu.

Clicking on the “Turn Windows Defender Firewall On or OFF” option - Next in the Customize Settings window checkmark the box in front of “Turn Off Windows Defender Firewall” for both Private and Public Network Settings.
- Lastly hit the “OK” button, close the window and then check if the error got removed. If not, then move on to try the next solutions indexed below.

Solution 13: Tweak Java Platform SE Settings In Firewall
- Press the “Window + R” keys together to open up the Run prompt, here type “Control Panel” in the dialogue box, and hit the “Enter” button.
Open Control panel - Then alter the selection of View By located on the top-right of the screen to “Large Icons” and next select “Windows Defender Firewall”.
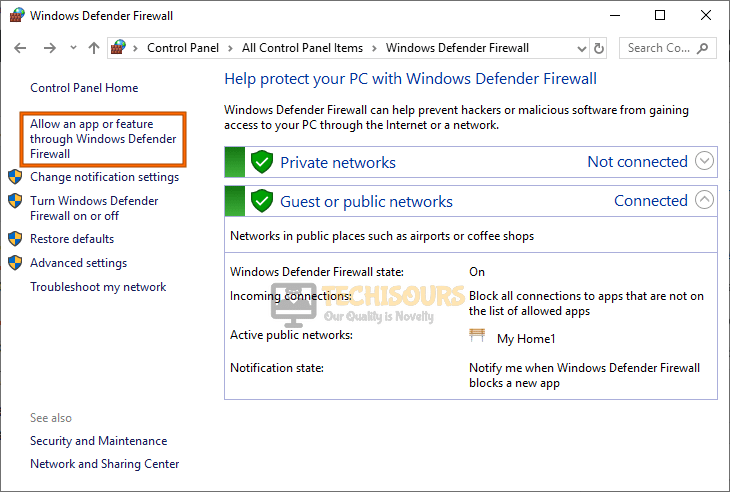
- In the pop-up window select “Allow An App Or Feature Through Windows Defender Firewall” from the menu at the left.

Allow an app or feature through Windows Defender Firewall - In the following window click on “Change Settings” and from the list of apps and features locate “Java ™ Platform SE Binary”. If you are unable to find it from the list click on “Allow Another App” at the bottom and then enter the “Installation Directory” of Java (usually it’s the Java directory of Program Files and Program Files (x86) folders), now double-click on “Java.exe”.
- In the next step, you need to uncheck the box of “Public” and checkmark the option of “Private” for all the Java ™ SE-related binary processes.
- Next, click on Java ™ SE Binary and hit the “Details” button. Afterwards, open the “Network Type” and tick mark the option of “Private”.
- Apply all the changes made and “Restart” your PC.
- Finally, check to see if the internal exception java.io.ioexception operation timed out problem got resolved.
Solution 14: Bypass Minecraft Through Firewall
- In the search bar near the Start menu type in “Windows Defender Firewall With Advanced Security” and press the “Enter” button.

Typing Windows Defender Firewall With Advanced Security - Now select the option of “Inbound Rules” and “Outbound Rules” respectively, here find “Minecraft” from the list, double-click on it, and in the Services Properties window check to see if “Block the Connection” isn’t enabled for Minecraft.
- Again select Inbound Rules and select “New Rule” under Actions from the left.

Clicking on the “New Rule” option - In the New Inbound Rule Wizard select “Program” and hit the “Next” button.
- Now click on “Browse” and proceed to the “Installation Directory” of Minecraft.
- Here select “Minecraft.exe” and click on the “Allow the Connection” button.
- Click on “Next” and choose all three profiles i.e. “Public”, “Private”, and “Domain”.
- Next set the “Name” of the rule and click on the “Finish” button.
- Now repeat the steps “3 to 8” for “Outbound Rules” as well and afterwards “Restart” your PC.


Solution 15: Disable NAT Acceleration In Your Router
- On your PC open up the “Web Browser” and launch your “Router’s Control Page”.
- Then select “LAN” from the left menu and proceed to the “Switch Control” tab.
- Here disable “Hardware Acceleration” and if it does not show up you can look for it with different names such as “CTF (Cut Through Forwarding)” and “FA (Flow Accelerator)”.
- Apply the changes made, close the window and see if the problem got solved.
Solution 16: Try Using An Alternate Network
You can also try using another network to see if that helps, for this, you first need to disconnect from the current network and then reconnect to a new network. You can opt from among the various choices such as “Ethernet”, “LAN”, “Mobile Hotspot” etc. If all of these do not work then you can also consider using a “VPN” instead.
Solution 17: Run A Traceroute
If the above methods didn’t help you much you can try running a traceroute on your system which will help you troubleshoot the cause of the error. It works by tracking your connection straight through your system to Aternos (a remote server) and displays output in the form of useful information depicting the errors in that particular connection. This troubleshooting data will later help you identify the root cause of the problem thus making the error resolution easier.
Solution 18: Use A Different Launcher
There is a greater possibility that the game launcher you are using is a pretty old version of Java even if you have had installed the latest version of Java on your PC. Therefore this error might pop up due to the Java bug itself and not because of Minecraft. In this case, you need to use some different launchers whether it be a “.jar Minecraft launcher” or you forcibly configure the game launcher to use the latest version of Java installed on your system. For the latter option go to your Java settings and in the game launcher options alter the password of the older version of Java to the new version available with you.
WorkAround:
If none of the above-indexed solutions works for you then you can try implementing some of the other remedies listed below:
- Check to see if “Parental Controls” are not the ones blocking the Minecraft access.
- Try allowing the Minecraft connection through “Router’s Firewall”.
- Try allocating more “RAM” for Minecraft as it may also be helpful in solving the error.
- Perform a “Factory Reset” of your system, also try getting your system checked for any sort of “Hardware Error”.
- Also, verify if the “Ports” are forwarded properly in the system/router Firewall as needed for Minecraft.
- Check up with the server admin to either delete your “Player Data” or check for any “Server-Side” issues.
- Check if this fixes the internal exception java.io.ioexception issue on your computer.
Hopefully, by following the list of detailed fixes mentioned above you’d get through the error easily but in case you have any more queries regarding it feel free to reach us out here.