Easily Fix Input not Supported [Complete Guide]
If you are plugging in your HDMI, VGA, or DVI cable for the first time into your monitor or into your second monitor, you might get the Input not Supported message. Therefore, in this article, we will be implementing some solutions and workarounds that will be aimed at getting rid of this message.

Make sure to first read through the causes due to which this error occurs in the first place and also make sure to go through implementing all the solutions one-by-one until one of them fixes the error for you.
What Causes the Input Not Supported Message?
After going through certain fixes, we came to the conclusion that the following must be the paramount reasons behind the occurrence of this error.
- Boot configuration: If the boot configuration from the Bios of the computer hasn’t been properly set, you will see Input Not Supported on monitor. Therefore, we suggest that you try and configure it properly as mentioned in the solution below.
- Hardware Issues: Some hardware issues can also prevent you from being able to properly plug in your second monitor or even your first. Therefore, we suggest that you try and fix them as mentioned below and verify that hardware isn’t holding back your computer.
- Display Configurations: Certain display configurations might also prevent the PC from being able to function properly. Therefore, we suggest that you take another look at the display configuration and check to see if you are able to fix the error.
- GPU installation: GPU installation is also important to properly run your computer but if you haven’t seated it properly, you might run into errors. Therefore, to fix the Input Not Supported error, we suggest that you go through the solutions below to make sure that it is installed properly.
- Keyboard Connection: If you are using an old type of Keyboard connection, you might run into the Input Not Supported error while trying to plug in multiple monitors. Therefore, we suggest that you try and fix this by changing it to a standard USB connection. This particular cause is common with Acer monitors and computers and also while using an HDMI to VGA cable.
Now that you have been taken through almost all of the possible causes, we can finally start implementing the solutions.
How to Get Rid of Input Not Supported Message?
Solution 1: Tweak Boot Options
By using the System Configuration window we will set the base resolution to the lowest and then we can further change it to any resolution we want. For this you need to follow the method listed below:
- In the Windows search bar type in “msconfig” and press “Enter”, in the System Configuration window select the “Boot” tab at the top and then check mark the box for “Base Video” in Boot Options.

Checkmark the Base Video Option - Once checked click on “OK”, exit the window and afterward “Restart” your computer.
- After the reboot your screen will be very “Zoomed In“, to help with that right click on your Desktop and select “Display Settings” from the drop down menu.
- Now in the new window use the drop down menu to change the “Resolution” to the one supported by your new monitor, if you don’t know you can always use the Recommended Resolution.
- When you are done, again open up the “msconfig” window, uncheck the box for “Base Video” and most probably the input not supported windows 10 issue would be rectified.

Solution 2: Boot In Low-Resolution Mode
You can also boot into low resolution mode from the Safe Mode menu. To do this follow these steps:
- Restart your computer using the Start menu, once the “Restart” process begins start spamming the “F8 Key” on your keyboard.
- Once inside the “Startup Settings” menu select “Enable Low-Resolution Video” and boot into it.

Enable Low Resolution Video - When you’re booted into your Windows, follow the steps in “Solution 1” to change your resolution to the recommended settings.

Solution 3: Use Another Monitor
If you’re still having issues trying to get display then you can try connecting a monitor with a higher resolution to your computer, or you can also try connecting it to a TV that supports high resolutions and then check if everything works fine.
Solution 4: Check For Hardware Issues
You should check the “Display Cable” for any breaks, or you can also try connecting to the monitor using other input method like “HDMI” or “Display Port”. You can also use the “USB-C” ports on some laptops as they also support “Data/Display”. Furthermore you can try connecting using several multiple adapters in order to fix acer monitor input not supported issue.
Solution 5: Tweak Your Display Settings
- Right click on any empty area on your Desktop and select “Display Settings” from the drop down menu, in the new window scroll down now to select “Advanced Display Settings”.
- In the Advanced display settings select the monitor causing errors under the “Choose Display” option and then select “Display Adapter Properties For Display X” under Display Information.

Select the Display Adapter Properties Option - In the following window click on the “Monitor” tab and then select the recommended “Screen Refresh Rate” for your monitor under Monitor Settings, once selected “Apply” all the changes made and click on “OK”.

Solution 6: Update Graphics Drivers
Out of date display drivers can also cause input errors so to update your drivers implement these steps:
- In the search bar near the Start menu type in “Device Manager” and press “Enter”, in the Device Manager window expand the section for “Display Adapters”.
- Then right click on your “Graphics Card” and select “Update Driver” from the drop down menu, in the following window then press “Automatically Look For Drivers”.

Update Graphics Driver

Solution 7: Switch Back From Custom Resolutions
If you use any Custom Resolutions for your monitor, you can try disabling them and then check whether it resolve the error or not. To disable custom resolutions in GeForce:
- Right click on your Desktop and select “NVIDIA Control Panel” from the drop down menu, in the new window then select the “Change Resolution” option.
- Now select a “Native Resolution” and then click on “Apply”.
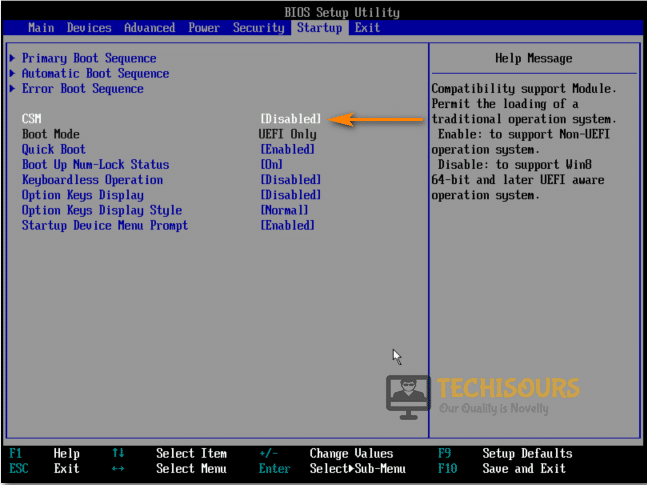
Solution 8: Enable CSM In BIOS
- On your Computer “Boot Screen” press the “BIOS” button displayed at front these keys are usually “F10, F2 or Del”.
- Once inside the BIOS menu navigate to the “Advanced” tab at the top using the arrow keys on your keyboard, in the Advanced tab proceed to the “Boot menu”.
- In the Boot menu locate “Boot/CSM (Compatibility Support Module)” and change it to “Enabled”, once enabled press the “F10” keys to save all the changes and “Restart” your computer afterward.

Enable Compatibility Service Module
Solution 9: Change Your Game Display Settings to Windowed Mode
If you launch a game and have the no Input not supported error, don’t worry you can still play your game if you switch to Windowed mode and then change your resolution. You can try pressing the “Alt + Enter” keys in game to directly switch to windowed mode.
Or
You can add a –windowed to the shortcut of your game file by using this method:
- Right click on the “Game.exe” shortcut on your Desktop and select “Properties” from the drop down menu.
- In the target window then add “–windowed” at the end of the target, make sure you do not rename anything else in there.
- Once done “Save” your changes and close the window.
Solution 10: Delete the Game Configuration File
You can also reset your game settings by deleting the Configuration files from documents. Simply go to your Game folder in My Documents and delete the Config file inside.
Solution 11: Replace the PS2 Keyboard With USB
Somehow if you disconnect the PS2 Keyboard and instead connect a USB keyboard input not supported on monitor acer error might get solved instantly, do try this as it worked for quite a lot of users.
Solution 12: Set the Game To Run At Native Resolution
In this solution we set Warcraft III to run at Native Resolution. To do this proceed with the steps below:
- Open up the “RUN” dialog box using the “Window + R” keys, in the address bar then type in “Regedit” and press “Enter”.

Typing “regedit” - Now navigate to the following address in the left pane:

HEKY_CURRENT_USER > Software > Blizzard Entertainment > Warcraft III
- Then select “Video” and afterward double click on “resheight”.
- Change the “Binary” to “Decimal” and then set the screen height you wish.
- Now double click “rewidth” and repeat the same step.
- Once done “Save” all the changes made and close the Registry window.
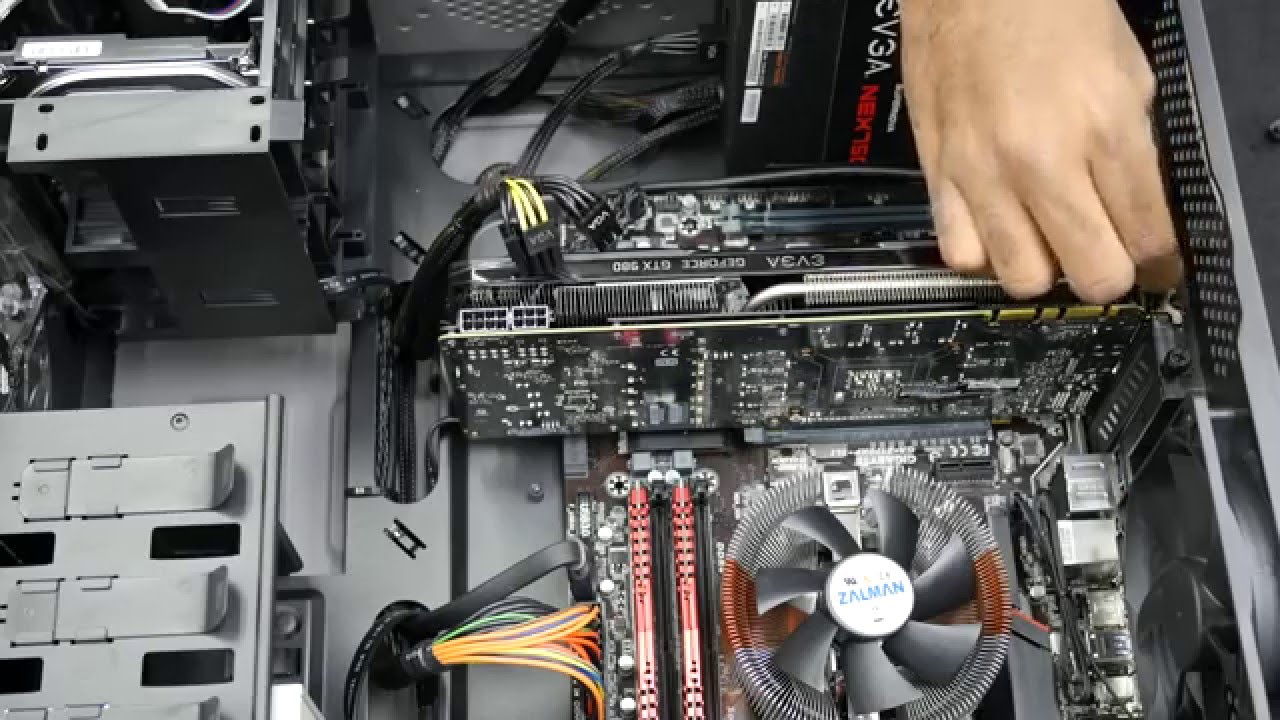
Solution 13: Re-install Your GPU
- Disconnect the “Monitor” completely from your computer, now remove the side panel of your case and remove the “GPU” carefully.

Remove Graphics Card - Now after a few seconds reinstall your GPU and “Boot” your computer with the monitor not connected.
- After a few minutes plug in your Monitor back and check if it displays anything.
Solution 14: Replace the CMOS Battery
The CMOS battery in your MOBO saves all the BIOS settings and configurations, removing this battery for some time can help fix any BIOS errors:
- On your “MOBO” remove the “CMOS Battery” carefully and put it aside for a few minutes, then press the “Power” button on your PC to drain out all left out energy.
- After a few minutes plug the CMOS battery back in and “Power ON” your computer.
Follow the solutions indexed above in order to get through the error successfully but if you continue to face any sort of bug don’t hesitate to Contact Us here and we’ll further look into the issue for you.