How to install Sectigo SSL on cPanel?
According to a near-recent study, 84% of internet users will abandon a website if they see the ‘Not secure’ warning. The “Not secure” warning (introduced by Google in 2017) indicates that a website is not using a secure HTTPS connection. Instead, it uses an unencrypted HTTP connection, which could allow hackers to intercept sensitive information. It is triggered when a website does not have an SSL/TLS certificate installed.
The not secure warning may also be triggered if the certificate is expired or not configured correctly. But you don’t need to fret if you’ve been seeing or just seen that warning pop on your website. A simple solution to secure your website and gain the trust of your visitors’ trust is installing an SSL certificate. And if you’re using cPanel as your web hosting control panel, you’re in luck.
In this article, we’ll guide you through the step-by-step process of installing a Sectigo SSL on cPanel, to ensure that your website is secure and trusted by all who visit. Let’s dive in!
What is SSL Certificate, and which type of SSL Certificate is best?
An SSL certificate is a digital certificate that helps secure information transmitted over the internet. It ensures a secure and private connection between the user’s browser and the web server. This is accomplished via encryption, which scrambles the data being transmitted. This process ensures that unauthorized parties cannot intercept the data in transit.

In other words, an SSL certificate acts as a seal of trust between a website and its visitors. It shows that the website is taking the necessary steps to protect its users’ sensitive information, like personal data, login details, credit card numbers, etc.
When you install an SSL certificate on your website, visitors will see a padlock icon in their browser’s address bar. They will also see the letters “https” before the website’s URL. This lets them know that their connection to the website is secure and that they can trust the site with their sensitive information. It is worth pointing out that there are several types of SSL certificates on the internet. If you’re just getting started, it can get a little confusing choosing the best type of SSL certificate to install on your website.
Now, the type of SSL certificate you choose will depend on your specific needs and the level of security you require. For most websites, a DV or OV certificate will be sufficient. For e-commerce sites and financial institutions, an EV certificate will be necessary for the highest level of security. Here’s a quick summary of the types of SSL certificates you can buy online:
- Domain Validated (DV) SSL Certificate: This is a basic SSL certificate that only verifies ownership of the domain. It is a good option if you’re running a personal website or blog that does not handle sensitive information.
- Organization Validated (OV) SSL Certificate: OV SSL is a higher level of validation that confirms the organization’s identity and domain ownership. It may be the best option if you’re running a small business handling sensitive information.
- Extended Validation (EV) SSL Certificate: The highest level of validation that requires a rigorous verification process. This includes confirming the legal, physical, and operational existence of your organization. An EV will be ideal if you run an e-commerce site or financial institution website that handle highly sensitive information.
- Wildcard SSL Certificate: This type of SSL certificate covers all first level of subdomains of a single domain. It is a good option for websites with multiple subdomains, such as blogs or forums.
- Multi-Domain SSL Certificate: Multi-domain SSL certificate covers multiple domains and subdomains. You may need it if you run multiple websites or online properties.
How to Install SSL on cPanel:
Now, installing SSL on cPanel is a straightforward process that can be completed in just a few steps. Here’s a summary of how to install the Sectigo SSL certificate on cPanel:
- Step 1: Choose the Right Type of SSL Certificate for your Needs. You can buy a Sectigo SSL certificate directly from SSL2BUY. Choose the type of certificate that best fits your needs, such as a DV, OV, or EV certificate.
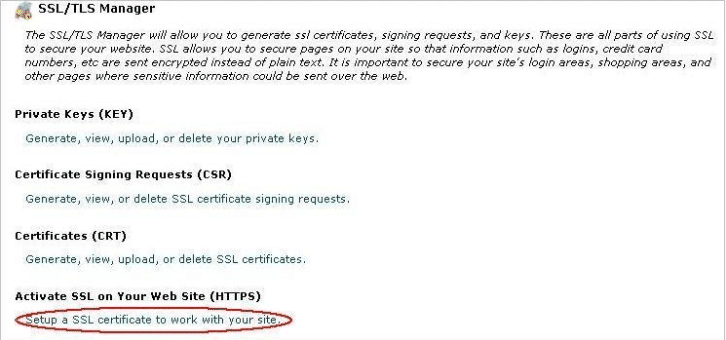
- Step 2: Log into your cPanel and navigate to the “Security” section and under that section, click the “SSL/TLS Manager” option.

Log into CPanel - Step 3: Under the SSL/TLS Manager, navigate to the “Certificates” Section and click the “Generate, view, upload or delete SSL Certificates” button.

Click on Generate Certificates Button - Step 4: Importing Domain/End Entity Certificate:
Here you have two options;- Copy and Paste: Open the “Upload a New Certificate” section. After that, locate the text box labeled “Paste the crt below”. Then, simply copy the contents of your “yourDomainName. crt” file and paste them into the text box.
- Upload: Alternatively, you can click on the ‘Browse’ button and locate the “yourDomainName. crt” file. Once you have found the file, select it and click “Upload” to complete the uploading process.

Upload Certificate
- Step 5: Click the button labeled “Go Back”.

Choose the Go Back Button - Step 6: Now, go to the bottom of the page and then click “Return to SSL Manager”.

Return to SSL Manager Now - Step 7: Select “Setup a SSL Certificate to work with your site” and from the Domain drop-down menu, choose the domain that you’re using. After that, the system will try fetching both the SSL certificate and private key for you.
Alternatively, you can copy and paste these files into their appropriate boxes at this stage.
Choose Setup SSL Certificate Now Option - Step 8: In the “CA Bundle” box, paste the contents of the CA Bundle file that you were provided.
- Step 9: Wrap all that up by clicking the “Install Certificate” option and that is it! Your certificate is now added to your server and assigned to the domain.

Hit the Install Certificate Button


Closing Thoughts:
There is no better feeling for a caring and responsible webmaster than knowing that your website provides your visitors with the highest level of security and trust. With the right SSL certificate installed, you can rest easy knowing that you’ve encrypted sensitive information, protected your site against cyber threats, and built credibility with your audience.
Don’t leave your website’s security to chance. Take the time to install the Sectigo SSL certificate on your website today and enjoy the peace of mind that comes with knowing your site is secure.