How to Fix ‘.NET Runtime Optimization Service High CPU Usage’ on Windows
The .NET Framework is one of the software that Windows requires to add some extended functionality to the operating system. Basically, a lot of games and video related software are very dependent on the .NET Framework service and .NET Runtime is basically an extension to it which optimizes a bit more to add more functionality to it or it runs to make sure that it plays well with the operating system but we’ve recently undergone .net runtime optimization service high cpu issue that will be addressed in this article today.
Now that you are a bit familiar with what the .NET Runtime service does, we will inform you of some of the negative aspects of this service. Basically, a lot of people have been complaining that they are noticing .NET Runtime Optimization Service High CPU Usage in the task manager and this has been perplexing to the resource-conscious users.
We understand how this can be frustrating and if this high CPU usage extends over a long span of time, it gets pretty annoying pretty fast. So without wasting any time, we will first inform you of the reasons that trigger this error on your computer and after that, we will move on towards implementing fixes, workarounds, and solutions to get rid of this issue completely.
What Causes the ‘.NET Runtime Optimization Service High CPU Usage’ Error?
Before trying any of the fixes, we think it is important that you are made familiar with the reasons that actually trigger this issue on your computer. Below is a list of the most common triggers behind it.
- Unoptimized Run: The service itself is responsible for optimizing the “.NET Framework” software installed on your system but ironically, it itself might be running in an un-optimized mode which is preventing it from accomplishing its purpose and that is causing this strain on your resources. Therefore, if you are noticing the .NET Runtime High CPU Usage, the first thing to try would be to follow the first method below to correctly optimize this service.
- Nvidia Telemetry Container: If you are using an Nvidia GPU on your computer, the chances of running into this issue are higher for you because Nvidia Drivers have been known not to play well with the .NET Runtime service and the Nvidia Telemetry Container commonly causes the .NET Runtime High CPU Usage after an update is applied to either the .NET Framework software or the drivers.
- Virus/Malware: Obviously this issue is frustrating you a lot which is why you are trying to fix it and if you just can’t seem to get rid of it, it might be because the service/Mscorsvw.exe process that the .NET Runtime client runs under might have been hijacked by a rogue virus or malware manifested on your computer. Therefore, getting rid of this Virus should be your number one priority and you can do so by following the instructions below.
Now that you have been made familiar with most of the reasons behind its occurrence, we will be moving on towards implementing the solutions.
Fixing the ‘.NET Runtime Optimization Service High CPU Usage’ on Windows:
Solution 1: Optimize the runtime optimization service
Use Command Prompt:
- Click on the search but button located on the taskbar and search for “cmd”.
- Now right-click on “Command Prompt” and choose “Run as administrator”.

Run Command Prompt - Now type the following commands in the prompt and hit enter to execute them:
Note: The first two commands will be entered according to your OS.cd c:\Windows\Microsoft.NET\Framework\v4.0.30319 cd c:\Windows\Microsoft.NET\Framework64\v4.0.30319 ngen.exe executequeueditems
- After executing the above commands check if the .NET Runtime Optimization Service is working normally again.

Use Microsoft official script:
- Launch your favorite browser and proceed to download the .Net script from Github.
- Right-click on the “Raw” button and choose “Save link as”. Make sure you select the file type as ” Windows Script File (*.wsf)”.

Use Microsoft official script - After saving the file on disk, double-click on it to run it and see if the issue has been resolved.

Use Task Manager:
- Press “Ctrl + Shif + Esc” keys simultaneously on your keyboard to open the “Task manager” and proceed to the “Details” tab.
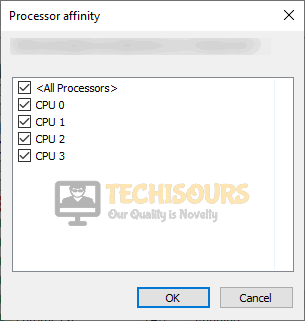
- Now right click on the “.NET Runtime Optimization Service” process and select “Set Affinity”.

Set Affinity - Now check all the boxes parallel to “<All Processors>”, “CPU 0”, “CPU 1”, “CPU 2”, and“CPU 3”.
- Right-click on the same process again and select “Set Priority > High” from the pop-up menu.

Set high priority

Solution 2: Restart NVIDIA Telemetry Container
- Press the “Win + R” keys on the keyboard to open the run box and search for “services.msc”.

Typing in “services.msc” - From the right-pane, right-click on the “NVIDIA Telemetry Container” and select “Properties”.
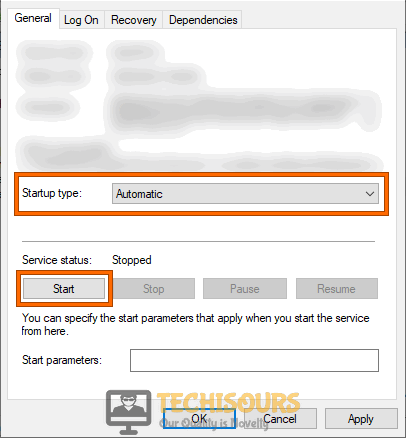
- Click on the “Stop” button to stop the service and select “Automatic” from the drop-down menu parallel to the “Startup type”.
- Now click on the “Start” button to start the service and see if the .NET Runtime Optimization Service is back to normal.

Starting the service

Pro-Tip: If the above steps lead you to an error message that states “Windows could not start the service on Local Computer. Error 1079: The account specified for this service differs from the account specified for other services running in the same process”, then follow the below steps to resolve this issue:
- Follow the steps 1-3 indexed above to stop the “NVIDIA Telemetry Container” service.
- Under the “Log On” tab, check the box parallel to “This account” and click on the “Browse” button.

Clicking on Browse - Type in your account’s name in the text field associated with “Enter the object name to select” and click on the “Check Names” button wait for the names to become available.

Enter the object name - On the completion of this process, go back and start the service to check if the .net runtime optimization service high cpu issue has been resolved.


Solution 3: Perform a clean boot
- Press the “Windows + R” keys simultaneously to launch the Run box and type in the “msconfig” command.

Typing in “Msconfig” - Click on “Services” and check the “Hide all Microsoft Services” option.

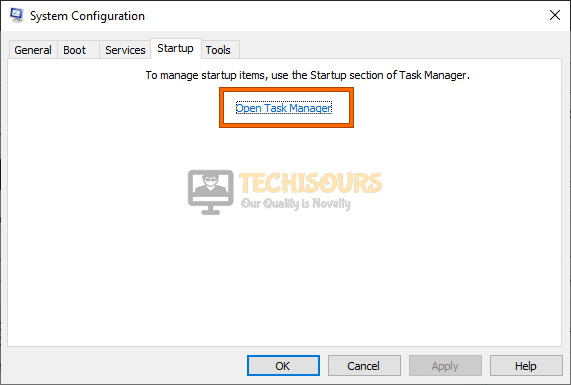
Hiding all Microsoft services - Select the “Disable all” button and then click on the “Startup Tab”.
- From there select the “Open Task Manager” button to launch the task manager.
Open Task Manager - Select each service one by one and click on “Disable” to prevent them from launching on startup.

Disable startup services - Restart your computer and all the unnecessary services and applications will now be stopped.
- Now check if you still encounter a problem with .NET Runtime Optimization Service.


Solution 4: Scan your computer for viruses
From Windows Settings:
- Press “Win+I” keys simultaneously on your keyboard to open “Settings” and navigate to “Update and security”.

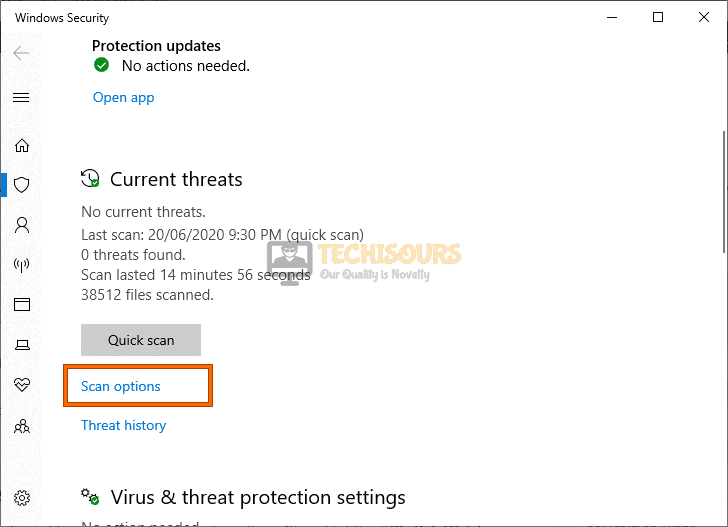
Choose Update and Security - Navigate to “Windows Security” from the left pane and select “Virus and threat protection” from the right side of the window.
Virus and threat protection - Now click on “Scan options” and check the box parallel to “Full scan”.

Click Scan options - Click on “Scan now” and check whether the .net runtime optimization service high cpu is rectified when the scan is completed.

Perform a full scan


Using Third-party tool:
- Launch your favorite browser and download MalwareBytes.
- Double-click on the setup file you’ve just downloaded and follow the onscreen instructions to install the tool.
- Now launch the tool and click on the “Scan” button to start scanning for corrupted system files and fix them automatically.

Scan for corrupted files - When the scanning procedure is completed hopefully the .NET Runtime Optimization Service issue would be resolved.

Solution 5: Disable .NET Runtime Optimization Service
From services manager:
- Press the “Win + R” keys simultaneously on the keyboard to open the run box and search for “services.msc”.
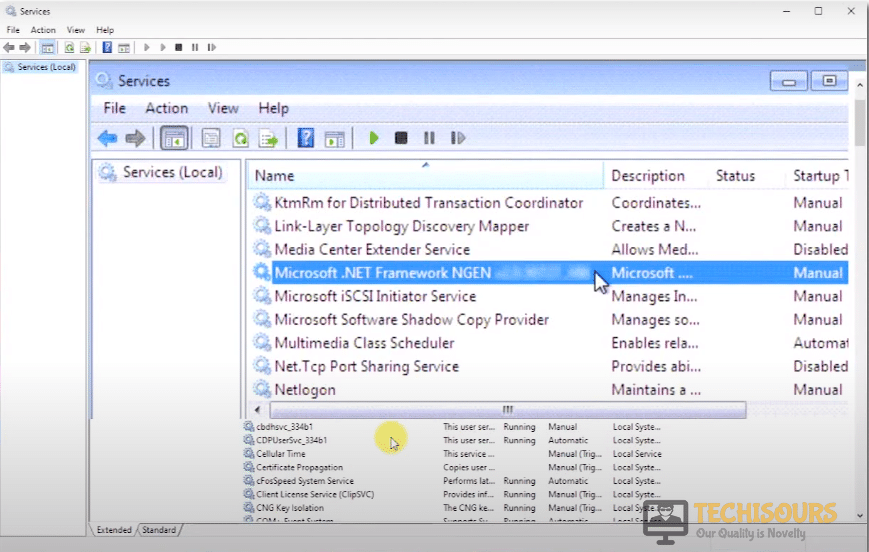
Typing in “services.msc” - From the right-pane, right-click on the “Microsoft.NET Framework NGEN” and select “Properties”.
- Under the “General” tab, click on the “Stop” button to stop the service and select “Disable” from the drop-down menu parallel to the “Startup type”.

Disable service - When disabling the service process is completed, most probably, you won’t encounter any problem related to the .NET Runtime Optimization Service now.

From Registry:
- Press the “Win + R” keys simultaneously on the keyboard to open the run box and search for the “regedit ” command.

Typing “regedit” - From the left pane, navigate to the following location:
HKEY_LOCAL_MACHINE\SYSTEM\CurrentControlSet\services\clr_optimization_(latest version number)

Navigate to this location - Double-click on the “Start” entry from the right side of the window to open its properties.
- Here, enter “4” in the text field related to “Value” to disable the service.

Setting the value - Save the changes and the .NET Runtime Optimization Service will not show any problem now.


Solution 6: End Mscorsvw.exe Task
- Press “Ctrl + Shif + Esc” keys simultaneously on your keyboard to open the “Task manager” and proceed to the “Processes” tab.
- Here, select all the processes related to “ngentask.exe” and click on the “End task” button to stop the process.
Ending ngentask.exe - Now right click on that process and select “Open file location” to proceed to its location in the directory.
- Right-click on the “Mscorsvw.exe” file and select “Properties” from the pop-up menu.
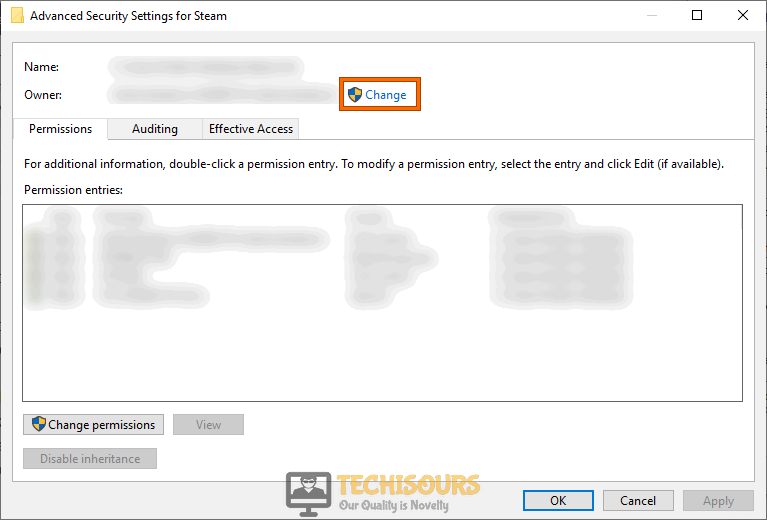
- Navigate to the “Security” tab and click on the “Advanced” button.

Click on Advanced Button - Click on the “Change” button parallel to “Owner” and change the owner from “TrustedInstaller” to your username.

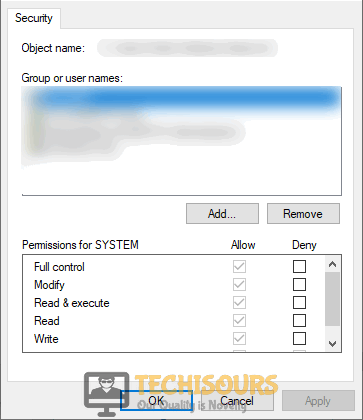
Click on Change - Save the changes and click on the “Edit” button from the properties window.

Click on Edit - Now check the box parallel to the “Allow” of every permission listed in the window and save the changes.

Allowing the permissions - Now locate the “Mscorsvw.exe” file and change its name to “Mscorsvw.exe.bak” to stop it from running in the background.


Workaround:
- Right-click on the “Windows” icon located on the taskbar and select “Windows Power Shell (Admin)”.

Windows Powershell (Admin) - Now launch your favorite browser and copy the code from here.
- Paste the copied code in the PowerShell and hit enter to execute it.
- When the above code is executed, hopefully, the issue would be resolved.

If you are still unable to fix this issue, you can contact us for any further assistance.