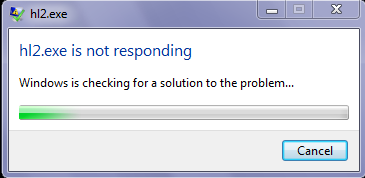
Easily Fix HI2.exe has Stopped Working Error
Windows 10 has always had issues playing older games due to their engines being outdated and no longer supported by the developers as some of the newer games would be. This issue especially comes into play with Half-Life 2 where the “HI2.exe has Stopped Working” error prevents the user from enjoying it as it suddenly crashes the game.
In this article, not only have we compiled different steps and fixes that you can follow to completely fix the HI2.exe has Stopped Working error but, we have also listed the reasons due to which this error might be getting triggered on your computer. Make sure to first, read through the reasons behind its occurrence and then follow through with the methods to completely fix the issue.
What Causes the HI2.exe has Stopped Working Error?
After having to go through the different steps and workarounds commonly used to fix this, we decided to jot down the reasons due to which the error might occur on your computer.
- Outdated GPU Drivers: In certain cases, it is possible that the older GPU Drivers installed on your computer might have less compatibility with the Half-Life 2 game. Therefore, we suggest that you try to update your GPU and other drivers either manually or automatically using the methods listed below.
- Antivirus: Sometimes, in order to fix the HI2.exe has Stopped Working issue, we suggest that you disable the Antivirus temporarily and then check to see if doing so has fixed the issue. This is because sometimes the Antivirus might be blocking certain components of the game due to which the issue might be triggered.
- Missing Permissions: In certain situations, your computer might be missing certain privileges that are required to properly run the game and execute all of its files. Therefore, we suggest running the game in administrative mode as mentioned below.
- Refresh Rate: The refresh rate of the monitor might prevent the game from running properly if it isn’t configured properly. Therefore, we suggest that you try to follow the methods that we have listed below to properly configure your monitor’s refresh rate.
Now that you have been taken through most of the reasons behind this issue, we can finally start implementing the solutions for it.
Verify System Requirements:
Some users may face this error due to incompatibility of their PC hardware i.e. their computer does not meet the required minimum system specifications in order to run Half-Life 2. To check the game’s minimum system requirements, visit the game’s official website and look for the Minimum System Requirements section before proceeding to the major fixes below. Follow the instructions given below to find your system specifications.
- Press the “Windows + R” keys simultaneously, a dialogue box will appear. Type “dxdiag” and then click “OK”.

Typing “dxdiag” - DirectX Diagnostic Tool window will appear in front of you.
- In the “System” tab, basic information related to your PC’s main hardware will be listed.
- Compare those specifications with Half-Life 2’s minimum required specifications and check if your system meets the required specs.

Before You Start:
- Legacy games can be launched by using Steam Client Launcher. However, due to some bugs in this launcher, it causes the game crash. Therefore, running Half-Life 2 without Steam Client Launcher proved to be helpful in some cases.
-
If you are using Windows Vista Home Basic version, then there is a high probability that you’ll encounter this error. Upgrading to an advanced version of Windows Vista i.e. Windows Vista Ultimate can fix this issue.
How to fix HI2.exe has Stopped Working problem:
Solution 1: Update the GPU Drivers Manually
This error can arise due to newer graphics card drivers which are not compatible with your game. Reverting back to older graphics card drivers which are compatible with your game can resolve this issue. Windows 10 automatically installs display drivers through the windows update feature. Turning off this feature can also help in this matter. Follow the below-mentioned procedure to stop the automatic update of display drivers.
- Firstly, proceed to the Start menu, type “View advanced system settings” and press the “Enter” button.

View Advanced System Settings - Navigate to the “Hardware” Tab and click on the “Device Installation Settings” option located at the bottom.
- Select the latter option i.e. “No (your device might not work as expected)” and click on the “Save Changes” option.
- Now type “Device Manager” in the start menu and open it. In the Device Manager window, expand the Display Adapters option, right-click on your GPU and select the option “Uninstall device”.

Uninstall NVIDIA Graphics Driver - Now navigate to your GPU manufacturer’s website i.e. Nvidia / AMD and download their display drivers and afterwards install these files or simply click here to download the relevant graphic driver.
- Restart your PC and launch the game. If the game still crashes, repeat “Step No 5” but this time try downloading an older version of GPU display drivers instead of the latest one to match with Half-Life 2.


Solution 2: Update Drivers Automatically Through DriverFix
There is another way to fix these driver issues by simply installing a popular driver update assistant named DriverFix.
- After installing the software, simply launch the software, click on the Scan option and wait for it to scan and detect all your computer’s faulty drivers. When the scanning is complete, simply select the ones that need fixing and wait for the software to download and install the latest files.

Scan Using DriverFix - Restart your PC and try launching Half-Life 2 again.

Solution 3: Temporarily disable Third-Party Antivirus
Some antivirus software detects the Half-Life 2 files as suspicious and marks them as viruses or infected files. As a result, antivirus removes and deletes these files as a safety measure. Two options can be implemented to stop the antivirus from removing these files that are listed below:
Method 1: Pause Protection
- To pause protection and disable the antivirus, simply navigate to the “Show Hidden Icons” option on the right side of the taskbar, locate your antivirus, and right-click on it.
- Select the option “Pause Protection” or “Disable Antivirus” (the option may vary depending upon your antivirus) and click on it.

Disable antivirus - A warning prompt window will appear and click on the “OK” button.

Method 2: Add file/folder to the exception list
- Find the “Show Hidden Icons” option on the right side of the taskbar, locate your antivirus, and right-click on it.
- Navigate to the “Settings” option and then find the “Advanced Settings” option.
- Locate the “Exceptions” option and add the game’s installation folder link to the exceptions list. Save these settings and then exit the antivirus.
Solution 4: Run the game file as an administrator
This error arises due to compatibility issues with the operating system. Running the file as an administrator can help in resolving this issue. Follow the instructions given below to successfully implement this procedure:
- Find the game’s installation folder and locate the game’s executable file i.e. “.exe”, right-click on the file and open the “Properties” option.
- Navigate to the compatibility tab and the compatibility mode section, check the “Run this program in compatibility mode for” box and select the windows version from the drop-down list that’s mentioned in the game’s system requirements.
- Also, check the “Run this program as an administrator” box located at the bottom of the compatibility tab.

Run this program as an administrator - Click on “Apply” and then on the “OK” button. Run the game again and check if the error hl2.exe has stopped working tf2 still exists.

Solution 5: Check DirectX Version Compatibility
This error can also be caused by DirectX compatibility issues. This game is more compatible with an older version of DirectX as compared to newer versions. To check the installed version of DirectX on your computer, follow the below-mentioned steps:
- Hold the “Windows + R” keys simultaneously, a dialog box will appear, and type “dxdiag” in the Run prompt.
Typing “dxdiag” - DirectX Diagnostic Tool window will appear in front of you. Your main system specifications will be listed in that window, and at the bottom of the list, you can see the installed version of DirectX on your computer.
- If the installed version is other than “DirectX 9” then you need to install the compatible version of DirectX i.e. DirectX 9 from here and follow the on-screen instructions to install it on your system.
- Now, check to see if the “HI2.exe has Stopped Working” issue is fixed and Half-Life 2 runs smoothly on your computer.
Solution 6: Disable Background Processes
Tasks running in the background can also cause the game to crash and as a result, generate this error. Restricting the activity of background running tasks can also fix this issue. To disable the background running tasks, follow the below-mentioned steps:
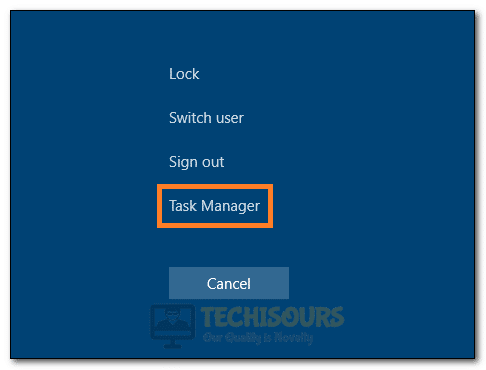
- Press the “Alt + Ctrl + Del” keys simultaneously and click on the Task Manager.

Launching Task Manager - Navigate to the “Processes” tab and a list of all the tasks currently running in the background will appear in front of you.
- Now, right-click on all the tasks individually and select the option “Disable”.

Disable background applications - Reboot your PC and then run the game again.
- Hopefully, this will resolve the HI2.exe has Stopped Working issue but if the error still persists, move to the next solution listed below.

Solution 7: Validate Game Files Using Steam Client
The steam client can also be used to authenticate the reliability of the game files. Game files can get corrupted due to viruses or they can get removed by antivirus due to false discovery. Follow the below-mentioned procedure to repair the game files using the Steam client.
- Double click on the “Steam” icon on the desktop.
- Navigate to the Games “Library” section, afterwards right-click on the affected game, and select the “Properties” option.

Opening Steam Library - Locate the “Local Files” tab and click on the option “Verify integrity of game cache…” located at the bottom of the list.

Verify Integrity of the Game Files - Now Steam client will verify the integrity of the affected game files. When this process is finished, try launching Half-Life 2 again and see if the error still persists and if the error still exists, move to the next solution listed below.


Solution 8: Re-install Half-Life 2
If none of the above-mentioned solutions work, consider performing a fresh reinstallation of the game again. Follow the instructions given below to successfully perform a clean reinstallation of the game:
- Firstly, right-click on the “Steam” icon and open it.
- In the Library tab, right-click on the affected game and click on the “Uninstall” option.

Uninstall Steam Games - Locate the game’s installation folder and delete all the remaining files if found any.
- Install the game again from the Steam Library and check if the issue has been fixed.

Solution 9: Modify Garry’s Mod In Steam
- Open the Steam application and navigate to the “Library” option.
- Locate “Gmod”, right-click on it, and select the “Properties” option.
- In the newly opened window, locate the “Set Launch Options” button located at the bottom and click on it. A box will appear in front of you, type the following command in that box and hit the “OK” button.
-dxlevel 80
- Now run the game again and hopefully, that’ll resolve your issue.
Solution 10: Delete Garry’s Mod from Steam
Some users found this method to be useful by deleting Gmod from the Steam library. Follow the steps given below to successfully resolve this issue:
Method 1:
- Open the Steam application and navigate to “Library”.
Opening Steam Library - Locate “Gmod”, right-click on it, select the “Properties” option.
- In the “Local Files” tab, choose the “Verify Integrity of Game Cache” option.

Verify integrity of game files

If the above-mentioned procedure doesn’t work then proceed to “Method 2” indexed below.
Method 2:
- Open the Steam application and navigate to “Library”.
Opening Steam Library - Locate “Gmod”, right-click on it, and select the “Properties” option.
- Navigate to the “Local Files” tab and then browse files there.
- Now return to the previous folder and “Delete” the Gmod.
- Finally, Uninstall Gmod from the steam menu.
- Reboot the computer after you have performed all the above-mentioned steps and hopefully the issue might’ve been resolved by now but if the problem still persists proceed to the next potential fix indexed below.
Solution 11: Prevent Data Execution
- Click on the Start menu and type “View Advanced System settings” in the search box.
View Advanced System Settings - The System Properties window will appear in front of you. Navigate to the “Advanced” tab and click on the “Settings” option in the Performance menu.
- Performance options window will open in front of you. Click on the “Data Execution Prevention” tab and select the option “Turn on DEP for all programs and services except those I select”.

Turn ON DEP For All Programs - Now click on the “Add” option located at the bottom of the Performance Options window and then locate the “Steam.exe” file that is located in the following directory and afterwards add this file to the exceptions list:
C:\Program Files\Steam
- Again click on the “Add” option and then find and add the HI2.exe file in the same exceptions list.
- Reboot your computer and then run the game and most probably the HI2.exe has Stopped Working issue would’ve been resolved by now.

Solution 12: Revert back AMD Drivers
Some users found this method to be helpful by installing the old compatible display drivers instead of the current one. After trying out different versions of display drivers, version “15.11.1” from 2015 was found out to be more compatible with the game instead of other versions. Users who revert back their display driver to version “15.11.1” reported no issues with the game.
Solution 13: Modify Monitor’s Refresh Rate
This error can also arise due to the low system specs of the user. Modifying the refresh rate in the game’s properties can fix this issue. Follow the steps given below to successfully resolve this issue:
- Firstly, proceed to the Start menu, type “Display settings” and press the “Enter” button.
- Locate “Advanced Display Settings” and click on it. Here you can see the Refresh Rate of your monitor.

Advanced display settings - Now open the Steam application, right-click on the game icon and locate “Launch Options”.
- A box will appear in front of you, type the following command in that box and click “OK”.
Note: XX represents your monitor’s refresh rate in Hertz.-refresh XX
- Now launch the game again and hopefully, your issue would’ve been resolved by now.

If you are still unable to fix the issue, Contact Us for further troubleshooting.