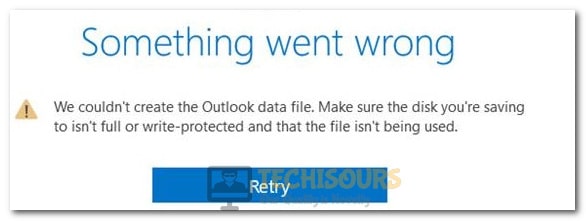
Fixing the We Couldn’t Create the Outlook Data File Error [Complete Guide]
The outlook is one of the popular email clients that are regularly used by a lot of people to get their emails and updates on their devices. The client, however, can sometimes encounter the ‘we couldn’t create the Outlook data file” error while trying to create a new file. This error can be easily fixed by employing some of the fixes listed in the guide.
What prevents you from creating an Outlook data file?
After going through the repair strategies commonly used to fix this issue, we concluded that the following are the most common potential triggers behind this issue.
- Insufficient space on hard disk: Outlook needs a certain amount of free Disk Space on the system drive in order to create new files and to manage its cache storage. Even though there might be some space available, make sure that there is at least 2 or 3GB of Free space.
- Write-protection enabled on hard disk: Some users might have enabled the write-protection feature in their operating systems which prevents all applications from being able to write on the disk. This can not only stop Outlook from functioning properly but it can also cause the ‘we couldn’t create the Outlook data file’ error.
- Enabled Simplified Account Creation: If the Simplified Account Creation entry in your registry is set to be enabled, the ‘we couldn’t create the Outlook data file error’ might be triggered. It is best to disable this before you try to create new data files on Outlook.
- Wrong location of the Temporary Internet Files: If the location of the temporary internet files has been entered incorrectly, the ‘we couldn’t create the Outlook data file’ error might be triggered. It is best to make sure that this has been entered properly before you move on to something else.
- IMAP access disabled in Gmail account: If you are trying to access your Gmail account on Outlook and the IMAP access is disabled on the account, the ‘we couldn’t create the Outlook data file’ error might be triggered while trying to access the account. This feature needs to be enabled in order to access the Gmail account from Outlook.
- Disabled 2-step verification: If you are trying to get your Gmail account to work with Outlook, you need to make sure that two-step verification is enabled on your account to get it working properly. However, users have been getting mixed results with this feature so it is best just to toggle the two-step verification feature and check if doing so fixes the ‘we couldn’t create the Outlook data file’ error on Outlook.
Now that you are aware of the reasons behind the occurrence of this error message, we will be moving towards implementing the fixes.
Before you start:
- Hit “Win + E” keys on the keyboard to open file explorer and see if you have enough space available on the hard disk.

Checking for free space - Press “Win + R” keys on the keyboard to open the run box and search for “diskpart”. Now type the following commands in the prompt to remove write protection from a hard disk.
Note: If you have multiple disks, select the disk on which Uplay is installed
Searching for “diskpart” list disk select disk 0 attributes disk clear read-only exit

Removing write protection from hard disk - If you have multiple email accounts, then we recommend you to remove all of the accounts and proceed to add them again. Make sure you always add the “Exchange Accounts” at the end, after adding all the other accounts.
Note: If you add the exchange account at first or in the middle, they will lock everything else.


How to fix we couldn’t create the outlook data file issue?
Solution 1: Setup your Email Account Manually
- Press “Ctrl + Shift + Esc” keys from the keyboard to open “Task Manager”. Select the process labeled as “Outlook” and click on the “End Task” button.

Closing Outlook - Now navigate to the following path in your directory and delete any OST/PST file that is named exactly as the E-mail you are trying to add to your outlook client.
C:\Users\Pro\AppData\Local\Microsoft\Outlook
Delete OST/PST file - Now launch “Outlook” on your computer and click on the “File” button from the menu bar located at the top of the screen.
- Click on “Account Settings” and select “Manage Profiles”.

Click on Manage Profiles Option - Now close Outlook and select “Email Accounts” from the “Mail setup box”.

Selecting Email Accounts - Now click on the “New” button and check the box parallel to “Emal Account” in the “Add Account” window.

Adding Account - Now fill out all the text fields carefully and click on the “Next” button to add your account manually and when the account has been added, check whether we couldn’t create the outlook data file error still persists.


Solution 2: Setup your Email Account
- Press “Win + R” keys on the keyboard to open the run box and search for “Control Panel”.
Opening Control panel - Select “Large Icon” from the “View by” drop-down list located at the top-right corner of the screen and click on “Mail”.

Opening Mail settings - Now choose “Outlook” from the list of profiles and select “OK”.
- Now select “Email Accounts” from the “Mail setup box” and follow the steps explained in Solution 1 to add your email account.
Selecting Email Accounts - When the account has been added, check whether the error is rectified.


Solution 3: Disable Simplified Account Creation in the registry
- Press “Win + R” keys on the keyboard to open the run box and search for “regedit”.
Search Regedit command - From the left pane of the screen, navigate to the following path.
Computer\HKEY_LOCAL_MACHINE\SOFTWARE\Microsoft\Office\16.0\Outlook\Setup

Adding a new DWORD - On the right side of the window, right-click and select “New > DWORD (32-bit) Value”.
- Name the newly created file as “DisableOffice365SimplifiedAccountCreation” and enter “1” in the text field associated with “Value data”.

Disable Simplified Account Creation - Click “OK” to apply the changes and check whether outlook we couldn’t create the outlook data file the error is eliminated.


Solution 4: Modify the location of the Temporary Internet Files
From Registry Editor:
- Press “Win + R” keys on the keyboard to open the run box and search for “regedit”.
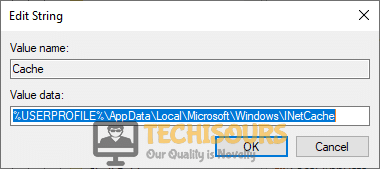
Typing “regedit” command - From the left pane of the screen, navigate to the following path and double-click on “Cache” from the right side of the screen.
Computer\HKEY_LOCAL_MACHINE\SOFTWARE\Microsoft\Windows\CurrentVersion\Explorer\User Shell Folders\Backup
- Now write the following path in the text field associated with “Value Data”.
Note: If something is already written in the text field, replace it by the following path.
Modify the location of files Windows 10 Users:
%USERPROFILE%\AppData\Local\Microsoft\Windows\INetCache
Windows 7 or Vista Users:
%USERPROFILE%\AppData\Local\Microsoft\Windows\Temporary Internet Files
- After applying the changes, check and see whether you still encounter that error message.
From Internet Options:
- Press “Win + R” keys on the keyboard to open the run box and search for “inetcpl.cpl”.

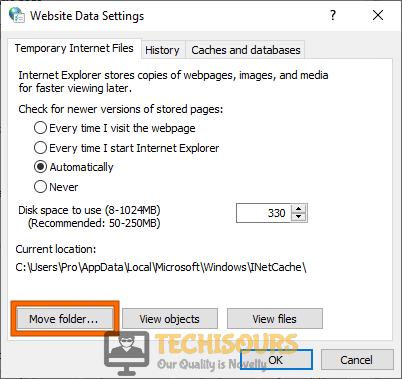
Typing “inetcpl.cpl” command - Navigate to the “General” tab and click on the “Settings” button under the “Browsing History” section.

Tweaking some settings - Now navigate to the “Temporary Internet files” tab and click on the “Move folder” button located at the end of the screen.

Browse to a new location - Now go to the following path from the browsing window appeared on the screen:
Windows 10 Users:C:\Users\user name\AppData\Local\Microsoft\Windows\INetCache
Windows 7 or Vista Users:
C:\Users\user name\AppData\Local\Microsoft\WindowsWindows XP Users:
C:\Documents and Settings\user name\Local Settings
- Now apply the changes and reboot your computer and hopefully, the error would’ve been resolved by now but if the issue still persists there is no need to panic just proceed further.


Solution 5: Add Gmail account in outlook
Enable IMAP in your Gmail account:
- In order to enable “IMAP” in your Gmail, log in to your Gmail account, click on the “Setting cog” at the top-right corner and select “See all settings”.

Click on See all settings option - From the menu bar located at the top of the screen, select “Forwarding and POP/IMAP” and check the box parallel to “Enable IMAP” in the “IMAP Access” section.

Enabling IMAP - Now click on “Save Changes” located at the bottom of the screen to save all the changes.


Add Gmail account to Outlook:
- Press “Win + R” keys on the keyboard to open the run box and search for “Control Panel”.
Open Control panel - Select “Large Icon” from the “View by” drop-down list located at the top-right corner of the screen and click on “Mail”.
Opening Mail settings - Now select “Email Accounts” from the “Mail setup box”.
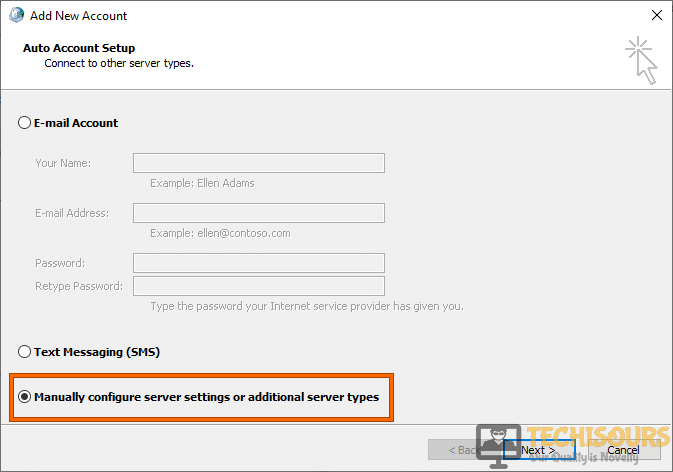
Selecting Email Accounts - Click on the “New” button and check the box parallel to “Manual setup or additional server types” in the “Add New Account” window.

Manual setup or additional server - Select “Next” and check the box parallel to “Internet Email”.
Selecting “Internet Email” - Fill up all the credentials on the screen carefully and follow the on-screen instructions to add your account. Note: Click on “Advanced settings” to modify the number of ports
Filling the text fields - After carrying this task out, check whether the error is rectified.


Solution 6: Use Google App password
- Navigate to the Google Account Security page, and click on the “Two-Step Verification” option under the “Signing into Google” section.

Two-Step Verification - Now follow the on-screen instructions to enable two-step verification for your Gmail account.
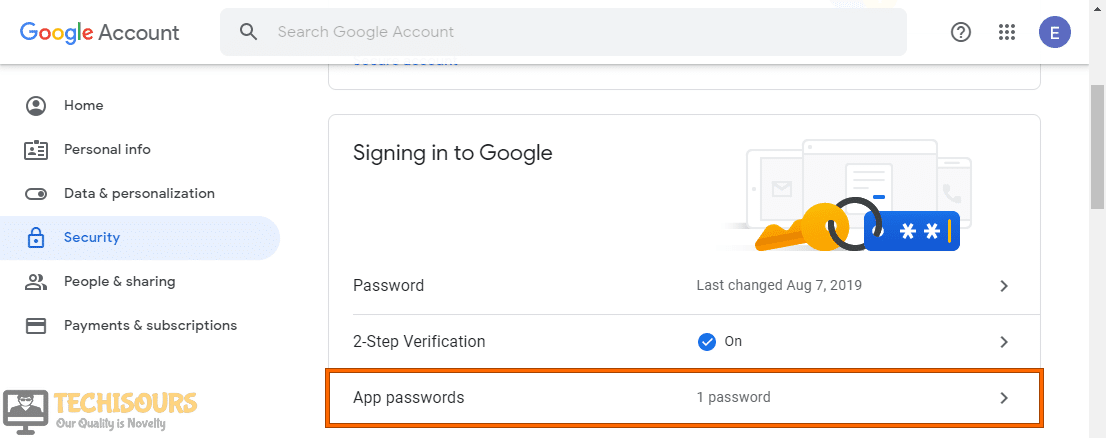
- Go back to the Google Account Security page, and click on “App Password” under the “Signing in to Google” section.

Choose App Password option - Now follow the onscreen instructions to generate an app password and as soon as the password is generated, use the newly created password to add your Gmail account to the Outlook client.

Solution 7: Tweak account privilages
- Press “Win + R” keys on the keyboard to open the run box and search for “Control Panel”.
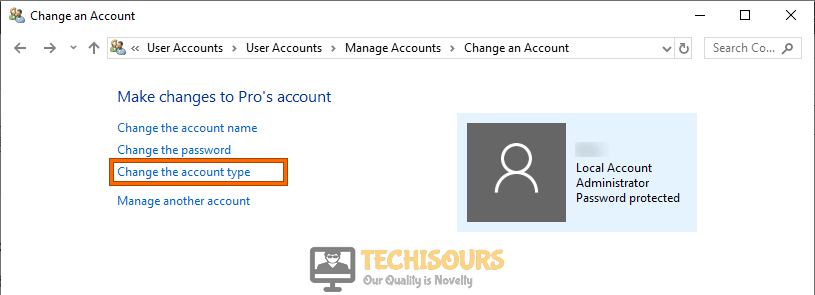
Open Control panel - Now navigate to the “User Account” option and click on “Change Account Type” under the “User Account section”.

Change Account Type - Now select the user account you are using to update your Outlook profile and select the “Change Account Type” option.

Changing Account Type - Now check the box parallel to “Administrator” and restart your computer to see if the issue persists.
Administrator Account


Solution 8: Fix your system using a third-party tool
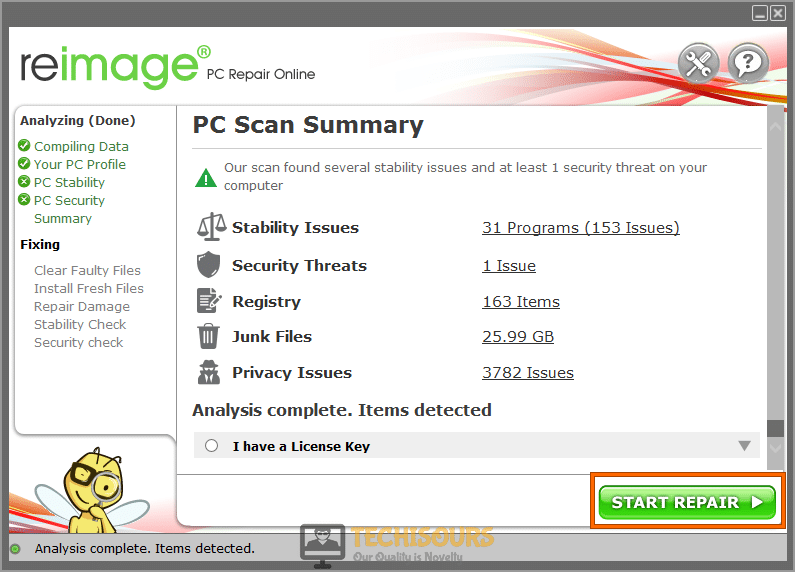
- Launch your favorite browser and download Reimage repair.
- Double-click on the downloaded setup file and follow the on-screen instructions to install it on your computer.

Installing Reimage repair - Now launch the tool and click on the “Start Repair” button to scan and repair all of the system files.

Start repairing files - When the system files have been repaired, try to add your outlook account again and hopefully the issue would be resolved now but if it still exists proceed to the next potential fix indexed below.

Solution 9: Reinstall MSOffice
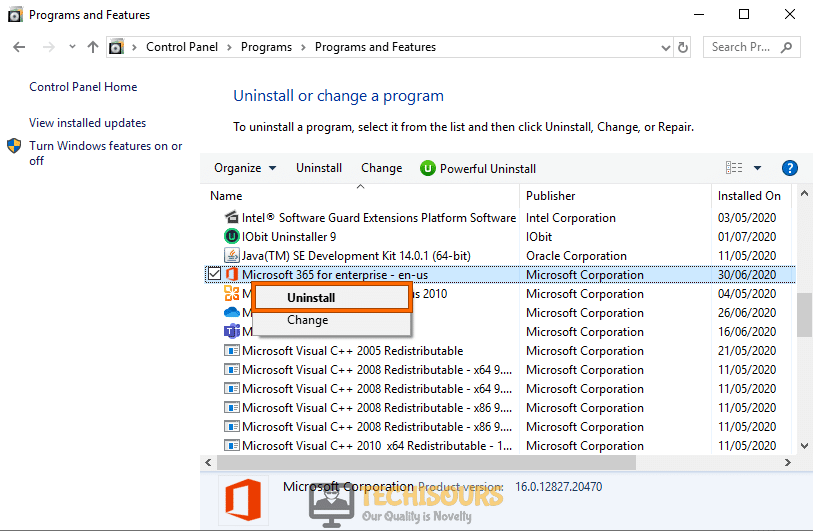
- Press “Windows key + I” on the keyboard to open the run box and search for “appwiz.cpl”.
Run appwiz.cpl command - Now right-click on the “Microsoft Office” already installed on your computer and select “Uninstall”.
Note: Microsoft Office could be of any version, for example, 2010, 2016, or Office 365.
Uninstalling Office - After deleting Microsoft Office from your system download it from here, double-click on the downloaded setup file and follow the on-screen instructions to install it.
- When the installation process is completed, check whether we couldn’t create the outlook data file error is resolved.

Workaround:
- Click on the “Search” button located on the taskbar and search for “Command Prompt”.
- Now right-click on “Command Prompt” and select “Run as administrator”.

Run Command Prompt as an administrator - Now type the following command in the prompt and hit “Enter” on the keyboard to execute it.
reg delete HKCU\Software\Microsoft\Office\16.0\Outlook\Profiles\Outlook/f
reg add HKCU\Software\Microsoft\Office\16.0\Outlook\Profiles\Outlook
- After executing these commands, the error would be resolved.

If none of the solutions explained above, helped you remove this error, then the only solution you are left with is to delete your Outlook profile and create it again. You will have to add accounts into your newly created Outlook profile again to terminate this error from your computer.
If you are still unable to fix this issue, you can contact us for any further assistance.