Fixing the Video Scheduler Internal Error [Complete Fix]
The Video Scheduler Internal Error is most usually caused due to a GPU glitch and is mostly seen on Windows 10 but some instances of this error have also been seen on the previous versions of the Windows Operating System. In this post, we have dedicated ourselves towards completely fixing the Video Scheduler Internal Error and we have done so by compiling a list of solutions, fixes, and workarounds.

What Causes the Video Scheduler Internal Error?
After this issue came to light, we started to dig in to determine its solutions, and we thought that it is also important for you to know the reasons behind its occurrence.
- Malware/Virus: A virus or malware infection on your computer is potentially the most common culprit behind the Internal Error and it is likely caused due to the prevention of proper GPU function from such viruses. This can easily be fixed by removing this virus from your computer by performing a complete antivirus scan.
- Corrupted Files: Another common culprit behind this error is the presence of corrupted files on the computer which can not only lead to this issue but it can also damage the storage sectors on the Hard Drive that you are using. It is recommended to get rid of any corrupted files and try to repair the HDD/SSD to ensure proper dispensation of storage.
- GPU Drivers: GPU drivers are also a common trigger behind this issue if they haven’t been properly installed or have been corrupted during the installation process. It is recommended to try and replace these drivers and make sure that they are properly installed on your system.
- Hardware Acceleration: If you have enabled hardware acceleration on your computer, it is possible that it is preventing the GPU drivers from working properly and is causing this error. Therefore, if you want to fix the Video Scheduler Internal Error Windows 10, it is recommended to disable Hardware Acceleration at least temporarily to ensure that it is not causing this issue on your computer.
- Windows Updates: Another common culprit behind the Internal Error on Video Scheduler is the installation of Faulty updates or an outdated operating system. Therefore, it is always recommended to remove any faulty updates and try and install them again from the Microsoft servers.
Now that you know of the most primary reasons behind the occurrence of the stop code video scheduler internal error, we can move on towards implementing the fixes.
Before we start:
Before proceeding towards any major solution, make sure that the GPU is properly seated in its slot. Also, make sure that your GPU is receiving sufficient power and sufficient airflow to operate normally. You can make this sure by detaching the GPU from your computer, cleaning the dust from its ports, and then reattaching it back into the CPU.
Fix Video Scheduler Internal Error:
Solution 1: Perform a full system scan
- Press the “Win + I” keys simultaneously to open the settings and choose the “Update and security” option.

Click on Update and Security - From the left pane, navigate to “Windows Security” and then select “Virus and threat protection” located on the right side of the window.
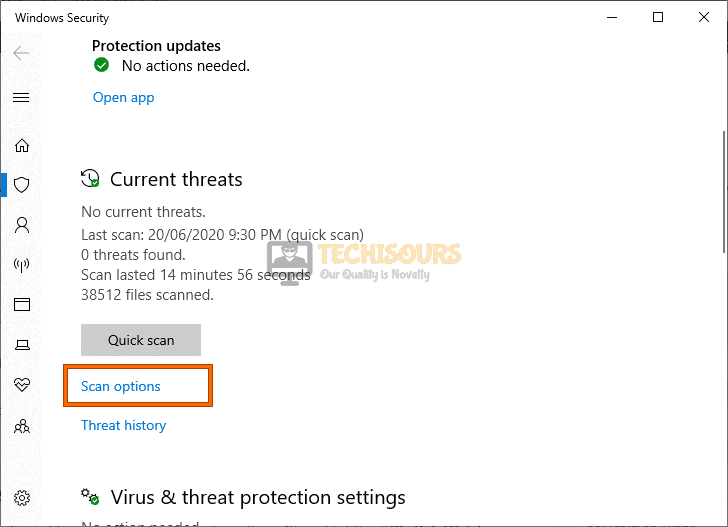
Virus and threat protection - Now click on“Scan options” and check the box parallel to “Full scan”.

Clicking Scan options - Now click on the “Scan Now” button located at the bottom of the screen to start the scanning process.
- When the system scan is successfully completed, check whether the bsod video scheduler internal error has been resolved.

Perform a full system scan


Solution 2: Check your disk for corrupted files
- Click on the search button located a the left side of the toolbar and search for “cmd”.
- Right-click on the “Command Prompt” option and select “Run as administrator” from the pop-up menu.

Run Command Prompt - Now type the following commands in the command window and hit enter to check for the corrupted hard drive.
chkdsk /f /r
- After the successful execution of this command, type the following commands one by one and hit Enter to execute them:
sfc /scannow
Dism /Online /Cleanup-Image /StartComponentCleanup
Dism /Online /Cleanup-Image /CheckHealth
Dism /Online /Cleanup-Image /RestoreHealth

Run Commands - When the above commands are executed successfully, reboot your computer and hopefully, you won’t encounter the video scheduler internal error windows 10 again on your PC.


Solution 3: Perform a disk cleanup
- Double-click on the “This PC” icon located on the desktop to open it.
- Right-click on “Local Disk (C:)” and select “Properties” from the pop-up menu.

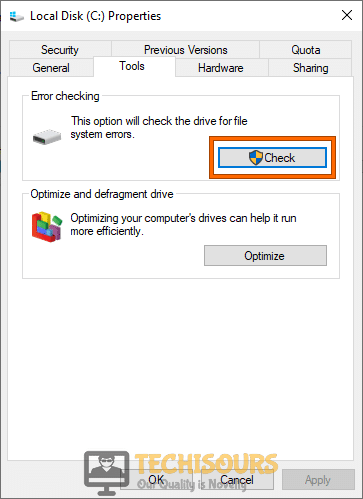
Selecting Properties - Navigate to the “Tools” tab and click on the “Check” button.

Click on the “Check” Button - Under the “General” tab, click on the “Disk Cleanup” button and wait until your computer calculates the amount of space on the disk.
Disk Cleanup - Now click on the “Clean up system files” button located at the bottom of the Disk Cleanup wizard.

Clean up system files - Now check the boxes parallel to both “Previous Windows Installation(s)” and “Temporary Windows Installation files” options and click on the “OK” button.
Check the boxes - Similarly, check all the disk partitions of your computer and check whether bsod video scheduler internal error arises again on your computer.


Solution 4: Use Third-Party Antivirus to scan your computer
- Launch your favorite browser and download AVG antivirus software from its official website.
- Double-click on the downloaded file and follow the on-screen instructions to install the antivirus on your computer.
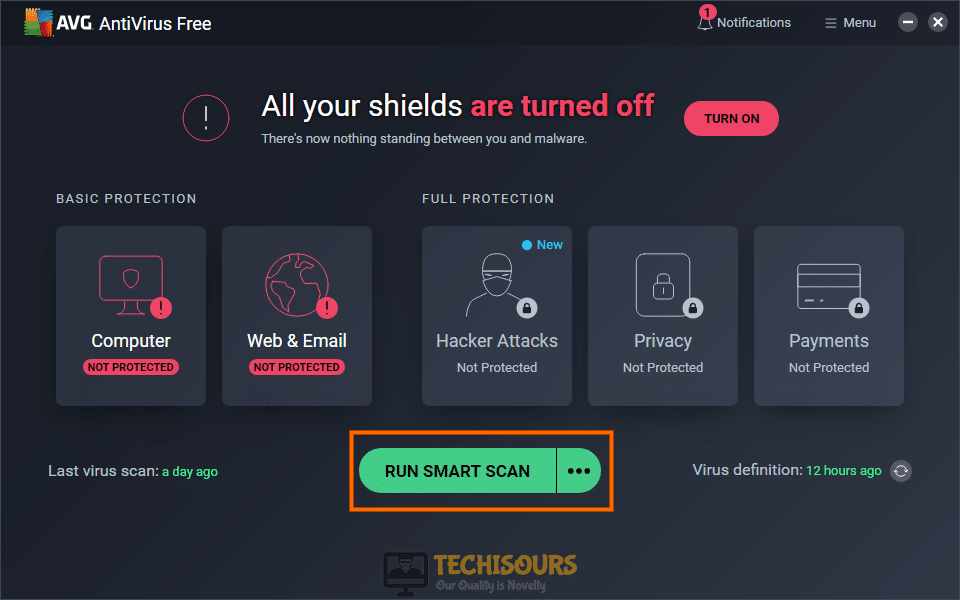
- When the tool is installed, launch it and click on the “Run Smart Scan” button to initiate a full system scan.

Run Smart Scan
Solution 5: Rollback video card drivers
- Right-click on the “windows” icon located at the toolbar and choose “Device Manager”.

Open Device Manager - In the device manager wizard, click on the “Display adapters” option to expand the list of graphic card drivers installed on your computer and double-click on the dedicated driver to open its properties.

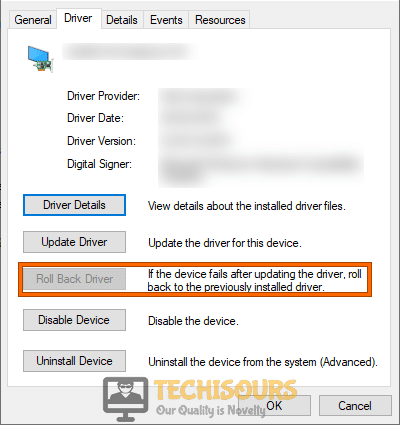
Open Display Adapters - Navigate to the “Driver” tab and click on the “Rollback Driver” button to revert to an older version of the driver.

Rollback Driver


Solution 6: Update or reinstall video card drivers
- Right-click on the “windows” icon located at the toolbar and choose “Device Manager”.
Open Device Manager - In the device manager wizard, click on the “Display adapters” option to expand the list of graphic card drivers installed on your computer and double-click on the dedicated driver to open its properties.
Choose Display Adapters - Navigate to the “Driver” tab and click on the “Update driver” button.

Update Graphics Driver - Now click on the “Search automatically for updated driver software” button to install the latest version of the driver on your computer.

Search automatically for updated driver - Even after updating the driver, the issue is not resolved, try to click on the “Uninstall device” button to uninstall the video card driver completely from your PC.

Uninstall Graphics driver - After uninstalling the driver, restart your computer to automatically install the latest version of the driver on your computer.
- Following the above procedure will hopefully eliminate video scheduler internal error windows 10 from your computer but if it still persists, move to the next potential fix of this issue.


Solution 7: Uninstall the latest installed hardware or software
- Right-click on the “Windows” icon located on the toolbar and choose “Apps and Features”.

Clicking Apps and Features - From the right side of the window, select the apps that you have installed most recently and click on the “Uninstall” button to remove them from your computer.

Uninstall the latest installed software - After uninstalling the latest installed applications, check whether the issue persists.


Solution 8: Disable hardware acceleration
- Click on the “Three-dot” icon located at the top right corner of Google Chrome’s window and select “Settings”.

Open Settings - In the search bar, located a the top of the screen, type “Hardware acceleration” and disable the toggle button parallel to “Use hardware acceleration while available” option to disable it.

Disable hardware acceleration - After propagating the changes, click on the “Relaunch” button to relaunch your browser and check whether the bsod video scheduler internal error is rectified.


Solution 9: Tweak NVIDIA Settings
- Right-click anywhere on the desktop and select “NVIDIA Control panel”.

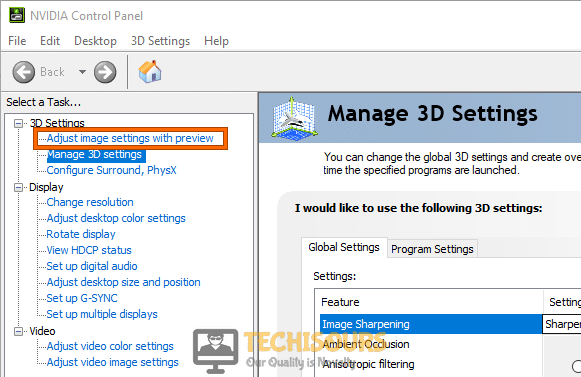
Clicking on the “Nvidia Control Panel” option - From the left pane, select “Adjust image settings with preview” located under the “3D Settings” section.

Adjust image settings with preview - Click on “Use my preference emphasizing” located on the right side of the window and select “Performance”.
- Apply the setting and choose “Configure Surround, PhysX” from the left pane.

Configure Surround, PhysX - Choose “Auto-select (recommended)” under the “PhysX settings” and save the settings.
- Now reboot your computer and most probably, video scheduler internal error would be resolved.


Solution 10: Disable weapon debris (In Fallout 4)
- Launch Fallout 4 and navigate to its “Settings”.
- Now open the graphics settings and disable the “Weapon debris” option.
- Save the settings and try playing the game again to see if you have gotten rid of the video scheduler internal error.
- If the error still persists, we recommend you to play the game in the “Borderless” mode.
Solution 10: Restore your computer
- Right-click on the Windows icon located on the toolbar and choose “Run” from the pop-up menu.

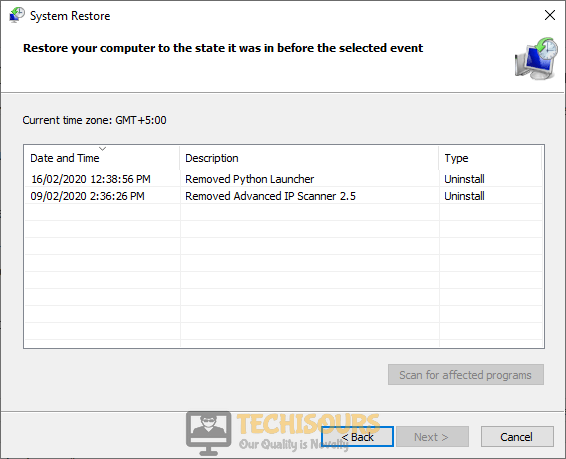
Click on Run - In the run box, type “rstrui” command and hit enter to open the system restore wizard.

Typing in “rstrui” Command - Click “Next” and select a point that was created before the error occurred on your computer.

Select a restore Point - Now click on “Next” and then select “Finish”.
- After restoring your computer to an earlier stage, hopefully, the video scheduler internal error windows 10 would’ve been resolved.


Solution 12: Uninstall Windows Update in Safe Mode
- Right-click on the Windows icon located on the toolbar and choose “Run” from the pop-up menu.
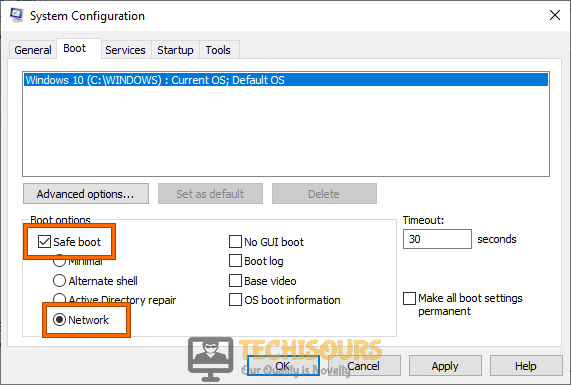
Click on Run - In the run box, type “msconfig” and hit enter to open the system configuration wizard.

Typing in “Msconfig” Command - Navigate to the “Boot” tab and check the boxes parallel to “Safe Mode” and “Networking”.

Choose Safe mode - Apply the settings and reboot your computer to enter the Safe Mode.
- Now open the run box again and search for “appwiz.cpl” to open the Programs and Features wizard.
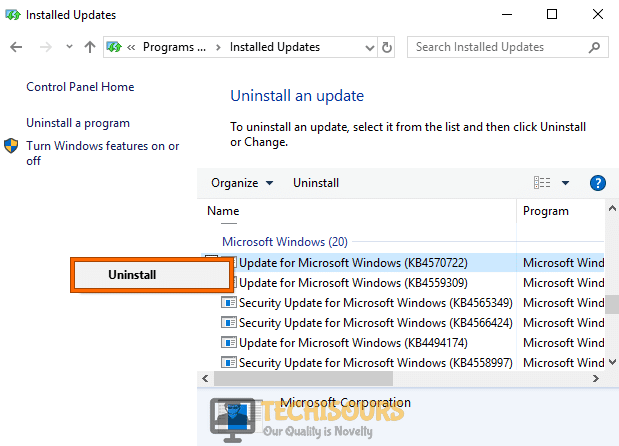
Typing “appwiz.cpl” - From the left pane, select “View installed updates” and locate the most recently installed windows update.

View installed updates - Right-click on the selected entry and choose “Uninstall” from the pop-up menu.

Uninstall Windows Update


Solution 13: Use a third-party tool for disk cleanup
- Launch your favorite browser and download CCleaner software from its official website.
- Double-click on the downloaded file and follow the on-screen instructions to install the tool on your computer.
- Launch the tool and click on the “Analyze” button and afterward, click on the “Run CCleaner” button.
- When the CCleaner has scanned for all corrupted files and fixed them successfully, reboot your computer and check if you encounter bsod video scheduler internal error again on your PC.
Solution 14: Check for Windows update
- Press “Win + I” keys simultaneously on the keyboard to open the “Settings” and choose “Update and Security” from the menu displayed on the screen.
Update and Security - From the left pane, proceed to the “Windows Update” tab and click on the “Check for updates” button located a the right side of the screen.
Check for updates - Now, wait while your computer installs an update of Windows and see if the issue is rectified after the Windows is updated.

Solution 15: Reset your PC
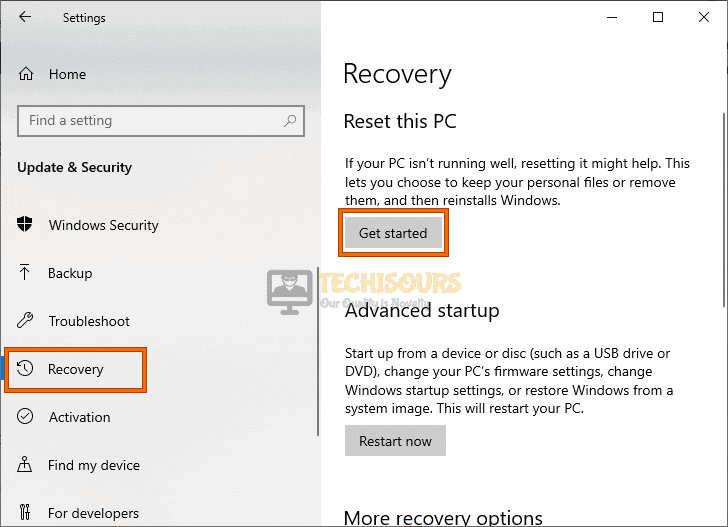
- Press “Win + I” keys simultaneously on the keyboard to open the “Settings” and choose “Update and Security” from the menu displayed on the screen.
Update and Security - From the left pane, proceed to the “Recovery” tab and click on the “Get started” button located, under the “Reset this PC” section, on the right side of the screen.
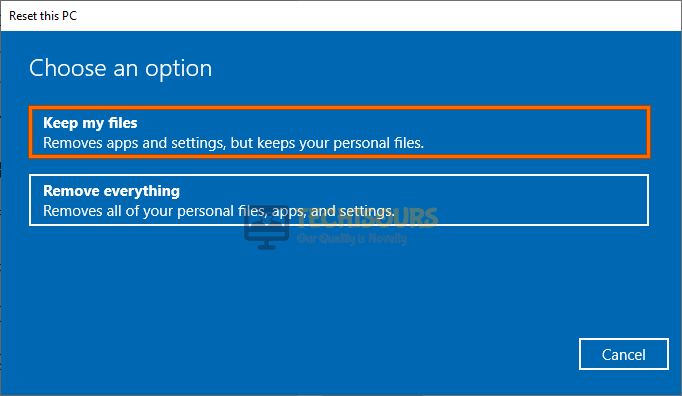
Reset this PC - Now click on the “Keep my files” option and proceed to reset your PC.

Keep my files
Note: Resetting your PC can prove to be very risky sometimes especially if you are not a computer expert, hence we don’t recommend you to carry this task out on your computer if you are not a computer expert. Consult a technician for Resetting PC if you’ve tried the rest of the fixes and they didn’t prove to be beneficial for you.
Workaround:
Some users have reported that they encountered this error message because their GPU was overclocked. So, we recommend you to underclock your CPU and see whether the bsod video scheduler internal error is rectified on your computer.
Hopefully, the error might have gone by now but if you need further assistance, contact here.