Fix: The Content was Blocked because it was not Signed by a Valid Security Certificate Error
Quite recently, we have had an influx of users that have been getting the ‘content was blocked because it was not signed by a valid security certificate’ error while trying to access a particular application or a service on their computer, we have compiled some comprehensive fixes, solutions, and workarounds in this article to help you fix this issue completely.

What Causes the ‘Content was Blocked because it was not Signed by a Valid Security Certificate’ Error?
When we talk about fixing the error, we should also know what causes this issue on your computer in the first place. Therefore, we have listed some basic and potential triggers behind this error as follows.
- Untrusted Site: If you are accessing a site on your computer, it is important that it hasn’t been blacklisted or deemed untrusted by your computer because if so, the ‘content was blocked because it was not signed by a valid security certificate’ error will be triggered. Therefore, add the site into the list of trusted sites by following the first solution below.
- Internet Explorer Settings: If the Internet Explorer Settings haven’t been properly configured on your computer, you might get this particular error while trying to launch a site or access a service. It is vital that you follow the second and third solutions below to reconfigure or reset the internet explorer settings to fix this issue.
Now that we know of the causes behind this error, we can move on towards fixing it.
Before we start:
Most of the users encounter this error when they try to access a web page through Internet Explorer. The best workaround to avoid this error is to switch to Google Chrome and see if you can access the same web page on that browser or not.
Fixing Content was Blocked because it was not Signed by a Valid Security Certificate Error:
Solution 1: Add the website to your trusted sites
- Press “Win + R” keys simultaneously on the keyboard to open the run box and search for “inetcpl.cpl” command.
Typing “inetcpl.cpl” - Navigate to the “Security” tab, select the “Trusted sites” icon and click on the “Sites” button.
Choose Trusted sites - Now paste the link of the site in the text field under the “Add this website to the zone” section and uncheck the box parallel to “Require server verification (https:) for all sites in this zone”.
Add this website to the zone - Now click on the “Add” button and restart your PC to check whether the content was blocked because it was not signed by a valid security certificate issue has been resolved.
Solution 2: Tweak Internet Explorer settings
- Press “Win + R” keys simultaneously on the keyboard to open the run box and search for the “inetcpl.cpl” command.
Typing “inetcpl.cpl” - Navigate to the “Advanced” tab and uncheck the boxes parallel to“Check for server certificate revocation”, “Check for publisher’s certificate revocation” and “Warn about certificate address mismatch” options located under the “Settings” section.
Tweak Internet Explorer settings - Now hit the “Apply” button to save the changes and restart your computer to check whether you encounter the internet explorer error again.
Note: If the issue has been resolved, go back to the Internet Settings and check the boxes again to revert the settings.
Solution 3: Reset Internet Explorer’s security settings
- Press “Win + R” keys simultaneously on the keyboard to open the run box and search for the “inetcpl.cpl” command.
Typing “inetcpl.cpl” Command - Navigate to the “Advanced” tab and click on the “Reset” button under the “Reset Internet Explorer Settings” section.
Reset Internet Explorer Settings - From the Internet Explorer settings in the next window, check the box parallel to “Delete personal settings” and click on the“Reset” button.
Deleting personal settings - Now restart your computer and check whether the content was blocked because it was not signed by a valid security certificate error arises again on your PC.
Solution 4: Start Windows Time service and manage proxy settings
- Press “Win + R” keys simultaneously on the keyboard to open the run box and search for “services.msc” command.
Typing in “services.msc” - Locate and double-click on the “Windows Time” service to open its properties.
- Set its “Startup Type” to “Automatic” and click on the “Start” button to start the service.
Start Windows Time service - Press “Win + R” keys simultaneously on the keyboard to open the run box and search for the “inetcpl.cpl” command.
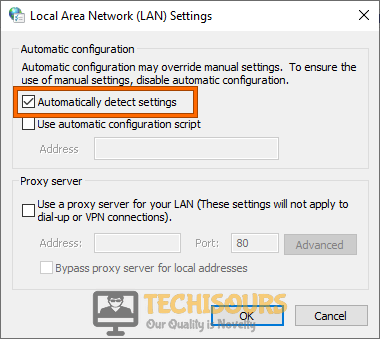
Typing “inetcpl.cpl” - Under the “Connections” tab, click on the “LAN Settings” and check the box parallel to “Automatically Detect Settings”.
Automatically Detect Settings
Solution 5: Obtain a trusted Certificate Authority
- From your console, click on “Admin” and then select “Servers”.
- Under the “Local Site” section, select the management server for which you want to update the server certificate.
- Click on the “Update the server certificate” button in the “Manage Server Certificate” panel and then click “Next”.
- Now choose a certificate that you want to update, from the “Update the server certificate” panel and then click “Next”.
- Now follow the on-screen instructions and select “Finish”.
- To use the new certificate, you must restart the “The Symantec Endpoint Protection Manager service”, “The Symantec Endpoint Protection Manager Webserver service”, and “The Symantec Endpoint Protection Manager API service (As of 14)” services.
- To restart the service, click on “Start > Settings > Control Panel > Administrative Tools > Services” from your console.
- In the “Services” window, locate the service and click on the “Stop” button to stop the service.
- After waiting for 1 minute, click on the “Start” button to start the service and check if the issue persists.
If the above steps don’t allow you to update the server certificates on your browser then you can follow the following workaround to carry this task out on your browser.
Internet Explorer:
- Right-click on the Internet Explorer’s shortcut and select “Run as administrator” to grant it administrator privileges.
- In the address bar, type in the hostname and the IP address of your server and computer respectively. Note: Follow the format given below.
http://hostname:9090
- Click on “Symantec Endpoint Protection Manager Web Console” and then click on ” Continue to this website (not recommended)” on the certificate alert screen.
- Now click on the “Certificate Error” alert on the search bar and select “View Certificates“.
Note: Make sure that the name associated with “Issued to” is the same as you used in Step 1. - Now click on “Install Certificate” to go to the certificate installation wizard.
- For the store location, select “Current User” and click on “Next”.
- Click on “Place all certificates in the following store > Browse” and then select “Trusted Root Certification Authorities“.
- Now follow the on-screen instructions to finish the installation of the certificate.
Mozilla Firefox:
- Right-click on the Mozilla Firefox’s shortcut and select “Run as administrator” to give it administrator privileges.
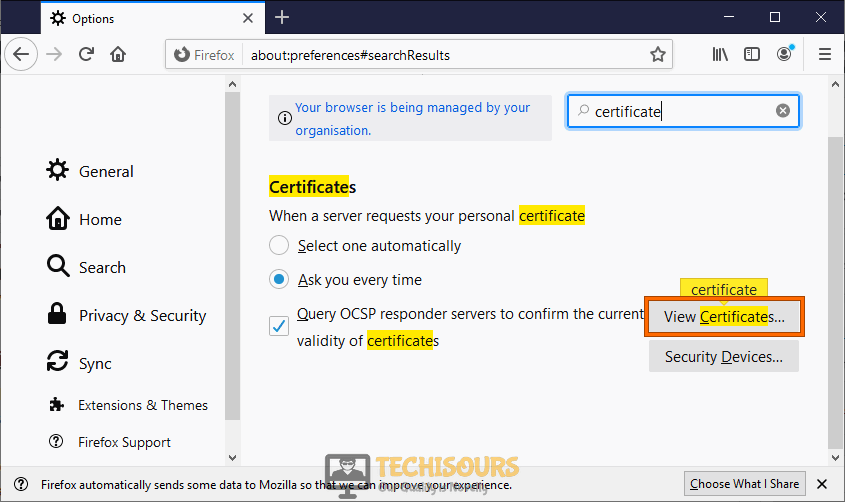
- From the home screen, click on “Options” and type “Certificate” in the search box.
View Certificate - Now select “View Certificate” and then click on “Server > Add Exception”.
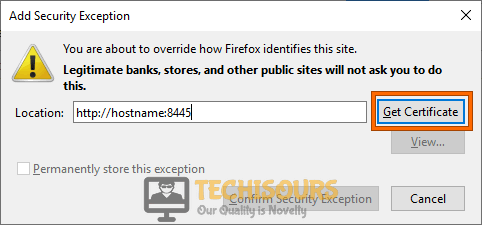
Add Exception - In the location field, type in the hostname and the IP address of your server and computer respectively. Note: Follow the format given below.
http://hostname:8445
- Click on “Get Certificate” and then select “Confirm Security Exception”.
Get Certificate - Now follow the on-screen instructions to install the certificate.
Google Chrome:
- Right-click on the Google Chrome’s shortcut and select “Run as administrator” to grant it administrator privileges.
- In the address bar, type in the hostname and the IP address of your server and computer respectively. Note: Follow the format given below.
http://hostname:9090
- Click on “Symantec Endpoint Protection Manager Web Console” to download the certificate.
- Click on the “Three-dot” icon located at the top-right corner of the screen and select “Settings”.
Open Settings - In the settings window, search for “Manage Certificate” and click on the “Arrow” icon located parallel to it.
Manage Certificate - From the window appeared on the screen, click on the “Import” button and click “Next”.
Import Certificate - Now, click on the “Browse” button and select the certificate that you downloaded in “Step 3”.
- Now, in the certificate import wizard, select “Place all certificates in the following store > Browse” and then choose “Trusted Root Certification Authorities“
- Follow the on-screen instructions to finish the installation procedure and hopefully content was blocked because it was not signed by a valid security certificate issue would be resolved.
Solution 6: Install vSphere Certificate through Internet Explorer
- Navigate to the “hostname/IP” of the vCenter on Internet Explorer and choose “Download trusted root CA certificates”.
- Now, wait until the certificate is downloaded on your computer.
- Double-click on the downloaded certificate and follow the on-screen instructions to install it.
- During the installation process, select “Place certificate in the following store” and choose the “Trusted Root Certification Authorities” container.
- When the certificate is installed successfully, check whether you encounter the content was blocked because it was not signed by a valid security certificate error again.
Workaround:
- Press “Win + R” keys simultaneously on the keyboard to open the run box and search for the “regedit” command.
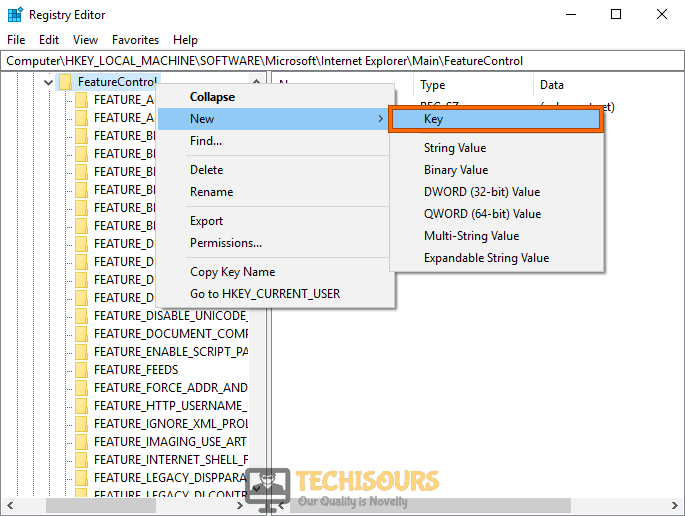
Typing “regedit” - From the left pane, navigate to the following location, right-click on the “FeatureControl” folder and select “New > Key” to create a new key.
HKEY_LOCAL_MACHINE\Software\Microsoft\Internet Explorer\Main\FeatureControl
- Name this newly created key as “FEATURE_ERROR_PAGE_ERROR_ERROR_BYPASS_ZONE_CHECK_FOR_HTTPS_KB950067 ” and on the right side of the screen, right-click anywhere and select “New > Dword Value”.
Create a new key - Name it as “iexplore.exe” and set its value to “1”.
Set value of the DWORD - Save the changes and hope so you wouldn’t encounter content was blocked issue again.
Hopefully, the error might have gone by now but if you need further assistance, contact here.


