Easily Fix Destiny 2 Anteater Error [Complete Guide]
Destiny 2 is a multiplayer game that is developed by Bungie and has a plethora of loyal players that absolutely adore its gameplay. However, a lot of people have been getting the Destiny 2 Anteater error while trying to play the game or log into the servers.

This error is caused by various problems just like not having stable Network Connections due to which Packet losses occur, Ping Spikes, and many more issues are born. It also may be due to a poor connection with the server.
What Causes the Destiny 2 Anteater Error on your PC?
After going through a lot of troubleshooting guides, we concluded that the following must be the paramount reasons due to which this error message is seen.
- Firewall: It is entirely possible that the firewall installed on your computer is preventing the Destiny 2 game from being able to establish a proper connection with its servers because it is raising a false flag against it. Therefore, we recommend that you try and disable the Firewall temporarily or allow Destiny 2 through it to fix the Destiny 2 Anteater Error.
- UPnP: The UPnP option is used by games nowadays to bypass certain security measures taken by routers to increase security and this can cause the Destiny 2 Anteater Error if this option is disabled. Therefore, we recommend you to follow the guide below and enable the UPnP option on your computer.
- Wired Connection: Sometimes using a Wired connection might be a good idea if you want to rid yourself of the Destiny 2 Anteater Error. Therefore, we recommend that you use a wired connection because it is less susceptible to interference from other electronic devices, unlike a Wi-Fi connection.
- Router Issue: The router being that you are using to receive the ISP connection might be causing the Destiny 2 Anteater Error because it might not be properly equipped to handle the bandwidth. Therefore, we recommend that if you see this issue with a lot of games, you should try and upgrade your router to a better one.
- Corrupted Cache: In certain cases, the cache being used by the application or by the internet connection might have been corrupted due to which the Destiny 2 Anteater Error is being triggered. Therefore, we recommend that you try and clear this out as it is automatically regenerated after a while.
Now that you have been taken through almost all the important reasons behind its occurrence, we can finally move on towards implementing the fixes.
Before You Start:
One of the simplest troubleshooting tips before proceeding on with the detailed solutions is that try to restart both of your devices i.e. your PC and the router/network modem. First, disconnect all of the wires of the ethernet connection from your PC/console and then proceed to restart it. But you should always keep in mind that it is not a permanent solution rather it’s only a temporary fix for your error. Moreover, if this does not work for you then try to reinstall the game from scratch. Reinstallation would help in installing the missing files that may have caused this particular error. If the error continues to exist move on with implementing some of the advanced solutions listed below.
How to fix the destiny 2 anteater error:
Solution 1: Disable Firewall (PC Users)
The major purpose of the Firewall is to protect the system against any malicious entities but sometimes it can give rise to certain problems too. Therefore it’s better that you disable the Firewall temporarily and then proceed to perform the specific task again. But it is risky, and there are two things that you can opt to choose from:
1. Add your Destiny 2 in the Exception list in the Firewall
2. Disable Firewall for the whole system
The first option is recommended as it is a bit safe in terms of safety and security. To add Destiny 2 to the exception list of the Firewall follow the below-mentioned steps:
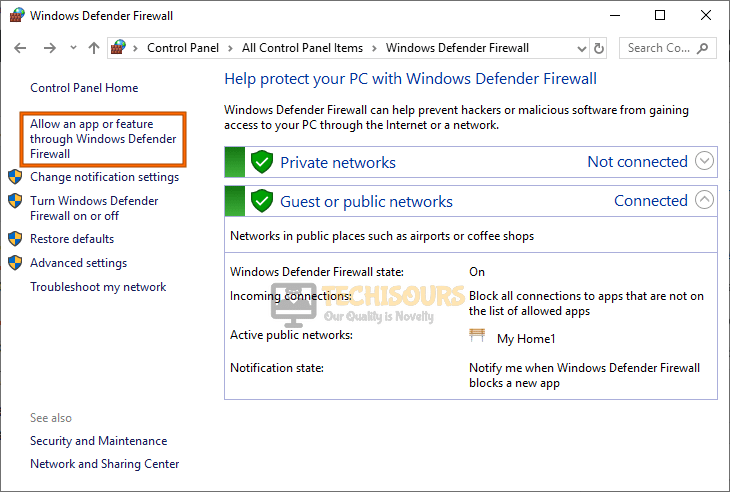
- Navigate to the Start menu and search for “Allow an App through Windows Firewall” and then click to open it up.

Allow an app or feature through Windows Defender Firewall - A window will pop up on your screen and you will see a list of softwares.
- Click on “Change Settings” in order to add Destiny 2 to the exception list.
- Once you click on Change settings uncheck the “Public” and “Private” options for Destiny 2.
- Finally, click on “OK” to save the changes made and check to see if the error got resolved now.
Solution 2: Disable Windows Defender Firewall
Windows defender is a crucial anti-viral component for the windows, but it can cause this specific error too. So you should try to disable Windows Defender while playing Destiny 2. In order to do so follow the below-mentioned steps:
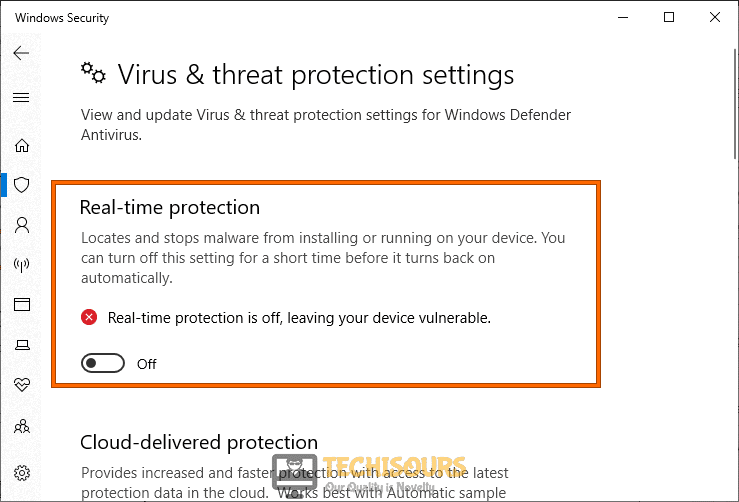
- Open your PC, navigate to the Start menu and select “Settings”.
- In the Settings window select and open “Update & Security”.

Choose Update and Security - In here click on “Windows Defender” that is on the left side below the Windows Update option.
- Once you open Windows Defender turn OFF the “Real-Time Protection” and finally check to see if the issue still persists or not.

Disable Real-time protection

Solution 3: Enable Universal Plug and Play Option (UPnP)
As you know Anteater error is due to poor connection and in order to improve the quality of the connection you should directly connect your console to Destiny 2 by enabling Universal Plug and Play (UPnP). UPnP allows other devices such as printers, internet gateways to interfere and consume a required portion of the network. Once you enable UPnP it will automatically forward ports to your router directly hence it will increase the performance of the network while you are playing online games. To do this you need to create a new firewall. It is a few steps process which is mentioned below:
- To open your router Settings type in “ipconfig” in the Command Prompt window and hit Enter.
- Scroll down to locate the option of “Settings” for default gateway under Ethernet or WiFi.
- From here locate your router’s IP address and afterward put it in your browser’s search bar and then press Enter.

Note down Default Gateway - Once you are directed to the homepage of your router open “Toolbox” and here find and select the option of “Firewall”. Next select “New Firewall”.
- You can edit the level of your Firewall through the Firewall settings. Once you set a custom level to your Firewall, edit and change its name to “Destiny 2”. So, when you play Destiny 2 you should know which Firewall you should use.
- Once you are done with Firewall, go back to the “Toolbox” page and open “Game and Application Sharing”.
- Here you will find an option for “UPnP”. Enable it and disable other options like “Extended Security” and the options under “Assigned Games and Application”.

Enable UPnP - Finally, press the “Save” button in order to save the new settings and then check to see if the issue still persists or not.


Solution 4: Use A Wired Internet Connection
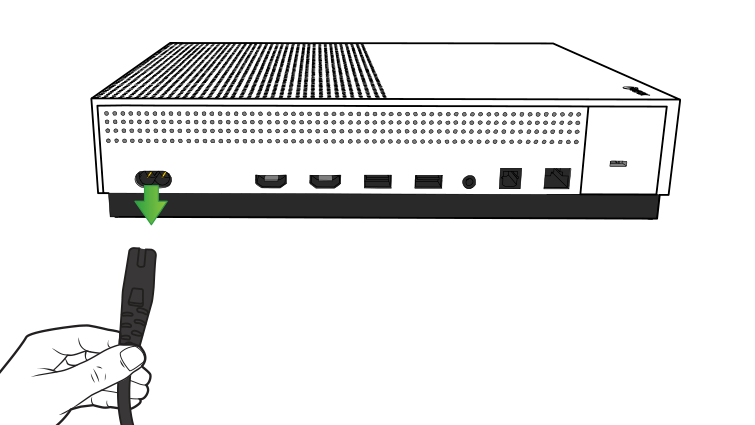
Anteater error in Destiny 2 is greatly linked to the speed of your internet connection. It is so because, in Wi-Fi, packet losses occur which in most cases cause anteater error and the player gets disconnected every now and then. In a wireless connection sometimes the wireless signals are strong and sometimes they become weak which reduces the number of packets transferred and hence results in a slow speed of the internet connection. In such a case users are recommended to install a wired network connection particularly an Ethernet cable to have sufficient bandwidth for their network connection.
Solution 5: Get Your Network Bandwidth Increased
If you have already installed ethernet wire but the issue still exists, then you should contact your network provider and ask them to increase your network bandwidth. Higher bandwidth will result in a greater internet speed hence higher download and Upload Speed. Having good download and upload speed results in smooth gaming due to less ping and fewer packet losses. A minimum bandwidth of “4mbps” is recommended for playing Destiny 2 and also it requires relatively more bandwidth as compared to other games.
Solution 6: Upgrade Your Router
If you are using an old router or wire, then you must try to upgrade it. Also, make sure that your ISP is using optical fiber which is better for the high performance of the network. If your router is quite old it might be the cause of a slow network connection. Try upgrading your router for better wireless signals and for better speed of the internet. Also, check whether the ethernet wire is damaged or not.
Solution 7: Fix Packet Losses Using Command Prompt (PC Users)
Packet losses can also be fixed through the Command Prompt directly. Packet losses generally mean that during a network connection packets are transferred from the router to PC/Console whatever you are using. During packet loss, few data packets are not transferred which results in a jerk or a lag hence not a game-friendly environment. Packet Losses can also be due to an old router, low bandwidth, damaged ethernet cable, or poor wireless connection. If all of the mentioned causes are fine, then follow the below-mentioned steps to avoid packet losses.
- Search for the “Command Prompt” window in the search bar located near the Start menu.
- Then right-click on it to select “Run as Administrator”.

Run command Prompt - Type in “ipconfig /release” in the dialog box and hit Enter. It will disconnect your network access because your current IP configuration will be released.
- Then type “ipconfig /flushdns” and again hit Enter. This command will assign a new IP address to your connection.
- Finally, type the “ipconfig /renew” command and hit Enter This command will update the status and information about the connection to the server.
- Afterward, close the Command Prompt window. Next up type and then open “Control Panel” from the search bar near the Start menu.

Type Control Panel - In here search for “Network and Sharing Center” and click to open it.
- Once in the Network and Sharing Center window click on your “Adapter”.
- A new tab will open up on your window. Here in the bottom left corner click to select the “Properties”.
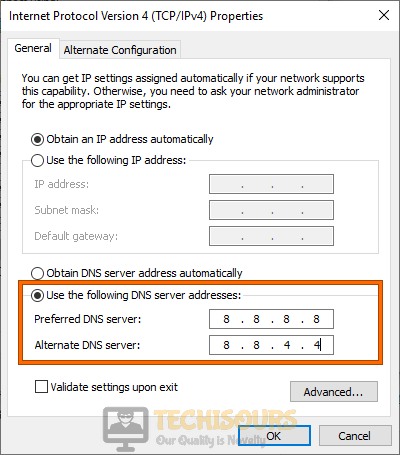
- In the Properties tab, look for “Internet Protocol Version 4 (TCP/IPv4)”.

Internet Protocol Version 4 (TCP/IPv4) - Click on “Internet Protocol Version 4 (TCP/IPv4)” and then click on “Properties” to open a new tab.
- Here click to select the option of “Use the Following DNS Server Addresses:”
- Type in “8.8.8.8” in the Preferred DNS server and “8.8.4.4” in the Alternate DNS server.

Use the following DNS server addresses - Finally hit the OK button and check to see if the error gets removed now.


Solution 8: Clear Faulty Cache on Your PC/Console
A cache is irrelevant memory data that is stored or hidden and clearing cache can help improve the performance by eliminating several bugs and also helps in resolving different errors. Follow the below-mentioned steps to clear cache:
For PC Users:
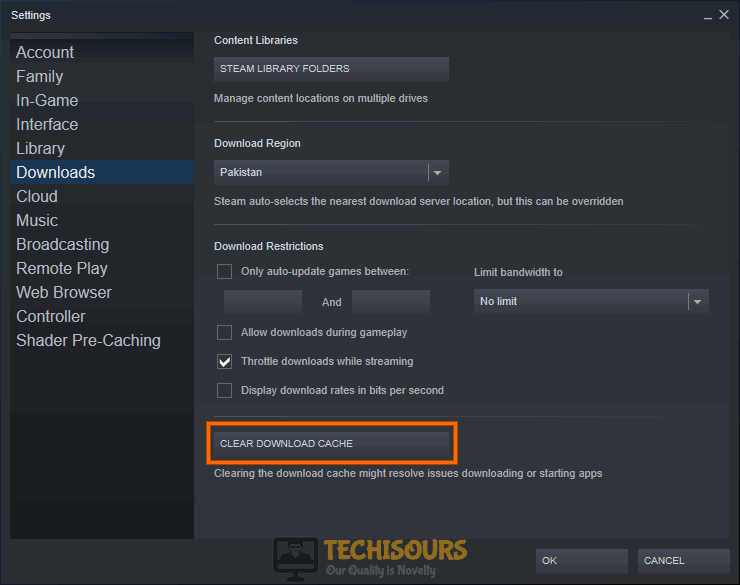
- Open up Steam on your PC and click on “Settings”.
- Once you open Settings on the left side there will be a “Download” icon, click to open Download.
- In the Download section on the bottom left corner, there will be an option of “Clear Download Cache”. Click to select it and it will clear all the download cache from your PC.

Clear Download cache
For Xbox Users:
- Go to the “Settings” option by pressing the guide button and select “System Settings”.
- In the System Settings window select to open “Storage”.
- Here highlight “Destiny 2” and press “Y” on your controller in order to open up the device options.
- Once you open device options select “Clear System Cache”.
- Lastly, a message will pop up to confirm storage device maintenance. Click to select “YES”.
- Check to see if doing this has fixed the Destiny 2 Anteater Error.
For Console (PlayStation) Users:
- Start with switching off your PlayStation completely. Take out the power cable in order to drain out the power from your PlayStation.
- Press the Power button a few times in order to fully drain the left power in your PlayStation.
- Now plug in the Power cable and restart your PlayStation again.
Note: This method works for Xbox too.
Clear Xbox Cache - Check to see if doing so fixes the Destiny 2 Anteater Error.
Solution 9: Switch Your ISP
If none of the aforementioned methods work, it is recommended to change your ISP. Try switching your ISP to a better one in case the bandwidth is not up to your expectations. Many ISP’s are the reason for the high ping. Not all ISP’s are good enough for gaming purposes, try and look for reviews before going for another ISP. Having high ping most of the time ruins the gamer’s motivation especially those who play games professionally and is not a good thing for gamers who especially play on online servers.
Solution 10: Contact Support
Despite carrying on all of the above-listed fixes if the issue is still there then you must contact Bungie Customer Support. Document your complete problem here and preferably also do attach the error screenshots to give a better insight. Afterward, wait for some time until the Support team gets back in touch with you and resolves the Destiny 2 Anteater Error positively.
Follow all of the above-listed fixes respectively in order to get rid of this issue but if the error still persists you may Contact Us here and we will further look into the issue for you.