Fix: Destiny 2 Error Code Marionberry [Complete Guide]
Some Users have been getting the Destiny 2 Error Code Marionberry issue on their computers which displays the “Error: Could not connect to the Destiny Servers. Please Try Again Later Error Code: MarionBerry” message on the screen while trying to connect to the game’s servers. In this article, we have listed some reasons due to which this error might be getting triggered and have also defined the solutions that you can use to fix it.

The Error message is mostly seen due to a disruption in the connection when you try to communicate with the Destiny servers and can be fixed easily by following some of the solutions that we have listed in this article. Make sure to follow the steps carefully and to proceed in a step-by-step manner.
What Causes the Destiny 2 Error Code Marionberry Issue?
After going through some basic troubleshooting techniques, we concluded that the following are some of the most important reasons due to which this error message is triggered.
- Parental Control: Sometimes there might be parental control feature activated on your router due to which you are getting the Destiny 2 Error Code Marionberry. Therefore, we recommend that you try and disable this feature which should help in getting the packets through without any restrictions and can sometimes get rid of this error message.
- DNS Server: The DNS server that your computer is using might have been configured incorrectly due to which you are running into the error message or the server itself might be facing an outage. Therefore, you can easily use another DNS server which should help get rid of this issue entirely.
- Security Software: The security network monitoring or other software that might be installed on your system might be preventing you from being able to load into the game servers. The best thing that you can do is to temporarily disable the software and check to see if doing so fixes the issue.
- Network Issues: On Windows’ end, there might be certain networking issues that might be getting in the way of the connection with Destiny servers. Therefore, we recommend that you try and troubleshoot these network issues to get to the bottom of this error message.
- Port Forwarding: Some ports need to be forwarded on your computer and if they are closed, you will get the Destiny 2 Error Code Marionberry message on your screen. In order to confirm that these ports have been forwarded properly, we recommend that you check to see if there are rules set up in your Firewall. If not, you will have to set them up manually.
Now that you have been made familiar with the most crucial reasons behind this error message, we can finally move on towards the implementation of solutions to get rid of the Destiny 2 Error Code Marionberry.
Before You Start:
Before getting into the detailed troubleshooting techniques for this error just try out a simple fix initially by power cycling both of your devices i.e. console as well as router/modem and then check to see if it helped in eradicating the error for you. To do so proceed with implementing the below-listed procedure:
- Close your Destiny game and “Turn OFF” your Xbox or PlayStation. Then remove the power by unplugging the power cord and let it sit for a few minutes.
- Switch off your internet connection including the router, modem, or any other network device.

Disconnect Internet Devices - Wait for roughly a minute or so and then switch on your network devices one by one. Once done, proceed by turning on your console again.
- Launch Destiny now and start to play online.

If this method doesn’t work to suppress the problem for you then proceed on with the implementation of some advanced fixes listed below.
How to rectify destiny 2 error code marionberry pc problem:
Solution 1: Checking Parental Controls on the Router
- Press the “Window + R” keys simultaneously on your keyboard to open up the “Run” prompt. In the Run dialogue box, type “cmd” and press Enter.
- In the Command Prompt window type in the following command:
ipconfig/all
- Then copy the “Default Gateway” and paste it in the “Address Bar” of your browser. You can get to know about the default gateway by simply entering the ID and password found at the back of the router, or call your ISP to know.

Note down Default Gateway - Now uncheck the “Parental Control” option to disable the parental controls and choose “None or No Blocking” if there is a “Web Content Blocking” option available.
- Exit from the window and check to see if the issue still persists or not.

Solution 2: Changing the DNS of your Xbox and PlayStation
Xbox Users:
- On the home screen of your controller press the “Menu” icon.
- Then navigate to “Settings” > “Network” > “Advanced Settings” > “DNS Settings” > “Manual” respectively.
- Replace the “Primary DNS Field” with “8.8.8.8” and “Secondary DNS Field” with “8.8.4.4”.
- Save the updated settings and restart your Xbox for the changes to have an effect and then check to see if the error still persists or not.
Playstation Users:
- Navigate to “Settings > “Network” > “Set Up Internet Connection” and choose “Wi-Fi or LAN” > “Custom” respectively.

Set up Internet Connection - Set the fields as specified below:
IP address settings to  ->   Automatic
DHCP hostname to        ->   Do Not Specify
DNS settings to         ->   Manual
Primary DNS to          ->   8.8.8.8
Secondary DNS to        ->   8.8.4.4
MTU settings to         ->   Automatic
Proxy server to         ->   Do Not Use
- Save the updated settings and restart your Xbox for the changes to take effect.

Solution 3: Stop Your Security Software Services
- Press the “Window + R” keys together on your keyboard to open the “Run” command prompt. Type “services.msc” in the search box and press OK.

Typing in “services.msc” - In the Services tab locate your “Antivirus/Security Center” and choose to select it. Once selected, click on the “Stop” button in the “Quick Access Toolbar”.
- Restart your system, try to get back online on Destiny 2, and proceed to verify if the error has been resolved.

Solution 4: Troubleshoot Your Network
- To start with make sure that no downloads are running in the background.
- Now, “Reset” your console if you are using a wireless internet connection.
- Perform an “Internet Speed Test” to ensure your internet meets the “Minimum 1 Mbps upload/download ratio”. If it doesn’t, you may be facing Marionberry error because of low internet speed.
- Try to directly connect your console to the modem instead of going through the router.
Solution 6: Turning Off Windows Defender Firewall
- Open your PC and search for “Settings” in the Start menu.
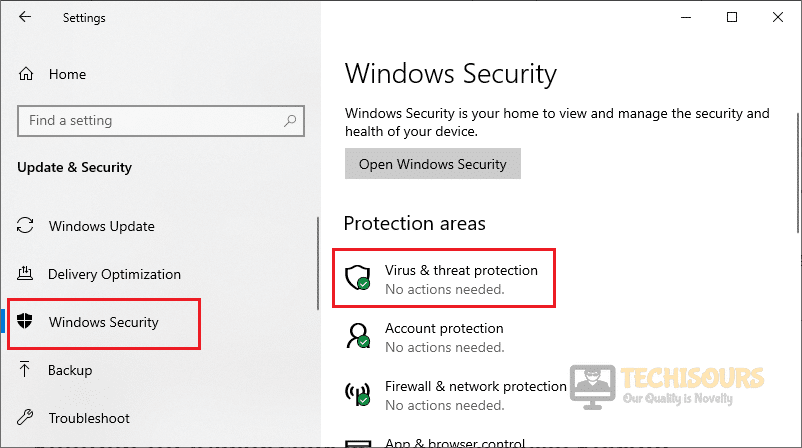
- When in the “Settings” tab locate the “Update and Security” option. In the “Update and Security” dialogue box locate and open “Windows Security”.

Update and Security - Proceed to “Virus and Threat Protection” under the “Protection Areas” section. In the new dialogue box, navigate to “Virus and Threat Protection Settings” and click on “Manage Settings”.

Virus and Threat Protection - Now turn “OFF” the button located under the “Realtime Protection”. Click to select “YES” when the permission dialogue box pops up.
- Finally, restart your console and try getting back online.

Solution 7: Setting Up a Static IP On PS4
- Turn on your PS4 and navigate to “Settings” > “Network” > “View Connection Status”.

View Connection Status - Find the “IP Settings and MAC Address Information” in the menu and note it down.
- Open your router’s “Settings or Configuration Page” and locate the option of “LAN/DHCP”. Then look for any box that indicates space for a manual entry.
- In the “IP and Mac Address Entry” fill in the “IP/MAC address” you noted from the PS4 settings.
- Finally, click on “Save/Apply/OK” to confirm your settings and check whether destiny 2 error code marionberry is rectified.

Solution 8: Forward Ports on Your Router
Port Forwarding is a way for you to instruct your browser not to block certain requests from going through and when a port is forwarded, your computer is able to use that port to communicate on the internet. Therefore, in this step, we will be taking you through a step-by-step guide to forward your ports. For that:
- If you already know the IP address of your router, then skip this step. Otherwise, press the “Win + R” keys simultaneously and type “cmd”.

Open Command Prompt - Enter the following command in the command window and hit the Enter key:
ipconfig
- Under the Wireless LAN Adapter Wi-Fi option, you will see the “Default gateway” option and “IPv4 address”.

Default Gateway and IPv4 Address - For PS4, first, navigate to “Settings” and then “Network”. Under “View Connection Status” you will find the IP address.
- For Xbox, first, proceed to “Settings” and afterward “Network”. Under the “Advanced Settings,” you will find the IP address.
- Note down these addresses somewhere and afterward, copy-paste the default gateway in your browser and press the Enter key.
- Then log in to your account using credentials provided to you by your Internet Service Provider.
- Go to the “Forwarding” option from the left panel and enter this address in the “IP Address Box”.
- Finally, you have to open the connection ports, which are required by the game.
- Go to ‘Forwarding’ then “Virtual Server’ and finally “Add New”. Here Enter the following numbers accordingly.


PlayStation 4 Users:
TCP: 1935,3478-3480

UDP: 3074,3478-3479
Xbox One Users:
TCP: 3074

UDP: 88,500,3074,3544,4500
PC Users:
TCP: 27015-27030,27036-27037

UDP: 4380,27000-27031,27036
-
- After completing all the steps click on the “Save” button and close the browser.
- Finally, launch the game to see if the destiny 2 error code marionberry is settled now.
Solution 9: Examine Destiny Server Status
If you have tried implementing all of the aforementioned solutions but none of them worked for you it simply means the problem is with Destiny’s servers and they are down for maintenance or any such matter just like updating the game to add in some advanced features. You can look for the matter whatever it may be by simply navigating to the Bungie Support Website. In this case, the only available option with you would be to wait for the servers to get active again.
Hopefully, you’d be able to overcome the error by now but if you continue to struggle with the same error then you may Contact Us here and we will further look into the problem for you.