Easily Fix Unreal Engine is Exiting due to D3D Device being Lost
If you have been getting the “Unreal Engine is Exiting due to D3D Device being Lost” error while trying to launch a game it can be due to a number of reasons. Basically, this message pops up when you are trying to launch into a game with Unreal Engine at its core or using Unreal Engine directly. Therefore, we suggest that you try to fix it by implementing the methods that we have suggested in this article.

What Causes the Unreal Engine is Exiting due to D3D Device being Lost Error?
After getting through the methods and steps listed in this article, we were able to list the reasons which are usually behind the error.
- Outdated Software: It is possible that the software installed on your computer might have gotten outdated and this resulted in the “Unreal Engine is Exiting due to D3D Device being Lost” error is triggered. Therefore, we suggest that you try the steps below to update the software that has been outdated.
- Antivirus: Sometimes, the Antivirus installed on the computer might be preventing certain operations from being run. Therefore, we suggest that you try to disable the Antivirus temporarily and check to see if that fixes the issue.
- Game Files: It is possible that the game files might have been damaged and that ended up causing the “Unreal Engine is Exiting due to D3D Device being Lost” error. Therefore, we suggest that you try to repair these files and check to see if that fixes the issue.
Now that you have been taken through most of the reasons behind the issue, we can finally start implementing the solutions.
Fix Unreal Engine is Exiting due to D3D Device being Lost
Solution 1: Update Unreal Engine And Windows
In order to update the unreal engine follow the steps mentioned below:
- First, open the Epic game’s Launcher and then go to the “Library”.

Choose Library Option - In the library section, you will see “Engine Versions” on the right pane, if an update is available you will see the “+Add Versions” option beside it.
- Double click on the “Add Version” option, a message will appear up for installing the new engine. Install the new version by following the on-screen instructions and then select “Update”.

In order to update Windows follow the steps below:
- Press the “Window + S” keys together to open up the search box, here type “Check for Updates” in the search prompt, and press “Enter”.

Check For Updates - In the Windows, Update tab choose the “Check for Updates” option. This will prompt windows to look for any possible upgrades over the internet.

Solution 2: Disable Any NVIDIA Performance-Enhancing Functions
You must also make sure to disable any active performance-enhancing function in NVIDIA’s GeForce Experience. Although functions such as “Game Booster” and “Battery Optimization” are useful in increasing the overall performance of your system simultaneously they can also cause certain issues. Launch the GeForce Experience (or relevant application) and disable it if there’s any enhancement function enabled.
Solution 3: Modify Preferences For Dedicated Graphics
It is common among the users of the unreal engine to have dedicated graphics on top of default graphic cards. In some cases, two different graphic cards can cause some errors. Follow these steps to change a few preferences for your dedicated graphics card:
- Right-click anywhere on your desktop and select the “NVIDIA Control Panel”.
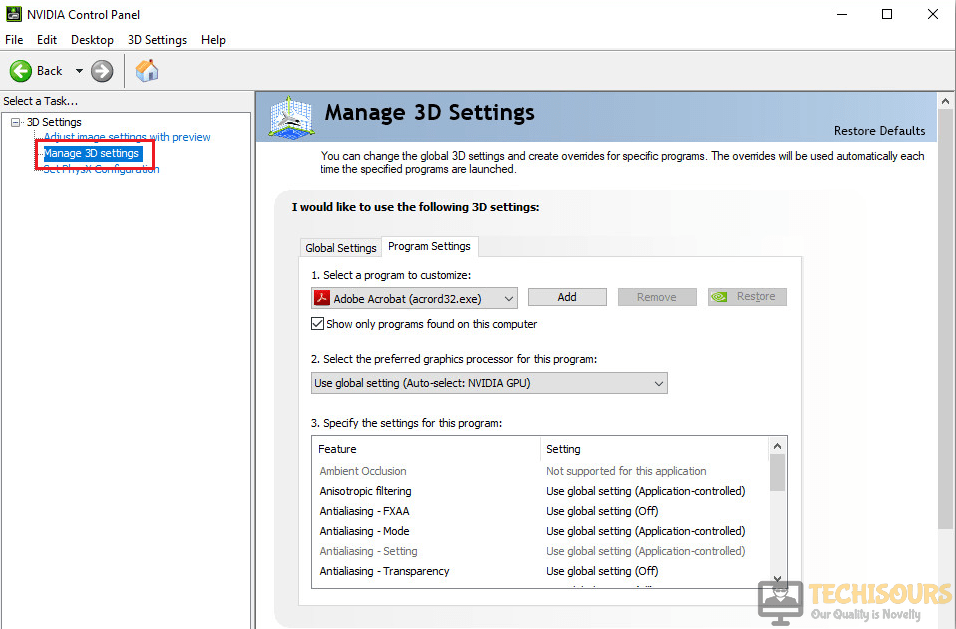
- In the control panel window select the “Manage 3D Settings” option and then click on “Program settings”.

Manage 3D Settings - A drop-down menu will appear with a list of all the programs. Add “Unreal Engine” and then choose “NVIDIA (Dedicated graphics)” from the second drop-down menu.
Solution 4: Turn Off Onboard Graphics
- Press the “Window + R” keys together to open the run dialogue box, here type “devmgmt.msc” in the dialog box and select “OK”.

Typing devmgmt.msc - In the “Device Manager” window locate and expand the “Display Adapters” section and then select the “On-Board” option.
- Now, right-click on it and select “Disable”.

Solution 5: Disable Any Antivirus or Firewall Software
Your antivirus software or Windows firewall might be the reason behind the D3D error. It is commonplace for antivirus software to block various games due to a perceived threat to your system. In this case, it might help solve the error by disabling any antivirus or firewall software temporarily on your PC. All you have to do is disable or uninstall the active antivirus on your PC. Follow these steps to disable Windows Defender:
- Press the “Window + I” keys simultaneously to open up the Settings window and here double-click on the “Update & Security” option.

Update and Security - Here select the “Windows Security” option from the left pane and then select “Virus & Threat Protection” under Protection Areas.
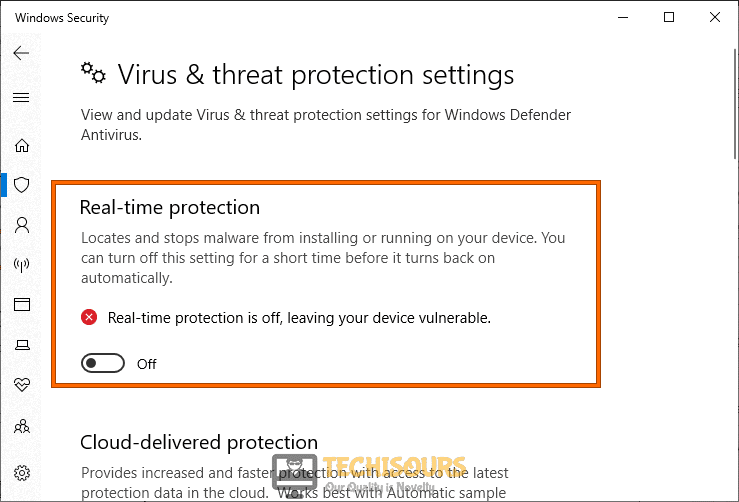
- In the following window select “Manage Settings” under Virus & Threat Protection Settings.

Choose Manage Settings - Now click on the toggle button under the “Real-time protection” section to turn it “OFF”.

Disable Real-time protection


Solution 6: Remove Any Overclocking or SLI Technology
Many users reported that disabling overclocking features from their PC solved the problem for them positively. This could be the case because the unreal engine is not well optimized for running in an overclocked environment. Moreover the same was found true for SLI technology. The reportedly unreal engine does not perform too well in the presence of SLI technology at work. To try this fix all you have to do is temporarily disable any overclocking or SLI technology feature on your computer. If this doesn’t solve the issue you can always enable them back.
Solution 7: Update Your Graphics Driver
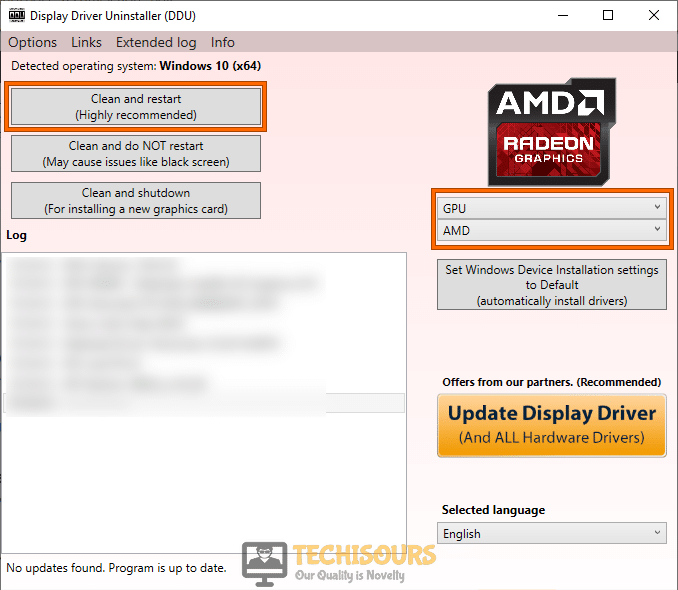
- Initially download and install “DDU” (Display driver uninstaller) from the official website.
- Once you have installed Display Driver Uninstaller (DDU) by following the on-screen instructions, now boot your PC in “Safe Mode”.
- As your PC successfully boots in safe mode, launch DDU and click on the first option stating the “Clean and Restart” to uninstall all the existing drivers from your system.

Choose Clean and Restart - Now restart your computer and boot it normally. Press the “Windows + R” keys together to open the Run dialogue box, type “devmgmt.msc” in the dialogue box, and select “OK”.
Typing devmgmt.msc - Right-click anywhere on the window and select “Search for hardware changes” and hopefully D3D Device being Lost steam issue would be fixed.
Solution 8: Avoid Playing In Full-Screen Mode
This might sound insignificant but it worked well for quite a lot of users. Playing games in full-screen mode could potentially be the reason for the problem hence try running games in minimized window mode.
Solution 9: Reinstalling DirectX and Modifying FreeSync Settings
This fix is relevant for the users of FreeSync monitors, to implement this procedure with the steps below:
- Reinstall “DirectX” on your PC and restart the system.
- Then go to “GSync settings” in the GeForce Experience application.
- In the FreeSync monitor settings section, enable the “Full-Screen” option. Checkmark the “Enable” and other relevant boxes.
- In the end “Reboot” your PC and see if the D3D Device being Lost problem is solved.
Solution 10: Verify Integrity Of Game Files
- Launch “Steam”, go to “Games” and double click on the “View Games Library” option.

Clicking on the “View Games Library” option - Right-click on the game that has been showing the d3d device lost error and select “Properties”.
- Under the “Local Files” tab, select the “Verify Integrity Of Game Files” option.

Clicking on the “Verify Integrity of Game Files” option - Let the verification process complete and then run the game again to see if the D3D Device being Lost error is resolved.


Solution 11: Lessen GPU Temperature
One potential fix, in this case, is to lower down your GPU temperature which can prevent your game from crashing at full load. Try to increase cooling which in turn can lessen your GPU temperature and the game can run stable without crashing.
Solution 12: Reconfigure FPS Limit
- First of all open “NVIDIA GeForce Experience” software and here head over to the “Preferences” tab.
- In the “Preferences” tab click on the checkbox associated with “Set Frame Rate Target When On Battery”.
- Now set the Frames per second to “30fps”.

Setting Frame Rate - Also, turn “OFF” GeForce Game Booster, Battery Optimizer, Overlay app, etc.
- Check to see if this fixes the Unreal Engine is Exiting due to D3D Device being Lost issue.

Solution 13: Check For Hardware Issues
Sometimes the cause of certain errors can be the computer hardware itself, so it’s better to inspect your computer hardware devices in order to check for any d3d device lost steam error. For this particular error check your video and graphics card and if you cant fix the error yourself then immediately contact your device manufacturer for help.
Workaround:
- Try checking for any faulty laptop cables or charging ports.
- Also, make sure to check your GPU TDR Delay, if a lot of computation stuff is involved the default TDR delay might cause the driver to stop responding hence causing this error.
- You can also try to uninstall Geforce Experience for a while.
- Try reverting back the drivers to previous versions.
- Do not maximize your UE4 UI window, instead, press the restore down button and try playing in half screen mode.
- Disable DPI scaling and enable all the settings above in order to avoid crashing issues during playing.
- Navigate to “NVIDIA Control Panel > Manage 3D Settings > Program Settings”, here select “ue4editor.exe” and change “Antialiasing – FXAA” to “OFF”.
- Try tweaking certain settings related to GPU lanes in the motherboard BIOS in order for the game to run smoothly.
Follow the aforementioned solutions in order to get through the error successfully and in case you have any more queries in this regard feel free to Contact Us here.