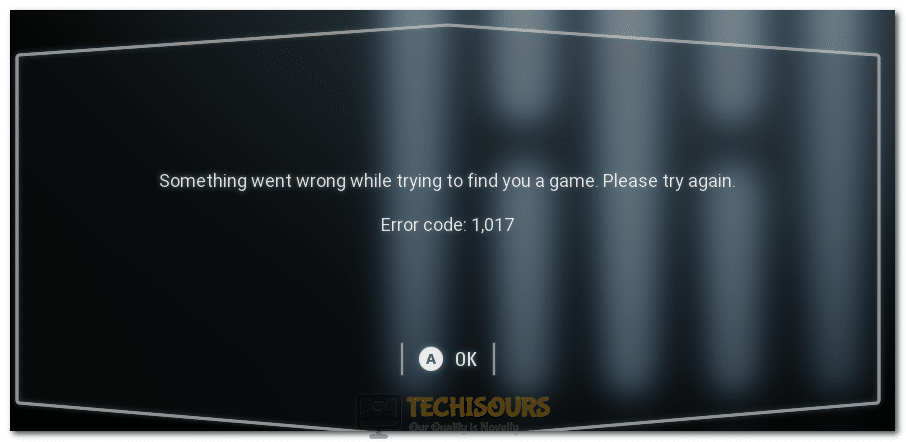
Easily Fix Battlefront 2 Error 1017 and 721 [Complete Guide]
We have been investigating the Battlefront 2 Error 1017 “Something Went Wrong While Trying to Connect to the Game” and Error 721 on some of our test benches and we have been able to fix this by testing and applying different solutions that have been the most effective for them. In addition to that, we have also devised the reasons due to which the error occurs in the first place and have listed them as follows.
What Causes the Battlefront 2 Error 1017 on Xbox One, PC, or PlayStation4?
After going through the solutions that were the most effective in our testing, we came to the conclusion that the following are the most important reasons behind the occurrence of this issue.
- Connection Issue: Sometimes the internet connection that you are using might be glitched or it might not be connecting properly to the servers. Therefore, we suggest that you try to check if the internet works properly.
- DNS Configuration: In certain cases, the DNS configuration that is being used on the Xbox, PS4 or the PC might not have been set properly and due to this, the Battlefront 2 Error 1017 might be getting triggered. Therefore, we suggest that you configure this DNS address properly.
- Firewall/Antivirus: The Firewall or the Antivirus installed on your computer might be blocking the connection from being made with the server. Therefore, we suggest that you try to block this temporarily and check to see if doing so fixes the error.
- Outdated Windows: If Windows has been outdated on your computer, the connection might not be properly made due to which the error occurs. Therefore, we suggest that you update Windows to the latest available version and check to see if the issue is fixed.
Now that you have been taken through most of the reasons, we can finally start implementing the solutions on our computer.
Fixing the Battlefront 2 Error 1017 and Error 721:
Method 1: Check Connection
- Press the power button on your PlayStation 4 and navigate to the settings.
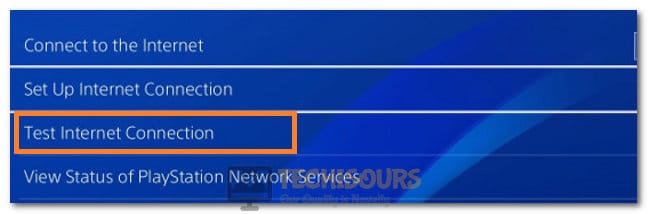
- In the Settings, select the “Network” option and from there, click on the “View Connection Stats” or the “Test Internet Connection” option

Selecting the Test Internet Connection Option - After doing so, check to see if you are getting the same kind of connection speed that your ISP provides.
- Fix your connection in case of not getting appropriate speed by restarting your router and contacting the ISP and check to see if the Battlefront 2 Error 1017 is fixed.
Method 2: Check for Service Outage
In certain cases, it might be possible that there might be a worldwide service outage on the EA servers or the PlayStation Servers. A good thing to do in such a case would be to contact your friends and have them check if the issue is affecting them as well. In addition to that, you could also check if EA or PlayStation Servers are down.
Method 3: Hard Reset Your Device
- If you are getting the error on Xbox One or on PS4, you can easily apply this method to hard reset your device.
- Make sure to shut down the PS4 or the Xbox One and wait for it to turn off completely.
- After turning it off, make sure to unplug the power cable from the console and press and hold the power button to get rid of any static electricity.

Disconnect Power Cable - Wait for at least 2 minutes and power the consoles back up.
- Check to see if doing so fixes the Battlefront 2 Error 1017 and 721 on your PS4, Xbox One or PC.

Method 4: Reinstall Battlefront 2 on your PC
- Press “Windows + R” to launch into the Run prompt and type in “appwiz.cpl” to launch into the application management window.

Typing in “Appwiz.cpl” and pressing “Enter” - From here, right-click on the Battlefront 2 app in the list and select the “Uninstall” button.
- Follow the on-screen instructions to completely uninstall the game on your computer.
- Download and install the game again and check to see if the battlefront 2 error 1017 and the battlefront 2 error 721 has been fixed.

Method 5: Renew IP Configuration on PC
- Press “Windows + R” to launch into the Run prompt and type in “cmd”.

Typing in cmd - After doing so, press the “Shift + CTRL +Enter” keys on your keyboard to launch a command prompt with admin permissions.
- After launching into the command prompt, type in the following commands one by one and press “Enter” after each to execute them.
Ipconfig/release

ipconfig/renew
- Restart your computer after the commands have been executed and check to see if the battlefront 2 error 1017 has been fixed.

Method 6: Enable UPnP
In certain cases, it is possible that Universal Plug and Play has been disabled on your router which is mostly used by games such as Battlefront 2 to connect online with their servers in an efficient manner. Therefore, we have to make sure that it is enabled.
- First of all, launch the command prompt by pressing “Windows + X” and clicking on the “Powershell” or the “Command Prompt” option.

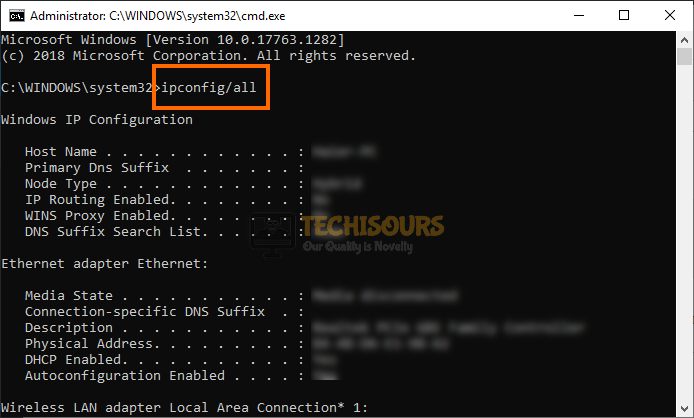
Windows Powershell (Admin) - In there, execute the “ipconfig /all” command and wait for the output.

ipconfig/all - From the output, note down the IP address listed beneath the Default Gateway listing and paste it into your browser.
- This will take you to the admin login page of the router.
- The credentials to this login page are usually “admin” for the username and “admin” or “1234” for the password but sometimes the password and the username might be written on the back of your router.
- Log in to this page and look for NAT Forwarding, Advanced or any other such setting.
- In there, make sure that the UPnP setting has been enabled because it is the most crucial in playing online games.
- Check to see if by enabling the UPnP, you are able to fix this issue on your computer.

Method 7: Change DNS Configuration
For Ps4:
- Press the button on your controller to take you to the PS4 menu and from there, select “Settings”.
- From the settings, select the “Network” option and select the “Set up Internet Connection” from there.

Clicking on the Set Up Internet Connection Option - Depending upon the type of connection that you are using, select the “Use Wi-Fi” or the “Use LAN Cable” option.
- From the next screen, click on the “Custom” option and from the next screen, select “Automatic” for setup IP Address setting.
- On the next screen, select the “Do Not Specify” option for the DHCP Host Name setting.
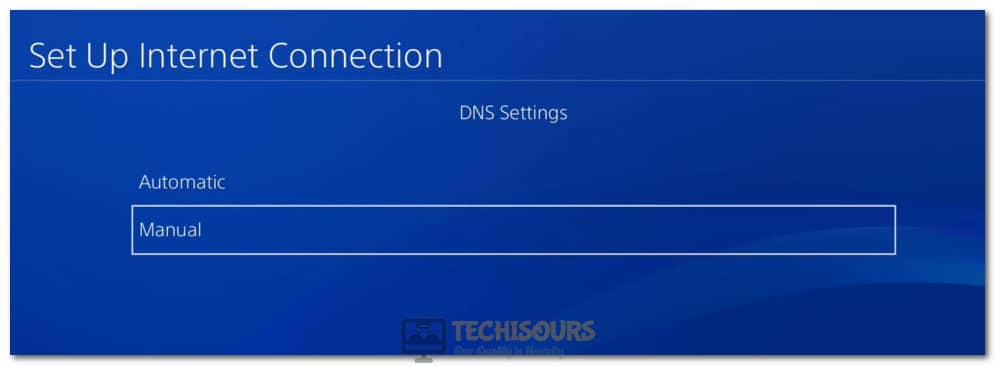
- From the next screen, select “Manual” for the DNS Address option.

Clicking on the “Manual” option for the DNS Setting option on PS4 - Now, set the following address for the Primary and the Secondary DNS Addresses respectively.
8.8.8.8

8.8.4.4
- Set up the rest of the internet connection normally and check to see if you are able to fix the Battlefront 2 Error 1017 PS4 Error.

For Xbox One:
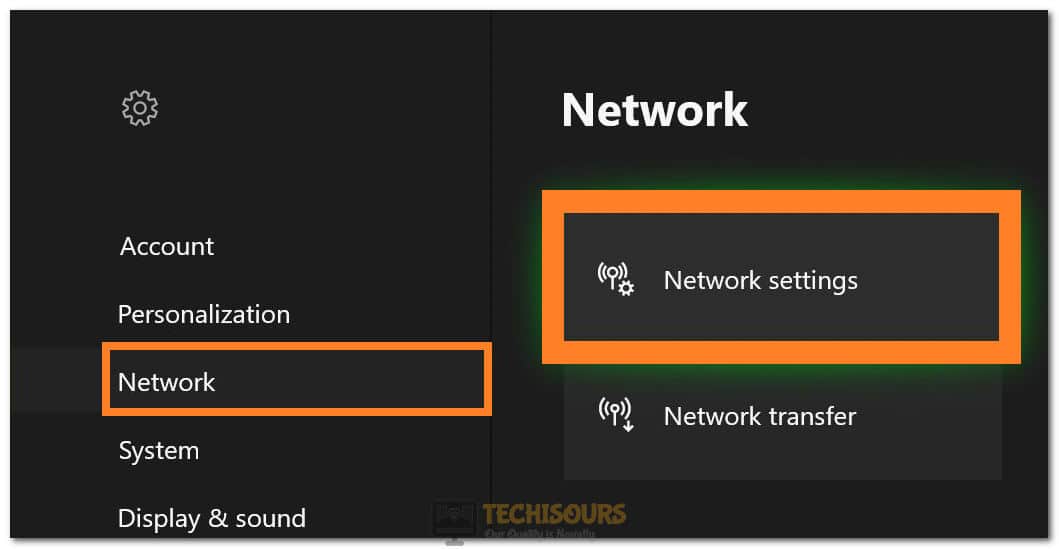
- Press the Xbox button from your controller to go to the settings.
- Now, from the left, select “Network” and then select “Network Settings”.

Clicking on the “Network Settings” option - From the next screen, click on “Advanced Settings” and then select the “DNS Settings” option.
- From the next screen, choose manual and set the Primary and Secondary IPV4 DNS to the following addresses respectively.
8.8.8.8

8.8.4.4
- Restart your game and check to see if you are able to fix the Battlefront 2 Error 1017 Xbox One and the Error 721 issue.
For PC:
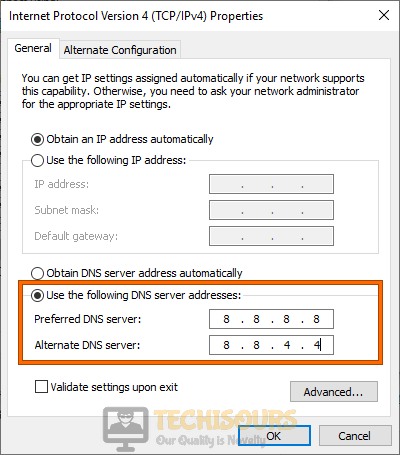
- Press “Windows + R” to launch into the Run prompt, type in “ncpa.cpl” and press “Enter” to launch into the network control panel.

Typing in “ncpa.cpl” - Right-click on the internet connection that you are using and select “Properties”.
- From the next screen, double-click on the “Internet Protocol Version 4(TCP/IPv4)” option and check the “Use the Following DNS Server Addresses” option.

Use the following DNS server addresses - Type in “8.8.8.8” in the Preferred DNS Server section and “8.8.4.4” in the secondary DNS server option.
- Click on “Apply” to save your changes and on “OK” to exit out of the window.
- Check to see if you are now able to fix the Battlefront 2 Error 1017 issue on your PC.

Method 8: Windows Network Settings Refreshing
- Press “Windows + R” to launch the Run prompt, type in “cmd” and press “Shift + CTRL + Enter” to launch with admin permissions.
Typing in cmd - Type in the following commands one by one and press “Enter” after each to execute them on your computer.
netsh int ip reset c:\resetlog.txt

ipconfig/release

ipconfig/renew

ipconfig/flushdns

netsh winsock reset
- Restart your computer and check to see if doing so fixes the Battlefront 1017 error.
Method 10: Disable Firewall
- Press “Windows + R” to open the Run prompt, type in “firewall.cpl” and press “Enter” to launch into the Firewall Control Panel.

Typing in “firewall.cpl” - From the left side, click on the “Turn Windows Defender Firewall On or Off” and then click on the “Turn OFF Windows Defender Firewall” option for both the Private and Public Networks option.
- Click on “OK” to exit out of the window.
- Check to see if doing so fixes the Battlefront 2 Error 1017.

Method 11: Disable Antivirus
- Press the “Windows + I” buttons from your keyboard to launch into the settings, click on the “Update and Security” option and from the left, select the “Windows Security” button.

Choose Windows Security Option - From the right side, click on the “Virus & Threat Protection” button and under the “Virus and Threat Protection” heading on the next screen, click on the “Manage Settings” button.
- From there, turn off the “Real-Time Protection” toggle and check to see if you are able to update your Windows.

Method 12: Update Drivers:
- Download and install the Driver Easy Application on your computer.
- Run the installed application and click on the “Scan Now” option.

Scan now - Check to see if any outdated drivers are installed on your computer.
- Update these drivers and check to see if doing so fixes the issue.

Method 13: Windows Updates
- Press “Windows + I” to launch into settings and click on the “Update & Security” option.
- Click on the “Windows Update” option from the left side and click on the “Check for Updates” button.

Check For Updates - Click on the “Download and Install” button and wait for them to be installed.

Method 14: Add an Exception in Antivirus
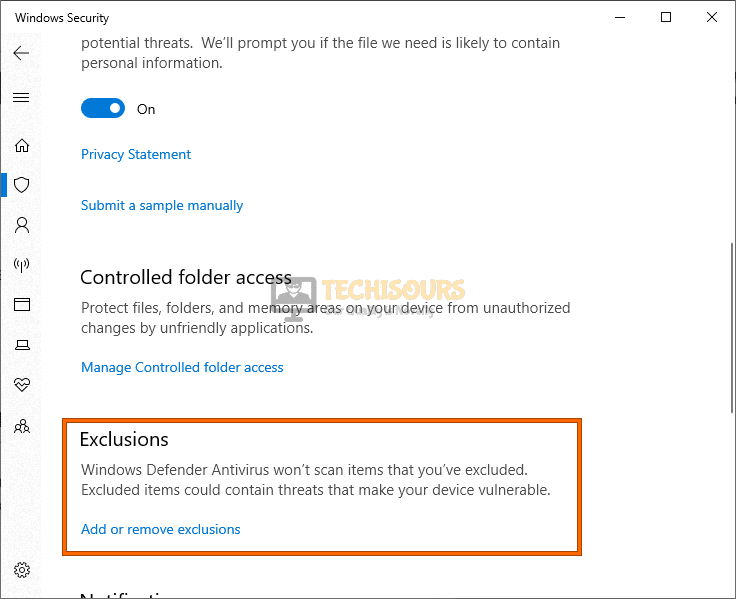
- Press “Windows + I” to launch into settings and click on the “Update & Security” option.
- From the left, click on the “Windows Security” option and from the right side, click on the “Virus & Threat Protection” option.

Virus and threat protection - Under the “Virus and Threat Protection” button, click on the “Manage Settings” option.
- Scroll down and under the “Exclusions” section, click on the “Add or Remove Exclusions” option.

Add or remove exclusion - Click on the “+” option to add an exclusion, select “Folder” and point out the location where the game has been installed.
- After adding this exclusion, check to see if you have been able to fix the Battlefront 2 Error 1017.

If the Issue is still being triggered, contact us for further troubleshooting.