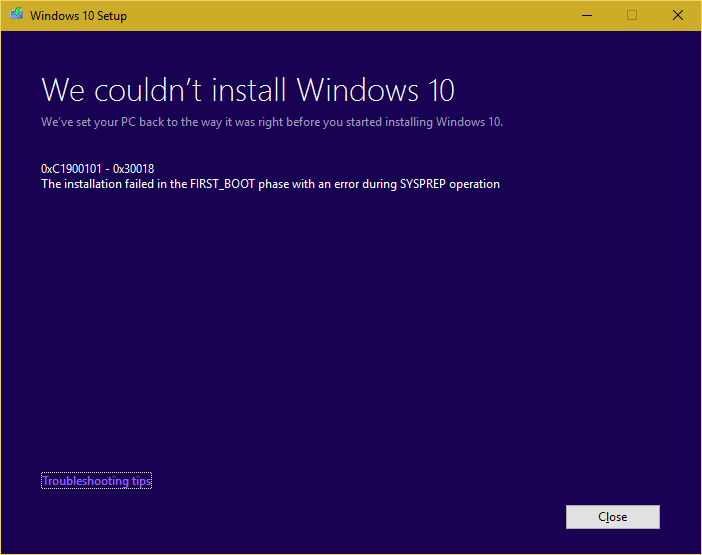
Easily Fix Windows Installation/Upgrade Error: 0xc1900101-0x30018
The 0xc1900101-0x30018 error that you might see on your screen while installing a Windows update or a new version of Windows, is mostly related to obstructions during processing the install on your system. Therefore, if you get the error message and are confused, you are in the right place because we will be explaining this issue in detail and offering different solutions that will help you completely rid yourself of this error.
What Causes Error 0xc1900101-0x30018 on Windows?
After going through the set of solutions compiled by our experts, we concluded that the following must be the most important reasons due to which this error message is triggered in the first place.
- Antivirus: It is possible that the Antivirus that you have installed on your computer is preventing Windows from being able to properly download all of its files from its server and that is causing the 0xc1900101-0x30018 error on your computer while trying to install the update package.
- Damaged Files: Sometimes, the Update Delivery Files might have been damaged due to a power interruption or due to corruption. Therefore, we strongly suggest that you try and repair the damaged files and then check to see if doing so fixes the error.
- Damaged Storage Device: If the Storage device on which you are trying to download and store the files has acquired bad sectors or is poorly optimized, you might get the 0xc1900101-0x30018 error while trying to install Windows. To prevent this, you can perform the SFC scan as indicated below to get around this issue.
- Problematic Drivers: In certain cases, problematic drivers might prevent you from being able to properly update your Windows by causing conflicts with the new updates. Therefore, we recommend that you check to see if there are any problematic drivers installed using the solution below.
- Outdated Bios: If the bios on your computer have been outdated, it might not be properly compatible with all the onboard components. Therefore, we suggest that you try and update the Bios to fix the 0xc1900101-0x30018 error, and before doing so, make sure that you have learned the process to do it immaculately because any interruption during the install or misconfiguration can leave you with a bricked board.
- On-Board Sound: If the On-board sound feature on your motherboard has been turned on, you might run into this error while trying to install Windows. Therefore, we suggest that you try and turn this feature off and then check to see if doing so fixes the 0xc1900101-0x30018 error.
Now that you have been taken through almost all the important reasons behind its occurrence, we can finally move on towards implementing the solutions.
Before You Start:
Follow some of the basic troubleshooting tips in the start as indexed below in order to to get over the problem instantly:
- If you have any “USB Device” or “External Hard Drive” connected to your PC make sure to “Disconnect” them before starting to launch an update.
- If you are trying to update over “Wi-Fi”, chances are there may be packet loss and data won’t be able to download as efficiently, to fix this try to connect to your Router using a “Wired LAN Cable”.
Once done carrying out these simple fixes if the issue persists then you can proceed to implement some other advanced solutions mentioned below.
How to fix 0xc1900101-0x30018 Windows Installation Error:
Solution 1: Disable Your Anti-Virus Temporarily
If you have any third-party anti-virus installed on your computer make sure to turn it OFF before an update. To turn off Windows Defender go through these steps:
- In the Windows search bar near the Start menu type in “Virus and Threat Protection” and press “Enter”.

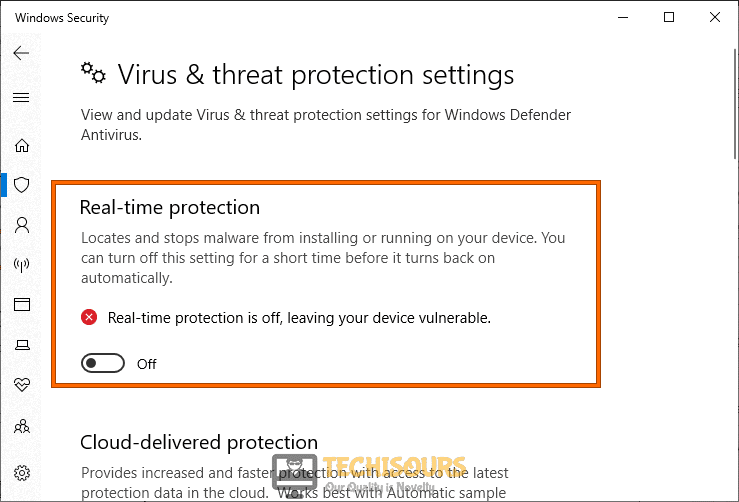
Virus and Threat protection - In the pop-up window click on the “Manage Settings” option below “Virus and Threat Protection Settings”.
- Here turn “OFF” the toggle button under the “Real-Time Protection” option.

Disable Real-time protection

Solution 2: Perform An SFC Utility and DISM Scan
Windows Command Prompt can execute different commands proving different purposes, one of them is the SFC/ SCANNOW and DISM command. These command helps fix corrupt system files. To perform an SFC scan on your system proceed with the steps below:
- In the search bar near the Start menu type in “cmd” and from the list of search results right-click on it to select “Run As Administrator”.
- In the command prompt window type in the following command and press “Enter”:
sfc /scannow
- Now in the next line type in the following command and hit “Enter” again:
DISM.exe /Online /Cleanup-image /Restorehealth
Solution 3: Perform A Disk Clean-up
Sometimes low storage on your Windows drive can cause such error, that is where the Disk Cleanup tool comes in. To clean up your disk carry out these steps:
- Open up “This PC” on your computer and right-click on your main drive which is mainly “C:”.
- From the drop-down menu click to select “Properties”, and in the new Properties window click on “Disk Cleanup”.

Run Disk Cleanup - In the following window click on “Clean Up System Files”, now in the files to delete section make sure to check all the files except “Downloads” and then press “OK”.

Solution 4: Use the Media Creation Tool
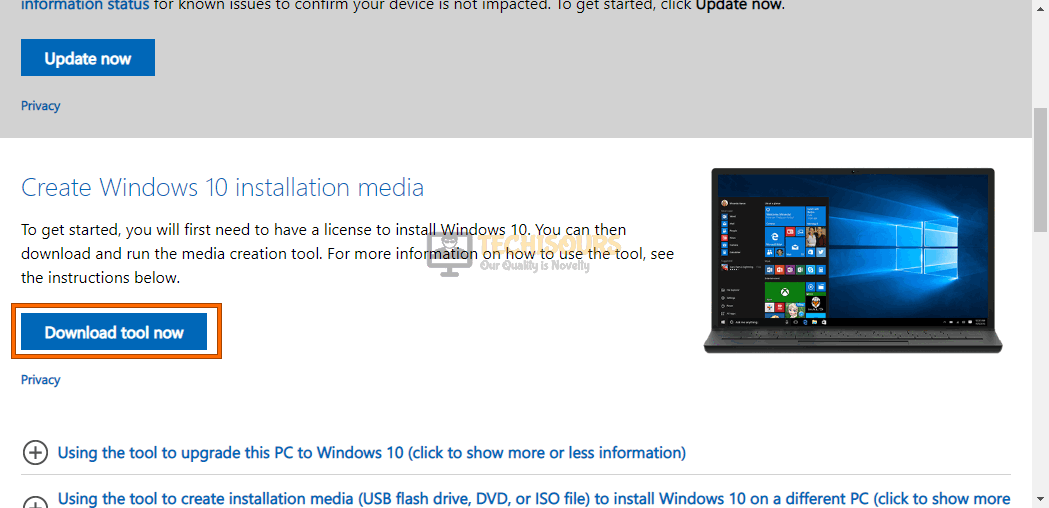
- Go to the official Microsoft website and download the “Media Creation Tool” for Windows Upgrade, once downloaded right-click on the program and click on “Run As Administrator” from the drop-down menu.

Download Media creation tool - Now Accept all the “Terms and Agreements” and press the “Next” button, in the following window click on “Upgrade This PC Now” and hit “Next”.
- Then click on “Download” and “Install Updates” and afterward hit “Next”. Follow the on-screen instructions until you reach the “Ready to Install” menu. If you wish you can select to keep your personal files or do a clean install, choose accordingly.
- Click on “Next” and the “Upgrade” will start and most probably 0xc1900101-0x30018 issue would be rectified.
Solution 5: Remove Problematic Drivers
- Open up “This PC” on your computer and navigate to the following address:
Local Disk (C:) > Windows > Panther
- In the “Panther” folder, locate the following files to identify the problematic drivers:
Setuprr.log

Setupact.log
- Once the problematic drivers are found, remove them and then check if it solves the 0xc1900101-0x30018 problem for you.
Solution 6: Uninstall Problematic Applications
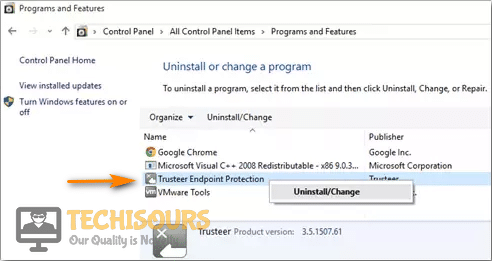
Some third-party applications can interfere with Windows Updates and can cause them to fail, it is found that programs like “Acronis True Image” and “Trusteer Rapport” can be culprits to the error. You can try uninstalling such programs to help resolve the issue. To do so follow these steps:
- Open up the “Run” dialog box using the “Window + R” keys together on your keyboard, in the search bar type in “appwiz.cpl” and press “Enter”.

Typing “appwiz.cpl” - In the pop-up “Programs and Features” window scroll down through the list of the installed applications to find such problematic apps, once located highlight the app and press the “Uninstall” button at the top.

Uninstall Trusteer Rapport Application - Next, follow the on-screen instructions to complete the uninstallation process and afterward check to see if the 0xc1900101-0x30018 issue got fixed.

Solution 7: Reset Windows Update Components
This method is a long one and should be tried after other solutions have failed to work. Carry out the steps indexed below:
- Open up the “Command Prompt” window by typing in “cmd” in the Windows search bar. From the search results right-click on it to select “Run As Administrator”.
- In the Command Prompt window type in the following commands one by one and press “Enter” after each:
net stop wuauserv

net stop cryptSvc

net stop bits

net stop msiserver

ren C:\Windows\SoftwareDistribution SoftwareDistribution.old

ren C:\Windows\System32\catroot2 Catroot2.old

net start wuauserv

net start cryptSvc

net start bits

net start msiserver
- Once all of the commands have been executed, proceed to “Restart” your computer and then check if the 0xc1900101-0x30018 got resolved.
Solution 8: Upgrade Your BIOS
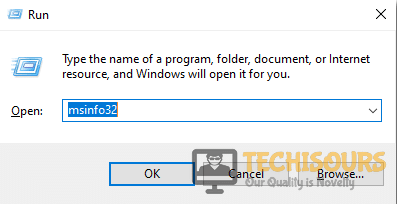
- Open up the “Run” dialog box, and here type in “msinfo32” in the address bar, and press “Enter”.

Type msinfo32 Command - When the System Information window opens up, scroll down through the list to locate the “BIOS Version/Date”.
- Once located write down the “Version” somewhere and close the window.
- Now open up the “Web Browser” on your computer and go to your “Motherboard Manufacturers Website”, proceed to the “BIOS Section” and check for the latest updated version. If it matches the same on your computer then close the browser window, if it doesn’t match “Download” the latest version and “Install” it by following the on-screen instructions.
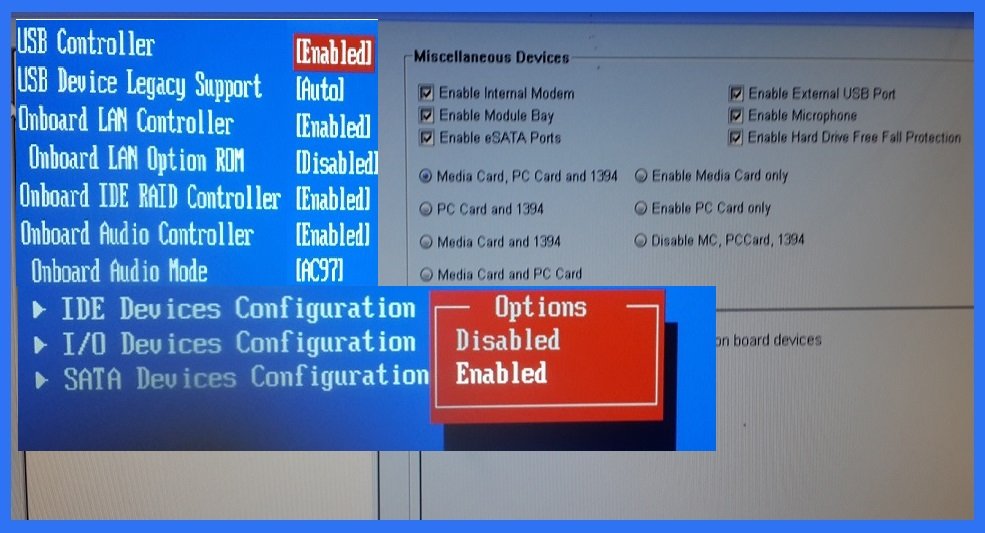
Solution 9: Disable the On-Board Sound In BIOS
One user suggested that disabling the onboard Sound in BIOS helped fix the issue for them as well. So, follow the procedure as listed below:
- Shut down your computer from the Start Menu, once turned “OFF” remove any “Sound-Cards” installed on your computer.
- Once removed, turn “ON” your PC and enter the “BIOS” using the key displayed on the screen. These keys usually are “F2”, “F10” and “Del”, in the BIOS menu navigate using the “Arrow Keys” on your keyboard, you can also use the “Mouse Cursor” if you have a “Motherboard”.
- Head into the “Advanced” tab at the top, and in the advanced tab locate the “Onboard Peripherals” menu, here you may find “Onboard Sound Settings”. Once you find the Onboard Sound Settings change the status to “Disabled”.

Disable On-Board Sound Settings - Once done move to the “Exit” tab on the top and select the option saying “Save Changes” and “Exit”.
Solution 10: Try the Registry Fix
- Open up the “Run” dialog box using the “Window + R” keys simultaneously, in the search bar type in “cmd” and press the “Ctrl + Alt + Enter” keys together to open up the command prompt window.
- In the Command Prompt window type in the following command and hit “Enter” afterward to execute it:
rundll32.exe pnpclean.dll,RunDLL_PnpClean /DRIVERS /MAXCLEAN
- Once the command is executed, close the window and “Restart” your computer to let the changes have their effect.
Solution 11: Update Device Drivers
- In the search bar near the Start menu type in “Device Manager” and press “Enter”, when the Device Manager window opens up expand the section for “Display Adapters” and look for a “Yellow Exclamation Mark” in front of any device.

Select Display Adapters - If you see a hazard mark, right-click on the said “Adapter” and select “Update Driver” from the drop-down menu.

Solution 12: Use Windows Troubleshooter
- Press the “Window + I” keys simultaneously on your keyboard to open up “Settings”, in the Settings window use the search bar at the top to find “Troubleshoot” and hit “Enter”.
- In the Troubleshoot window locate and click on the “Find and Fix Other Problems” option. Then in the following window click on “Windows Update” to start the troubleshooting process.

Start the Troubleshooting Process

Solution 13: Disable Wi-Fi In BIOS
Disabling Wi-Fi in BIOS can sometimes solve the issue too, to do so follow the below-mentioned steps:
- “Restart” your computer from the Start menu, and on the Boot menu press the appropriate “BIOS Key”, these keys are usually “F2, F10, Del, or ESC”.
- In the BIOS menu, navigate to the “Advanced” tab using the arrow keys on your keyboard. In the Advanced Tab locate your “Wi-Fi Card”.
- Once you locate your Wi-Fi card, “Disable” it using the drop-down menu and press “F10” to save all changes and “Exit”.

Disable WiFi in BIOS - Lastly, check to see if you got rid of the error or not.

Solution 14: Update Windows In Safe Mode
Safe Mode is helpful when you don’t know what third-party application or service is interfering with your Update, Safe Mode boots a PC with a very minimal application running in the background. Carry out the steps below to implement this solution:
- In the Windows search bar near the Start menu type in “msconfig” and press “Enter”.

Typing in “Msconfig” - In the pop-up “System Configuration” window select the “Selective Startup” option in the General tab.
- Now click on the “Services” tab at the top, and here checkmark the box in front of “Hide All Microsoft Services”. Once all services are hidden click on the “Disable All” option.

Hide all Microsoft services - Now go to the “Boot” tab and select “Safe Boot”, with “Minimal” as an option and click on “OK”. You will be asked to Restart, click on the “Restart Now” button.


Solution 15: Modify/Create Registry Key
- In the search bar type in “Regedit” and hit “Enter”, when the “Windows Registry Editor” opens up click on the “File” tab menu at the top and select “Export” from the drop-down menu.
Typing “regedit” Note: You can choose to save the file anywhere you want, this is for future purposes in case a step goes wrong and your PC is about to be corrupted, you can just load the older saved file
- Now on the main “Registry Editor” page navigate to the following address:

HKEY_LOCAL_MACHINE\SOFTWARE\Microsoft\Windows\CurrentVersion\WindowsUpdate\ OSUpgrade
- If the “OSUpgrade” key does not exist, don’t worry simply right-click on the “Windows Update” key and select “New” from the drop-down menu. Now click on the key and rename it to “OSUpgrade”.
- Next, right-click on the “OSUpgrade Folder” and from the drop-down menu select “New” and then select “DWORD (32-bit) Value” from the extended menu.
- Name the new registry key as “AllowOSUpgrade” and select “OK”, once created open the registry key and type in “0x00000001” in the value bar. Afterward hit the “OK” button.
- Once done, proceed to “Restart” your computer and then check if it solved the 0xc1900101-0x30018 error for you.
Hopefully, the detailed fixes indexed above will be quite helpful for you in getting rid of the error permanently but if the error continues to stay you may Contact Us here for further help.