Easily Fix DNS lookup Failed Error [Complete Guide]
DNS Lookup Failed is actually quite a common error that is being faced by a lot of Chrome users. However, the error isn’t restricted to just Chrome, there have been instances on Mozilla Firefox and other browsers as well. In this article, we have compiled solutions, workarounds, and fixes that will help you to completely get rid of the error message.

Also, we have acquired some information as to why it occurs in the first place and have also listed the reasons below. Make sure to read through the reasons why it occurs and then start implementing the solutions one-by-one until one of them fixes this error message for you.
What Causes the DNS Lookup Failed Error?
After going through certain solutions and workarounds, we came to the conclusion as to why this error is triggered in the first place.
- Network Issue: It is possible that your Network is being glitched or it is bugged due to which the DNS lookup Failed error is being triggered. Therefore, we suggest that you try and fix the network issues by running the troubleshooter as mentioned below.
- IP Address: Sometimes, the IP address might be blocked on the DNS server or it might have gotten blacklisted due to suspicious activities. Therefore, we suggest that you try and get around this error by trying to change your IP address.
- DNS cache: The DNS cache being stored on your computer can sometimes be corrupted which can end up causing the DNS loop failed issue. Therefore, we strongly suggest that you try and clear it out by flushing it completely.
- Chrome Extensions: The Chrome browser might have some faulty extensions installed due to which the connection might get derailed. Therefore, we suggest that you try and disable the Chrome extensions as mentioned below. The same goes for other browsers as well, you can try to block extensions and then check if doing so fixes the issue.
Now that we have taken you through almost all the listed reasons, it is about time that we start implementing the solutions.
Fixing the DNS Lookup Failed Issue:
Solution 1: Use Network Troubleshooter
Running the Network Troubleshooter might very well resolve the issue. Follow the steps below to access it:
- Press the “Windows + I” buttons on your keyboard simultaneously to open the settings.
- Once in the Windows Settings, click on the “Network & Internet” option.

Network and Internet - Now select “Network Troubleshooter” under Advanced Network Settings. After diagnosing is complete, the troubleshooter should display solutions in case any problems were found.

This should help resolve any possible issues with network settings and might resolve the DNS Lookup Failure error.
Solution 2: Reset Your IP Address
Turn off your Modem and turn it back on after 30 seconds. This should change your IP Address and possibly resolve the DNS Lookup Failed issue as well. While waiting to turn the modem back on, you should restart your computer as well.

Solution 3: Flush the DNS Cache
Flushing the DNS cache can potentially fix the DNS lookup failure error, follow the method below to do so:
- In the search bar near the Start menu type in “CMD”, and right-click on “Command Prompt” to select “Run As Administrator”.

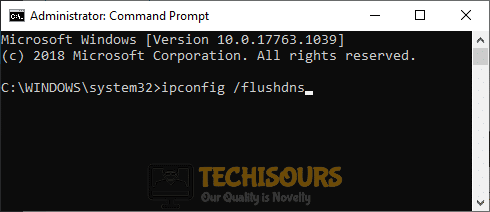
Select Run As Administrator From The Command Prompt - Once the Command Window opens, type in the following commands and press “Enter” on your keyboard after each command:
ipconfig /flushdns
ipconfig /renew
ipconfig /registerdns

Flushing DNS - Check to see if doing so fixes the DNS lookup Error.

Solution 4: Change the DNS Server
Another possible fix is to change the DNS Server address. To do this you must follow the below-indexed steps:
- Press the “Window + R” keys together to open up the “Run” dialog box.
- In the Run prompt, type in “ncpa.cpl” and press “Enter” to open up the Network Connections window.

Typing in “ncpa.cpl” - Your current network connection will now be visible to you, right-click on it and select “Properties”.
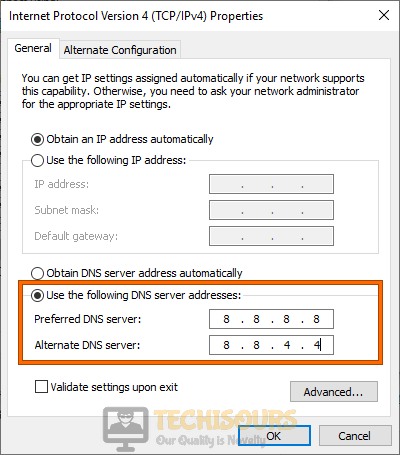
- Now select “Internet Protocol Version 4 (TCP/IPv4)” and click on “Properties”.
- Choose the option that says “Use the following DNS server addresses” and type in the fields below.

Use the following DNS server addresses - Type in “8.8.8.8” in the Preferred DNS Server and “8.8.4.4” in the Alternative DNS Server box.
- Click on the “OK” button and close the other windows.
- Check to see if the DNS lookup Failed error is fixed.

Solution 5: Reset the Winsock Catalog
If the above fixes did not work for you, try resetting your Network Stack by following the steps below:
- In the search bar near the Start menu type in “Run” and press “Enter”.
- In the Run dialogue box, type in “cmd” and on your keyboard press and hold the following buttons in order: “Ctrl + Shift + Enter”.
- This should run the Command Prompt window as “Administrator”.
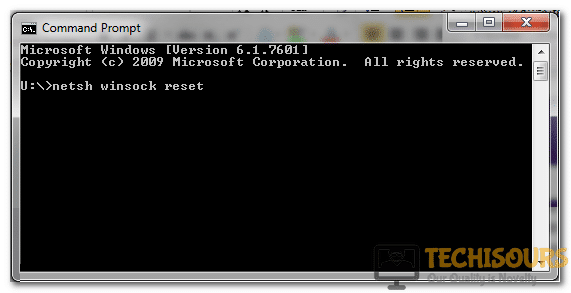
- Once the Command Window opens up, type in the following command and press “Enter”.
netsh winsock reset catalog

Type netsh winsock reset In Command Prompt - Press “Enter” and then “Restart” your computer.
Solution 6: Disable Chrome’s Extensions
Some extensions might mess up your browser function. To rule out the possibility of an extension causing the error, we are going to disable all the extensions by following the procedure below:
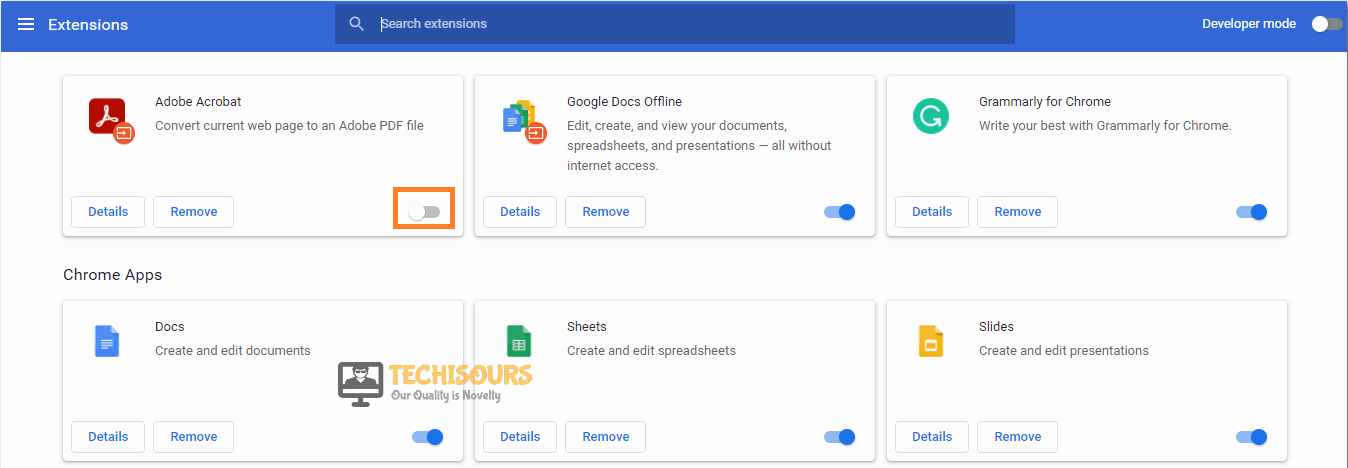
- In the search bar of Chrome, type in “chrome://extensions” and press “Enter”.
- You will now see all of your installed extensions. “Disable” all of them one by one.

Disable Chrome Extensions - Afterward “Restart” your browser.
If this resolved your issue, this means there is an extension that is causing the DNS Lookup Failure error. To figure out the culprit, enable the extensions one by one again until you come up with the issue again.
Solution 7: Clear Chrome’s Browsing Data
The other thing that you can try is to clear Chrome’s data as chances are it might resolve the issue as well.
- Click on the 3 dots at the top-right corner in Google Chrome that says, “Customize and Control Google Chrome”
- From the drop-down menu hover your mouse over to the option “More Tools” and then click on “Clear Browsing Data”

Clear Browsing Data Option - Now go to the “Advanced” tab and change the time range to “All Time”.
- Tickmark “Browsing History”, “Cookies” and “Cached Images and Files” checkboxes.
- Now click on the “Clear Data” button.

Solution 8: Change Your Browser
Once all the above fixes fail and the issue persists you should consider changing your browser. We would suggest switching to “Opera” as it is a very stable browser and has tons of built-in features and tools that can prove useful at times.
Solution 9: Disable Proxy (Firefox Users only)
Firefox users who encounter DNS Failure error can follow the method below to resolve the issue:
- Launch Firefox Browser and click on the three horizontal lines at the top right corner that says “Open Application Menu” and select “Options”.

Clicking on “Options” in Firefox - Here, scroll down to the bottom at “Network Settings” and click on the “Settings” option.

Network Settings Firefox - In the pop-up Connection Settings window select the “No Proxy” option under Configure Proxy Access to the Internet.
- Click “OK” to save the changes.
- “Restart” your browser and hopefully, the issue will be resolved now.


Hopefully, by following all of the above fixes you might be able to get rid of the error easily but if it continues to stay then you may Contact Us here for further help.