Fix: You do not have Permission to Save Files to this Location
The You do not have Permission to Save Files to this Location message is seen by some users while trying to save their excel files or sometimes even normal files on their computer. As seen from the message, sometimes, this might occur if the user is under an administrative environment and his permissions are limited but sometimes it might occur even if that is not the case.

In this article, we will be covering some reasons due to which this message might be seen and will also provide fixes that will get rid of it completely. Make sure to follow the solutions in a step-by-step manner to avoid any further escalation of the “Excel You do not have Permission to Save Files to this Location issue.
What Causes the You do not have Permission to Save Files to this Location Error?
After going through some user-based guides, we concluded that the following must be the primary reasons behind the occurrence of this issue.
- User Permissions: It is possible that certain user permissions are missing due to which you are getting the “You do not have Permission to Save Files to this Location” message while trying to open some files. Therefore, we recommend that you check to see if your user accounts has the permissions to read and write the files.
- Administrative Privileges: In certain cases, the program that you are trying to run might not have administrative permissions due to which the message might be seen while trying to open a certain file or save it. Therefore, we recommend running the program with admin permissions and then check to see if doing so gets rid of the “You do not have Permission to Save Files to this Location Contact Administrator” message.
- Protected Mode: If your Windows computer is running in protected mode, you might run into this message because your computer thinks that the file that you are trying to open might be potentially dangerous. Therefore, we recommend that you turn off the protected mode on Windows and then check to see if doing so fixes the error.
- File Ownership: If you haven’t properly acquired the File ownership on your computer, you will run into the “You do not have Permission to Save Files to this Location Mac” error while trying to open the File. Therefore, we strongly suggest that you make sure that your user account has the access to the file ownership and that the ownership is inherited.
- Damaged System Files: Some System files on your computer might have gotten damaged due to storage failures and this might trigger the error message. Therefore, we recommend that you try and repair the system files and then check to see if doing so fixes the issue.
- Bad Drive Sectors: The Storage drive that you are using might not be properly equipped to handle the smooth running of the operating system due to the presence of bad sectors. Therefore, we recommend that you try and fix the bad sectors and then check to see if the “You do not have Permission to Save Files to this Location” error persists.
- Antivirus Software: Some Antivirus software on your PC might be causing the You do not have Permission to Save Files to this Location error. Therefore, we recommend that you try and turn it off temporarily and then check if the file saves or opens properly.
- Background Apps: Some background applications can also cause this issue and if you boot into the safe mode, you can check to see if a background app was indeed the cause of the issue.
Now that you have been taken through almost all the possible solutions, we can finally move on towards implementing the solutions.
Fixing you do not have permission to save files to this location issue:
Solution 1: Allow Full Control To Your PC
Granting administrative privileges to perform a process is a must. In this solution, we would be giving full control (administrative privileges) to the PC and will check to see if it resolves our error.
- Start with right-clicking on the folder that shows up with the error and from the drop-down menu click to select “Properties”.
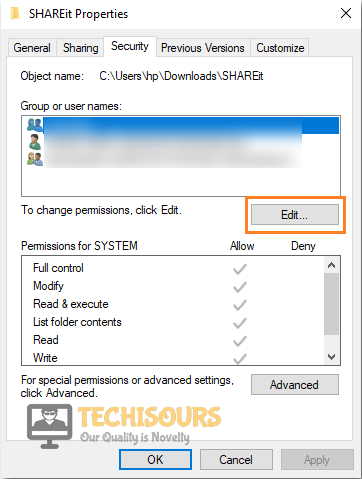
- On the pop-up Properties window click on the “Security” tab at the top and afterward click on “Edit”.

Select Edit Option - On the following window scroll down to locate “Administrators” and click once on it.
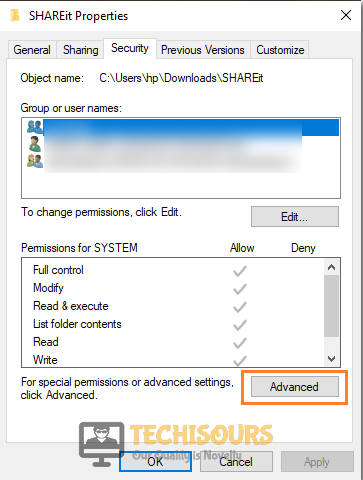
- Now, checkmark the box in front of “Full Control” and then click on “Advanced” at the bottom of the window.

Grant Full Control - In the Advanced Security Settings window click to select “Change Permissions” and select the user who is encountering the error. Then click on “Edit”.
- Now check the box in front of “Full Control” under “Basic Permissions”.
- Finally, click on “Apply” to save the changes made and press “OK”.
- Now proceed to check if you do not have permission to save files to this location error still persists or not.

Solution 2: Run the Program in Admin Mode
Running a program as an administrator will allow it to run with all privileges. To do so follow these steps:
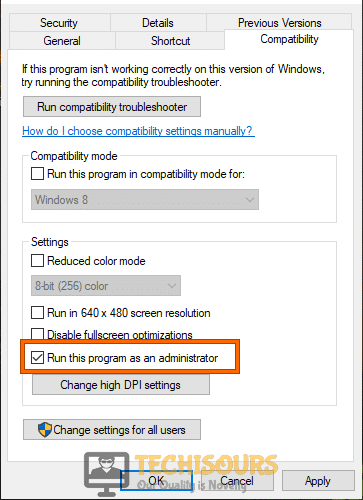
- Right-click on the program and from the drop-down menu click on “Properties”.
- From the tabs at the top of the window click to select “Compatibility”.
- Then scroll to the bottom and check the box in front of “Run This Program As An Administrator”.

Run this program as an administrator - Apply all the changes made and then click on “OK”.
Solution 3: Turn OFF User Account Control Settings
UAC settings can sometimes prevent you from performing certain actions, so you can try disabling UAC and then see if the problem gets solved. To turn “OFF” the user account control settings follow these steps:
- On the search bar near the Start menu search for “User Account Control” and click to select “Change User Account Control Settings” from the list of search results.

Change User Account Control Settings - In the new User Account Control Settings window move the “Slider” found under “Always Notify” to all the way down.
- Click on “OK”, close all the windows, and now check if the error got eradicated.

Solution 4: Disable Protected Mode In Windows 10
Protected mode helps against potential viruses and threats but it can also sometimes block certain tasks. You can try disabling it temporarily and see if it solves the problem. Follow this procedure to disable the protected mode on your system:
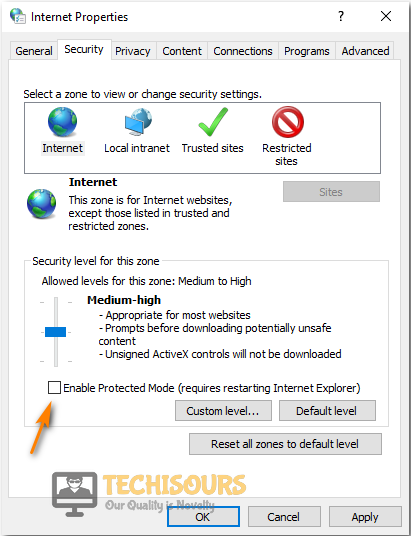
- On your keyboard press the “Window + R” keys simultaneously to open up the “Run” dialog box.
- In the Run prompt type in “inetcpl.cpl” and press “Enter”.

Typing “inetcpl.cpl” - In the pop-up “Internet Properties” window click on the “Security” tab and then uncheck the box in front of “Enable Protected Mode”.

Disable Protected Mode - Apply all the changes made and click to select “OK”.
- Proceed to check whether you do not have permission to save files to this location contact administrator error got eradicated now.

Solution 5: Tweak User Accounts Properties
- On your keyboard press the “Window + R” keys together to open up the “Run” prompt.
- In the Run dialog box type in “netplwiz” and press “Enter”.

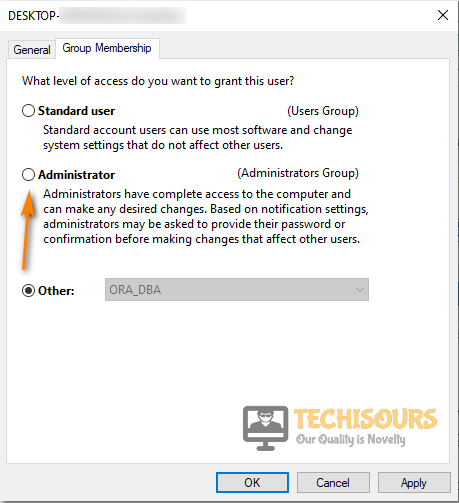
Type netplwiz Command - Then in the new “User Accounts” window click on the particular user giving the error and once selected click on “Properties”.
- In the new pop-up window click on the “Group Membership” tab and then select the “Administrator” option.

Select Administrator Option - Click on “Apply” and then “OK”. This will give you full access to save or modify files with administrative privileges.
- Lastly, check to see if you do not have permission to save files to this location mac error got removed now.

Solution 6: Gain Access By Allowing Everyone
You can also give privileges to all the users on the computer in order to get over this error. To do so proceed as follows:
- Right-click on the “File/Folder” that’s giving the error and from the drop-down menu click to select “Properties”.
- Click on the “Security” tab located at the top and then under “Group or User Names” click on “Edit”.
- Next, click on the “Add” button and type the object names to select in the dialog box.
- Then proceed to click on “Check Names” and afterward select “OK”.

Clicking Check Names Option - Now select “Everyone” under “Group or Usernames” and once everyone is highlighted click on the “Allow” checkbox in front of the “Full Control” option.
- Apply all the changes made and click to select “OK”.

Solution 7: Change the Ownership Of the File/Folder
In Windows, you can try changing the ownership of certain files/folders by following this method:
- Right-click to select the “File/Folder” and from the drop-down menu click on “Properties”.
- Then click on the “Security” tab at the top of the window and then choose to select the “Advanced” option at the bottom.

Select Advanced Option - Next, click on the “Change” icon located in front of the “Owner” title.
- In here type in the name of your “User Account” and then click on “Check Names”. Proceed to select “OK”.
- Before closing all the windows make sure to checkmark the box “Replace All Child Object Permission Entries With Inheritable Permission Entries From This Object”.
- Apply all the changes made and click on “OK”.
- Now proceed to check if you were able to overcome the error successfully.
Solution 8: Uncheck the Read-Only Option
This solution can work only in a few cases, so you can try implementing this and then check if it was helpful in your case or not. Follow these steps:
- Right-click on the “Affected Folder” and from the drop-down menu click to select “Properties”.
- In the Properties window uncheck the “Read-Only (Only applies to files in folders)” option located in front of the “Attributes” section.

Uncheck the Read-Only Option - Apply all the changes made and proceed to select “OK”.

Solution 9: Enable Inheritance
Enabling the Inheritance option also helped solve the error for quite a bunch of users. In order to enable inheritance follow this procedure:
- Right-click on your specific “File/Folder” and from the drop-down menu choose to select “Properties”.
- Then click on the “Security” tab at the top of the window and afterward click on the “Advanced” option at the bottom.
Select Advanced Option - In the advanced settings, window proceed to select the “Enable Inheritance” option.
- Apply the changes made and click on “OK”.
- Finally, observe if the error got resolved now.
Solution 10: Stop Sharing the File
If you are sharing the file with other users, you can try disabling it and then check if it was helpful. To stop sharing the file proceed with these steps:
- Right-click on the particular “File/Folder” and from the drop-down menu click on “Give Access To”.
- From the expanded menu click to select “Remove Access” and afterward observe if your error got fixed.

Remove Access

Solution 11: Try Saving File Elsewhere
If the file in question is a file from “Microsoft Office” or any similar programs you can try to save the file somewhere else using the “Save As” option and then try copying it from there.
Solution 12: Run the DISM Tool
- On your keyboard press the “Window + X” keys together and from the pop-up menu click on “Windows PowerShell (Admin)”.
- An elevated PowerShell window will pop up, type in the following command, and press “Enter”:
DISM.Exe /Online /Cleanup-Image /Restorehealth
The DISM tool fixes general issues and hopefully, it may resolve the issue for you too.
Solution 13: Run the System File Checker
- On your keyboard press the “Window + X” keys simultaneously and from the pop-up menu click to select “Windows PowerShell (Admin)”.
- An elevated PowerShell window will pop up, here type in the following command, and hit “Enter”.
ssfc /scannow
- SFC helps fix corrupted system configuration files, once the process is completed check if the issue has been fixed.
Solution 14: Disable Your Anti-Virus
The anti-virus application on your system can block certain files or programs, so you can turn off your anti-virus temporarily and then check if the problem has been removed.
- On the search bar near the Start menu search for “Windows Security” and click to open it from the search results.
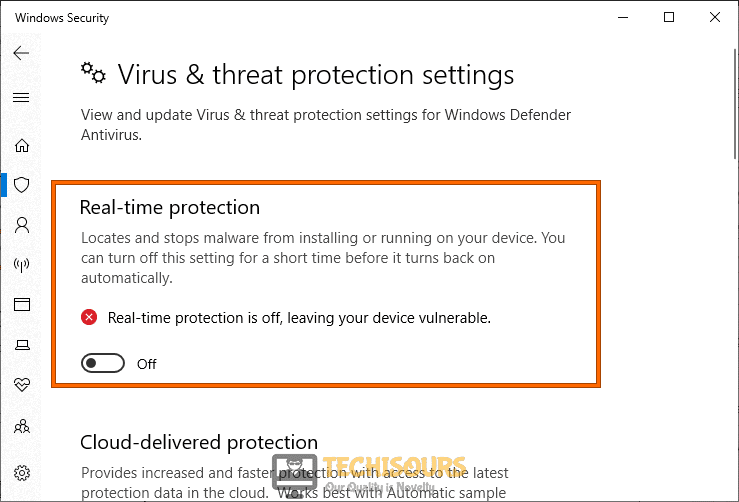
- In the left pane click to select “Virus & Threat Protection” and scroll down to “Virus & Threat Protection Settings”.

Virus and threat protection - Below the Virus & Threat protection settings click on “Manage Settings”
- Here you will be presented with three different security settings. Proceed to turn “OFF” the “Real-Time Protection” by clicking on the slide button.

Disable Real-time protection - Windows will ask for your permission click to select “YES” and finally, observe if you got rid of you do not have permission to save files to this location contact administrator error now.

Solution 15: Uninstall One-Drive
A lot of users were able to work around their files after uninstalling OneDrive. It is because the Share Folder option in OneDrive can causes issues with file permission. To uninstall OneDrive implement these steps:
- On the search bar near the Start menu search for “Control Panel” and click to select it from the search results.

Typing in Control Panel - In the Control Panel window click to select “Uninstall A Program” and scroll down through the list of installed programs to click on “OneDrive”.
- Once OneDrive is highlighted click on the “Uninstall” button at the top.
- Go through the on-screen instructions to uninstall OneDrive and then check if your error persists or not.

Solution 16: Use Command Prompt To Take Control
- On your keyboard press the “Window + S” keys together and in the search bar type in “Command Prompt”.
- From the list of search results right-click on the command prompt to select “Run As Administrator”.

Run command Prompt an as administrator - In the command prompt window type in the following command and hit “Enter”.
Takedown /F “full path of folder or drive” /A /R/D Y
- Restart your computer afterward and proceed to check if the error got fixed.

Solution 17: Use the Compatibility Troubleshooter
Using the built-in Windows Compatibility Troubleshooter can help resolve certain compatibility errors. To run the compatibility troubleshooter follow this procedure:
- Right-click on the troublesome Program and from the drop-down menu click on “Troubleshoot Compatibility”.
- Next click to select “Troubleshoot Program” from the “Program Compatibility Troubleshooter” and checkmark the box in front of “The Program Requires Additional Permission”.
- Now, select the “Next” button, then follow the on-screen instructions and click on “Finish” when done.
Solution 18: Boot Into Safe-Mode
Sometimes other programs can interfere with your files, so booting into the safe mode will only run important window programs. To boot into safe mode follow these steps:
- On the search bar near the Start menu search for “msconfig” and click to select the “System Configuration” from the search results.

Typing in “Msconfig” - Then click to select the “Boot” tab at the top of the window.
- From the Boot options select the “Safe Boot” check box and make sure “Minimal” is selected.

Enter Safe Mode - Click on “Apply” and then “OK” and finally, “Restart” your computer and try accessing/copying the files now.


Solution 19: Format the Drive through NTFS
If you face the error when moving files to removable storage like a USB, you could try formatting the drive-through NTFS format. To format to NTFS follow this procedure:
- Right-click on the “USB Drive” and from the drop-down menu click to select “Format”.
- In the format window select “NTFS” in the “File System Section”.
- Then checkmark the box in front of “Quick Format” and click on “Start”.
Follow all of the aforementioned fixes in order to get rid of the problem but if the error still exists then you may Contact Us and we will further look into the issue for you.