Easily Fix Windows did not Detect any Networking Hardware Error
Our users got the “Windows did not detect any Networking Hardware” error on their computer and we started to work towards fixing it as soon as we heard of it. After some trial and error, we came to conclude that the following are the most common reasons due to which this error has occurred. In addition to that, we have listed all the possible solutions that can fix this issue for you.

What Causes the Windows did not detect any Networking Hardware Error?
After having to go through the solutions that worked for most of our users, we came to the conclusion that the following are the most vital reasons behind this issue.
- Outdated Drivers: It is possible that the drivers installed on the computer have been outdated due to which this error is being triggered. Therefore, we suggest that you try to update them and check to see if doing so fixes this issue.
- Glitched Operating System: Sometimes the operating system on your computer might have gotten glitched due to which the “Windows did not detect any Networking Hardware” error is being triggered. Therefore, we suggest that you try to fix it by restoring it to an earlier date where it didn’t exist.
- Antivirus: The Antivirus installed on the computer can sometimes prevent the network hardware from getting detected due to which the issue is being triggered. This is because Antivirus software is often prone to false positives where they flag trusted software as suspicious.
- Outdated Windows: In certain cases, the Windows installed on the computer might have gotten outdated due to which the “Windows did not detect any Networking Hardware” error is being triggered. Therefore, we suggest that you try to update it to the latest possible version and then check if the issue is fixed.
Now that we have taken you through most of the reasons due to which the error occurs, we want to move on towards implementing the solutions.
Fixing the Windows did not detect any Networking Hardware Error:
Method 1: Update Network Driver
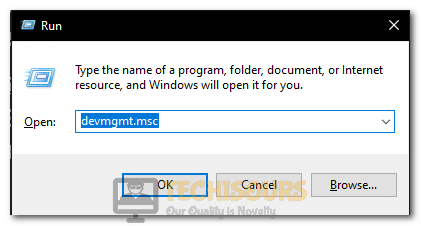
- Press “Windows + R” to launch into the Run prompt, type in “devmgmt.msc” and press “Enter” to launch into the device management window.
Typing devmgmt.msc in the Run prompt - Expand the “Network Adapters” tree and right-click on the driver and select the “Update Driver” option.
- From there, make sure to follow the on-screen instructions and then select the “Search Automatically for Updated Driver Software“.
Search automatically for updated driver - Check to see if doing so fixes the Windows did not detect any Networking Hardware Windows 7 error.
Method 2: Reinstall Network Drivers
- Press “Windows + R” to launch into the Run prompt, type in “devmgmt.msc” and press “Enter” to launch into the device management window.
Typing devmgmt.msc in the Run prompt - Double-click on the “Network Adapters” option and from there, right-click on the Network Driver installed and select the “Uninstall Driver” option.
- After that, make sure to follow the on-screen instructions and remove the driver from your computer.
- Now, go back to the device management window and from the top, click on the “Scan for Hardware Changes” option.
Scan For Hardware Changes - This will reinstall the uninstalled driver on your computer.
- Check to see if doing so has fixed the “Windows did not detect any Networking Hardware Windows 8″ error.
Method 3: Update your Network Driver Manually
- First of all, you need to identify the drivers that are required by your computer. You can do so by looking inside the device manager and identifying the network adapters.
- After that, google for the latest versions available from their manufacturers and download them on your computer.
- After that, repeat the first steps in the first solution and instead of selecting the “Search Automatically for Updated Driver Software” option, select the “Browse my Computer for Driver Software” option.
Clicking on the Browse My Computer for Drivers option - After that, point to the directory where the driver has been downloaded.
- Check to see if doing so fixes the issue.
Method 4: Update Drivers using Driver Easy
- Download and install the Driver Easy software on your computer.
- Click on the “Scan Now” option and wait for the scanning process to be completed.
Scan now - After that, make sure to update the outdated drivers that have been installed on your computer
Method 5: Run Internet Connection Troubleshooter
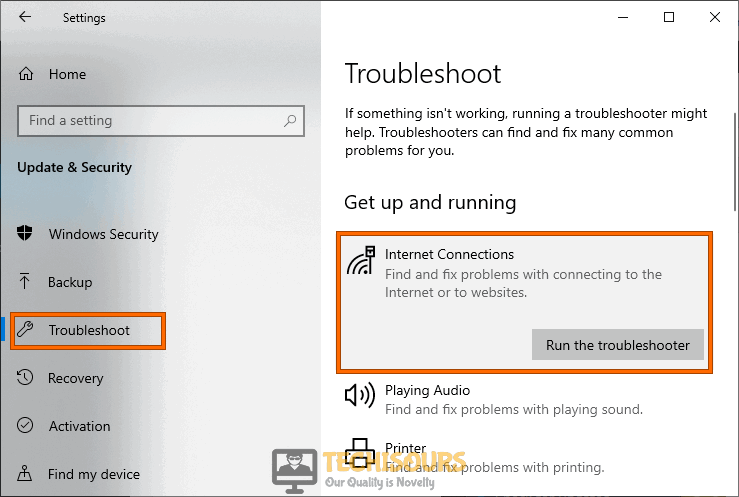
- Press “Windows + I” to launch into the settings, click on the “Update & Security” option and select “Troubleshoot” from the left.
Clicking on “Update and Security” - After that, select the “Additional Troubleshooters” option and click on the “Internet Connections” button.
- After that, select the “Run the Troubleshooter” option and let the window proceed with the checking process.
Run the troubleshooter - Check to see if doing so fixes the “Windows did not detect any Networking Hardware” error.
- If this doesn’t work, run the “Network Adapter” troubleshooter from the same menu.
Method 6: Restore Computer to Earlier Date
- Press “Windows + R” to launch into the Run prompt, type in “rstrui.exe” and press “Enter” to launch into the restore menu.
Typing in “rstrui” - In here, click on a restore point that you would like to reset your computer to and select the “Next” option.
- You can also check the “Show more Restore Points” button to reveal additional ones.
Clicking on the “Show more Restore Points” - Click on “Next” after selecting one and proceed with the on-screen instructions to reset your computer.
- Check to see if doing so fixes the error message.
Method 7: Reset Network Settings
- Press “Windows + R” to launch the run prompt, type in “cmd” and press “Shift + CTRL + Enter” to launch into the command prompt.
Typing in cmd - Type in the following commands one by one and press “Enter” after each to execute them on your computer.
netsh int ipv4 reset log

netsh int ipv6 reset log

netsh winsock reset catalog
- Restart your PC and check to see if the issue is fixed.
Method 8: Uninstall Norton Antivirus and Cisco VPN Client
- Press “Windows + R” to launch into the Run prompt, type in “appwiz.cpl” and press “Enter” to launch into the application wizard.
Typing in “Appwiz.cpl” and pressing “Enter” - From here, right-click on “Norton Antivirus” and click on the “Uninstall” button.
- After that, follow through with the on-screen instructions to completely remove the software from your computer.
- After doing so, try to uninstall the “Cisco VPN Client” from the panel as well.
- Check to see if doing so fixes the “Windows did not detect any Networking Hardware” error on your computer.
Method 9: Update your Windows
- Press “Windows + I” to launch settings, in here, click on the “Update & Security” button and from the left, select the “Windows Update” button.
- After this, click on the “Check for Updates” button to prompt Windows to check for updates.
Check for updates - Select the “Download and Install” button if there are any available updates.
- Check to see if doing so has fixed the Windows did not Detect any Networking Hardware issue.
Method 10: Run Commands
- Press “Windows + R” to launch the run prompt, type in “cmd” and press “Shift + CTRL +Enter” to launch in admin mode.
Typing in cmd - After that, type in the following command and press “Enter” to execute it on the computer.
netcfg -s n
- Check to see if DNI_DNE is present anywhere in the output and if it is, execute the following commands.
reg delete HKCR\CLSID\{988248f3-a1ad-49bf-9170-676cbbc36ba3} /f netcfg -v -u dni_dne - In the end, check to see if the issue is fixed.
Method 11: Reset your PC
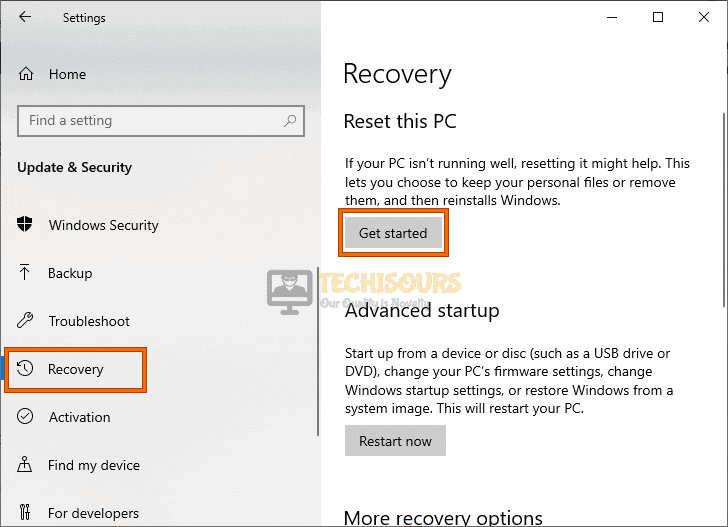
- Press “Windows + I” to launch into settings and click on the “Update & Security” option and from the left side, click on the “Recovery” option.
- Under the “Reset This PC” option, click on the “Get Started” button.
Reset this PC - Follow through with the on-screen instructions to reset your computer and check to see if the Windows did not detect any Networking Hardware issue is fixed.
Method 12: Install or Update Intel PROSet/Wireless
Install the “PROSet/Wireless Intel” drivers on your computer or update them if they have been already installed. Therefore, we suggest that you try to download them from the mentioned website and then install them on the computer and check to see if the Windows 10 did not detect any networking hardware issue is fixed.
Method 13: Reconfigure WWAN AutoConfig Service
- Press “Windows + R” keys on your keyboard to launch into the Run prompt, type in “services.msc” and press “Enter” to launch into the services management window.
Typing in “services.msc” - Right-click on the “WWAN AutoConfig Service” and then select the “Stop” option.
- Right-click on it again and select the “Properties” option and click on the “General” tab.
- Click on the “Startup Type” dropdown and select “Automatic” from the list.
Clicking on the “Automatic” startup for the service - After this, click on the “Start” button and then select the “Apply” option.
- Click on “OK” to close out of the window and check to see if doing so fixes the issue.
If you still haven’t been able to fix this issue, Contact Us for further information.


