Easily Fix Windows 10 Alarm not Working [Complete Guide]
There have recently been a lot of complaints from users that have said that the “Windows 10 alarm not working” issue has been seen on their computers and recently, we started investigating as to what causes this issue and why is the Alarm sound not working for some people.

After an intense investigation, we came to the conclusion that this issue arises mostly because of certain misconfiguration that causes conflicting issues, and as a result, you end up running into the alarm not working issue on Windows 10. Therefore, you can follow the guide below to make sure that your Alarm works normally.
Why is the Windows 10 alarm not working?
After going through a lot of user feedback, we came to the conclusion that the following must be the most important reasons due to which the issue is triggered in the first place.
- Deactivation: It is possible that you might have deactivated the Windows alarm from the settings or it might not have been set up properly. Therefore, we recommend that you try and check if the alarm is activated properly using the solution below and then check to see if doing so fixes the Windows 10 alarm not working issue.
- Hibernation: If the computer itself has been hibernated, you might run into this issue because during hibernation only a few triggers can wake the computer up and alarm might not be one of them. Therefore, check to see if your computer is being hibernated.
- Installation Issue: In certain cases, the installation of the Windows Clock and alarm app might have been corrupted or misconfigured due to a storage failure and due to this, you might be running into the Windows 10 alarm not working issue. Therefore, we recommend that you try and check if reinstalling the apps fixes the issues.
- Focus Mode: If the Windows has been put into the Focus assist mode, it might prevent the Alarm from sounding because during this mode, Windows limits the notifications that are propagated to the user and due to this, you might run into the issue.
- Cortana: If you have enabled Cortana on your computer, you might run into this issue because the two can often conflict with each other and this can end up causing the Windows 10 alarm not working issue. Therefore, we recommend that you try to disable Cortana and then check to see if the issue is fixed.
- Misconfigured Registry: Sometimes the Windows Registry can get misconfigured which can lead to this issue being triggered and this issue can only be fixed by analyzing and checking the registry which has been done for you in the solutions below.
- Account Issue: The User Account that you are using on the operating system might be configured in such a way that the Windows 10 alarm not working issue is being triggered. Therefore, we recommend that you try and use another user account and then check to see if doing so fixes the issue.
Now that we have taken you through almost all the important reasons behind this issue, we can finally start implementing the fixes.
Before You Start:
Try a couple of basic fixes initially to get through the error instantly. This includes restarting your PC simply, proceed to the Windows button on the left of the taskbar, and from here choose to select the option of “Restart” from the pop-up menu. If this doesn’t work then proceed to check the volume and speaker settings of your system. This is because sometimes your volume or speakers are turned down and they won’t sound.
Therefore try checking the sound levels on your speakers and make sure they are turned on. Moreover, you can also try checking for any loose connections on your computer which might be the real cause behind the issue. Once done with implementing all of these simple troubleshooting tips and the error still continues to exist then carry out some of the advanced solutions listed below.
Fixing the windows 10 alarm clock not working issue:
Solution 1: Activate the Alarm
To start with, make sure the Alarm you have set is activated. Follow a couple of below-listed steps in this aspect:
- In the search bar near the Start menu type in “Alarms & Clock” and hit “Enter”.
- In the pop-up window make sure the alarm you have set is turned “ON” and then close the window.
Solution 2: Prevent Your PC From Hibernating
- In the search bar near the Start menu type in “Settings” and press “Enter”.
- In the following window choose to select “System” and afterward click on the “Power & Sleep” option from the left vertical tab.
Select Power and Sleep Option - Then proceed to select the “Additional Power Settings” in the right pane and afterward click on the “Choose What Closing The Lid Does” from the left window pane.
Choose what closing the lid does - In the following “System Settings” window move to the “When I Close The Lid” option and from here select “Do Nothing”.
- Once done close all the windows and then check if the Windows 10 alarm not working issue persists or not.
Solution 3: Enable Windows Notifications
The alarm won’t work if your Windows notifications are disabled. So in order to enable notifications proceed with these steps:
- On your keyboard press the “Window + I” keys together to open up “Settings”.
- From here choose to select the “System” menu and afterward select “Notifications & Actions” from the left window pane.
- In here “Enable” all options in the Notifications section and then scroll down to locate “Alarms and Clock”.
- Make sure the slider next to the Alarms and Clock is turned “ON”.
- Once you have enabled all the Windows Notifications it must resolve your error now.
Solution 4: Reinstall the Alarm and Clock App
- On your keyboard press the “Window + X” keys together to open up the Start menu settings.
- From here select “Windows PowerShell (Admin)” from the drop-up menu and in the PowerShell window type in the following command and press “Enter”:
get-appxpackage *Microsoft.WindowsAlarms* | remove-appxpackage
- Once done you can download the application again from the Microsoft Store and then check to see if you got the error fixed.
Solution 5: Change the Alarm Sound
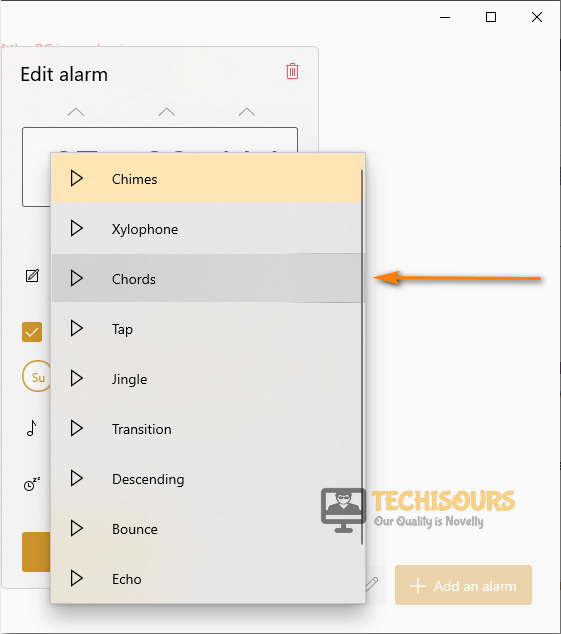
Some users were also able to solve the issue after changing their alarm sounds, as it seems like some alarm sounds won’t work with the Alarms and Clock application. To change the alarm sound follow these steps:
- In the search bar near the Start menu type in “Alarms & Clock” and hit “Enter”.
- In the pop-up window select your preferred alarm settings and then click on the “Selected Sound”.
- From the list of available sounds try any other and see which works best for you.
Change the Alarm Tone
Solution 6: Turn Off Focus Assist
Sometimes Focus Assist tends to mess up with the Alarm app, so try disabling focus assist and then check if it solves the issue. Follow this procedure to do so:
- Right-click on the “Action Center” in the bottom right of your desktop and from the pop-up menu select “Focus Assist”.
- Then select “OFF” from the extended menu and afterward observe if it helps you in getting through the error successfully.
Solution 7: Install Latest Updates
Making sure you’re up to date should be the first concern of a Windows user to avoid any such problems. To check for updates on your system implement a few steps:
- In the search bar near the Start menu type in “Check For Updates” and hit “Enter”.
- In the pop-up Windows Update tab click on “Check For Updates” and if any new updates would be available they will get installed on your system automatically.
Check for updates - After updating your PC now proceed to verify if the windows 10 alarm clock not working issue got resolved.
Solution 8: Install the Media Feature Pack
Different Windows versions lack different features, and due to these features, some applications may not work properly including the Alarms and Clock app. Therefore you can try to install the media feature pack which includes all the latest updates and features for a lot of pre-installed media applications. To install the Media Feature Pack head onto your browser, type in “Media Feature Pack” and download it from the first Microsoft website. Make sure to select the appropriate Windows version that you currently use and once downloaded follow the on-screen instructions to install it on your computer.
Solution 9: Update Sound Card Driver
- In the search bar near the Start menu type in “Device Manager” and press “Enter”.
Typing in Device Manager - In the new Device Manager window locate and expand the “Sound, Video and Game Controllers” menu.
- Then right-click on your specific “Sound Card” displayed and from the drop-down menu select “Update Driver”.
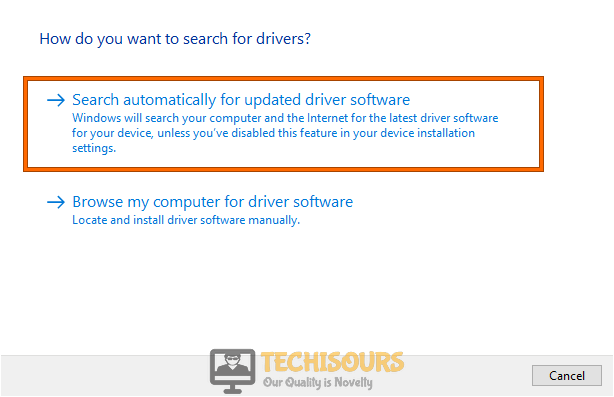
- On the pop-up window choose to select “Search Automatically For Updated Driver Software” and then follow the on-screen instructions to complete the process.
Search automatically for updated driver - Lastly, check to see if you have been able to overcome the windows 10 alarm not working error now.
Solution 10: Disable Cortana
- Press the “Window + R” keys together to open up the Run dialog box and type “gpedit.msc” in the dialog box
Typing “gpedit.msc” - Then navigate to the following location from the left window pane and double-click on the “Allow Cortana” entry located at the right side of the screen:
Computer Configuration > Administrative Templates > Windows Components > Search
- In the pop-up window choose to select “Disabled” in order to disable Cortana permanently and then proceed to check if your error got solved.
Solution 11: Reset the Alarms & Clock Application
To reset the application follow the below-mentioned steps as a simple reset can help solve a lot of defects in any application:
- In the search bar near the Start menu type in “Apps & Features” and hit “Enter”.
- In the pop-up window scroll down through the list of applications to locate the “Alarms and Clock” and click to select it.
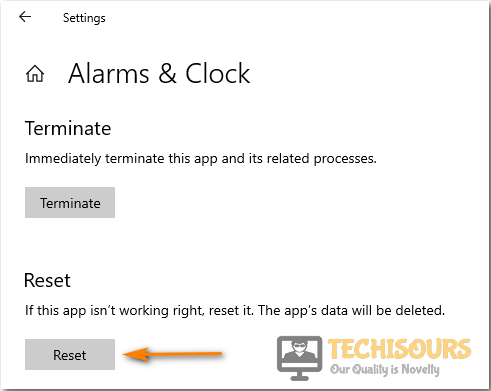
- Afterward, click on the “Advanced Options” and in the new window scroll down to click on “Reset”.
Reset Alarms and Clock - Confirm your selection, wait for the process to complete and then check if the windows 10 alarm not working error got fixed.
Solution 12: Edit the Windows Registry
Editing the registry with invalid entries can result in permanent damage to your Windows, so make sure to follow the steps very thoroughly. Follow the procedure as below:
- In the search bar near the Start menu type in “regedit” and hit “Enter”.
Typing “regedit” - In the Registry Editor window navigate to the following address:
HKEY_CURRENT_USER -> App Events -> EventLabels
- Then click on the “Notification.Looping.Alarm” and in the right pane double click on “Exclude from CPL”.
Clicking Exclude From CPL Option - Here change the value of “1” to “0” and then save the changes.
- Now repeat the steps “4-6” for all the keys from “Notification.Looping.Alarm” to “Notification.Looping.Alarm10” and “Notification.Looping.Call” to “Notification.Looping.Call10”.
- Once done close the “Registry Editor” window.
- Next, on your keyboard press the “Window + S” keys simultaneously and type in “Change System Sounds” in the search bar.
- In the pop-up Sound tab, you will find new entries in the “Program Events” section named “Alarm 1 to Alarm 10” and “Incoming Call 1 to 10”.
- In this section select “Alarm 1” or “Alarm” and once done open up the “Sounds” menu below and select “Alarm1”.
- Repeat this for all the entries and make sure to select the same sound for the same entry i.e. “Alarm 2 = Alarm2”.
- Now repeat the same procedure for the “Incoming Call Notification” and once done save all the changes made and then check the Alarm application.
Solution 13: Re-register the Alarm & Clock Application
- Right-click on the “Start” menu at the bottom left of your desktop and from the drop-up menu click on “Windows PowerShell (Admin)”.
- In the pop-up Windows PowerShell window type in the following command and press “Enter”:
Get-AppXPackage –AllUsers –Name Microsoft.WindowsAlarms | Foreach {Add-AppXPackage –DisableDevelopmentMode –Register “$($_.InstallLocation)\AppXManifest.xml” –Verbose} - Let the process complete and then check if the Windows 10 alarm not working error still exists or not.
Solution 14: Create A New User Account
Creating a new user account might also be helpful in eradicating the error completely. To do so follow these steps:
- In the search bar near the Start menu type in “Settings” and press “Enter”.
- In the Settings window click on “Accounts” and then select “Family & Other Users” from the left menu pane.
- Then click on the “Add Someone Else To This PC” option in the “Other Users” section.
Add someone else to this PC - Then click on “Local Account” and give the account a name and provide a password if you wish.
- Lastly, check for the Alarm application using the new user and check if you got rid of the Windows 10 alarm not working error.
Solution 15: Run the App Troubleshooter
If all of the manual solutions fail you can try the built-in Windows Troubleshooter. Follow these steps:
- In the search bar near the Start menu type in “Troubleshoot” and press “Enter”.
- In the pop-up window select “Windows Store Apps” and then press “Run the Troubleshooter”.
- Then follow the on-screen instructions to complete the process.
Solution 16: Try A Different Alarm Application
If none of the above-indexed fixes work for you then you can try using/installing another alarm application on your system. You can download the Alarm Clock HD application from the Microsoft Store as it has an unlimited number of alarms, world clocks, weather, and many other features. The alarm in this application can also wake up your device from Sleep (if supported).
Hopefully, the detailed list of fixes above will help you in solving the problem easily but in the end, if the issue is still there then you may Contact Us here and we’ll further inquire about the problem for you.


