Easily Fix VT-x is not available (VERR_VMX_NO_VMX) Issue [Complete Guide]
If you have been getting the VT-x is not available (VERR_VMX_NO_VMX) error on your computer while trying to start a virtual machine using the VirtualBox application, it is most probably because the virtualization has been disabled. Therefore, we suggest that you go through this article which has listed in detail how to fix the issue and why it is triggered in the first place.

What Causes the VT-x is not available (VERR_VMX_NO_VMX) Error?
After having to go through the different solutions and fixes that users employ to fix the issue, we have concluded that the following are the most crucial reasons behind its occurrence.
- Hyper-V Virtualization: It is sometimes the case that you might have enabled Hyper-V virtualization feature on your computer which prevents the virtual machine from being set up properly. Therefore, we suggest that you disable this feature as we have instructed below and check if that helps in fixing the issue.
- Core Isolation Feature: In certain cases, the Core isolation feature enabled on your computer can cause complications with the VirtualBox application and therefore trigger the VT-x is not available (VERR_VMX_NO_VMX) error. Therefore, we suggest that you disable this feature and check if the issue is then fixed.
- Disabled VT-X: If the VT-X has been disabled, the VirtualBox app will not work properly because it is required for the proper creation of the virtual machine. Therefore, we suggest that you follow the steps below to enable it on your computer.
Now that you have been taken through most of the reasons behind the error, we suggest that you start implementing the solutions below.
Fixing the VT-x is not available (VERR_VMX_NO_VMX) Error:
Solution 1: Disable Hyper-V Virtualization
- In the search bar near the Start menu type in “Command Prompt” and from the pop-up results right-click on it to select “Run As Administrator”.

Select Run As Administrator From The Command Prompt - In the Command Prompt window type in the following command and hit the “Enter” key:
exe /Online /Disable-Feature:Microsoft-Hyper-V - Once the command is executed then “Reboot” your computer afterwards and check to see if the error got resolved.

Solution 2: Disable Core Isolation
Try to disable core isolation from Windows Defender and then look if the error vanishes or not. You can disable it by following the procedure below:
- In the search bar near the Start menu type in “Settings” and press “Enter”.
- In the Settings window click to choose “Update & Security” and in the following tab select “Windows Security” from the left pane.

Clicking on “Update and Security” - Then select “Device Security” under Protection Areas and in the next window select “Core Isolation Details” under the Core Isolation menu.
- Next, toggle the option of “Memory Integrity” to turn it “OFF”.
- Finally, “Restart” your PC and check to see if the error got solved.

Solution 3: Switching Hyper-V ON/OFF
- In the search prompt near the Start menu type in “Command Prompt” and from the pop-up results click on it to select “Run As Administrator”.
Select Run As Administrator From The Command Prompt - Firstly, turn OFF Hyper-V using the following command and afterwards perform a “Reboot” on your system:
bcdedit /set hypervisorlaunchtype off - Then again turn it back ON using the below-mentioned command and then “Restart” your PC:
bcdedit /set hypervisorlaunchtype
Solution 4: Enable VT-X Option In BIOS
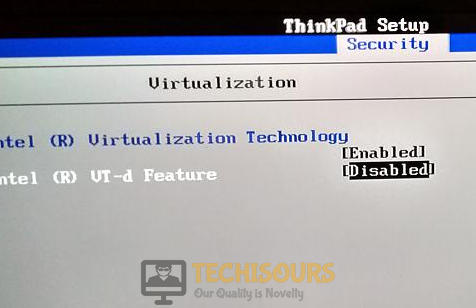
If the Virtualization Technology option is disabled in the BIOS settings it can also give rise to this error so make sure to check and enable this option if it is already disabled. Follow the steps below to do so:
- Initially “Boot” your computer and when the “Windows Logo” appears up on your screen hit the setup to enter the “BIOS Mode”.
- Once in the BIOS mode, move to the “Security” tab and scroll below to find “System Security”.
- Here locate the option of “Virtualization Technology (VTx/VTd)” and make sure it is “Enabled”. If not, then proceed to enable it.

Enabling the Virtualization Technology - Once done then “Restart” your PC and finally check if the error got eradicated.
Solution 5: Enable Nested Virtualization In Avast
For Avast users an application update was released some years back in which there was given an automatic feature that automatically prevents VT-x from running on your PC given a few conditions are met. But fortunately, there exists a method to resolve this error, to do so proceed with the steps below:
- Open “Avast > Avast Settings” on your PC and select the “Troubleshooting” option.
- Here enable the checkboxes linked to “Use Nested Virtualization Where Available” and “Enable Hardware-Assisted Virtualization”.
- If the method doesn’t work for you then move on to implement the next solution listed below.
Solution 6: Disable the Antivirus Temporarily
Sometimes the culprit behind this particular error could be any antivirus software installed on your system therefore it is recommended to uninstall it temporarily and then see if it helps to fix the error. In case you are using the Windows Defender Firewall itself you can disable it by following this method:
- In the search bar near the Start menu type in “Settings” and hit the “Enter” button.
- In the Settings window select “Update & Security” and then choose “Windows Security” from the left pane.

Update and Security - Next, select “Virus & Threat Protection” under Protection Areas and click on “Manage Settings” under Virus & Threat Protection Settings.
- In this window make sure to turn “OFF” the toggle for “Real-Time Protection”.
- Again go back to the “Windows Security” tab and choose “Firewall & Network Protection” from the left pane.

Firewall & network protection - In this window separately select “Domain Network”, “Private Network” and “Public Network” one by one and turn “OFF” the toggle for “Microsoft Defender Firewall”.
- Finally, check to see if your error got fixed by now.


Solution 7: Disable Device Guard / Credential Guard
On Windows hosts comprising of an EFI BIOS device, guard or credential guard may be active by default which results in interference with OS-level virtualization apps in turn giving rise to this error. So it needs to be disabled in order to avoid this error. On Windows you can do this by following the method below:
- Press the “Window + R” keys together in order to open up the Run dialogue box. Here type in “gpedit.msc” in the dialogue box and press “Enter”.

Typing “gpedit.msc” - In the Group Editor window navigate as follows: “Local Computer Policy > Computer Configuration > Administrative Templates > System > Device Guard > Turn On Virtualization Based Security To Disabled”.
(Note: If you are unable to do this using group policy editor below is an alternate method to do the same). - The equivalent registry hack is to locate the “keyHKLM > System > CurrentControlSet > Control > DeviceGuard > EnableVirtualizationBasedSecurity > Enabled” and set it to “0”.

Solution 8: Disable Windows Sandbox
Sometimes if Windows Sandbox is enabled on your PC it can also lead to the occurrence of this error, so simply try disabling it and afterwards reboot your PC. After doing this now disable virtualization from BIOS and restart your computer. After the restart, move on to enabling virtualization in BIOS again and lastly restart your PC afterwards to see if the problem got settled now.
Implement the aforementioned solutions in order to get rid of this error easily and for any further queries or questions feel free to Contact Us.