Fix: This Device Doesn’t Support Miracast Error [Complete Guide]
Miracast is basically a feature to send the display to another device wirelessly and this works seamlessly for a lot of devices. However, some Windows 10 users have been complaining about the “This Device Doesn’t Support Miracast” Error and the full message reads “This device doesn’t support Receiving Miracast” which prevents them from being able to use Miracast with their devices. After getting so many complaints, we decided to investigate this issue and devised a set of solutions to fix it permanently.

During our investigation, we found that there are certain triggers due to which this error arises in the first place and we have listed them as well. Make sure to read through them and then start implementing the solutions one by one until one of them fixes the error for you.
What Causes the “This Device Doesn’t Support Miracast” Error on Windows 10?
Upon getting information about this, we started investigating for the reasons due to which the error is triggered and came upon the following conclusion.
- Missing Support: It is possible in some cases that the device that you are trying to use Miracast on is missing the manufacturer’s support for Miracast due to which this issue is being triggered. Therefore, we recommend that you check if the device supports Miracast or not.
- Outdated Network Drivers: Another factor that can often come into play while using Miracast is the missing or outdated network drivers. Therefore, we suggest that you try and update your network drivers and then check to see if doing so fixes the issue.
- Disabled Wifi: Miracast requires you to have your Wifi Enabled in order to work properly. Therefore, if your Wi-Fi has been disabled, you will receive the “This Device doesn’t Support Miracast” error while trying to use it.
- Outdated GPU Drivers: Users can sometimes get the “This device doesn’t support Miracast” error because the GPU Drivers on your computer might have been outdated. Therefore, we suggest that you try and update them to check if that is indeed the case.
- Screen Resolution: The screen resolution that you are trying to use Miracast with might not be properly configured to allow the transmission. Therefore, we suggest that you try and change it as we have mentioned below and check to see if you are able to fix the “This device doesn’t support Miracast” error.
Now that we have familiarized you with most of the reasons behind this error, we can finally move on towards implementing the solutions.
Before you Start: How to Check If Your Device Supports Miracast
Before we start implementing any of the solutions below, we should be making sure that our device can support Miracast in the first place. For that, follow the methods that we have indexed for you below.
- Press the “Window + X” keys on your keyboard and from the pop-up menu select “PowerShell (Admin)”.

PowerShell (Admin) - In the PowerShell window type in the following command and press “Enter”:

Get-netadapter|select Name, ndisversion
- You will now be shown the “NdisVersion” which might show you the ethernet and the Wifi number, if it is more than or above “6.30”, it means that your PC is able to support and handle Miracast. Now that the version has been verified, you can exit out of the Powershell Prompt.
In addition to this, you can also check the same using the Dxdiag menu. For this follow the steps below:
- Press the “Window + R” keys on your computer to open up the “Run” dialogue box, in the Run prompt type in “dxdiag” and press “Enter”.

Typing “dxdiag” - In the “DirectX Diagnostic Tool” window click on the “Save All Information” option at the bottom and save the file where you want to.
- Now go to the file location and right-click on the file, from the drop-down menu select “Open with Notepad”.
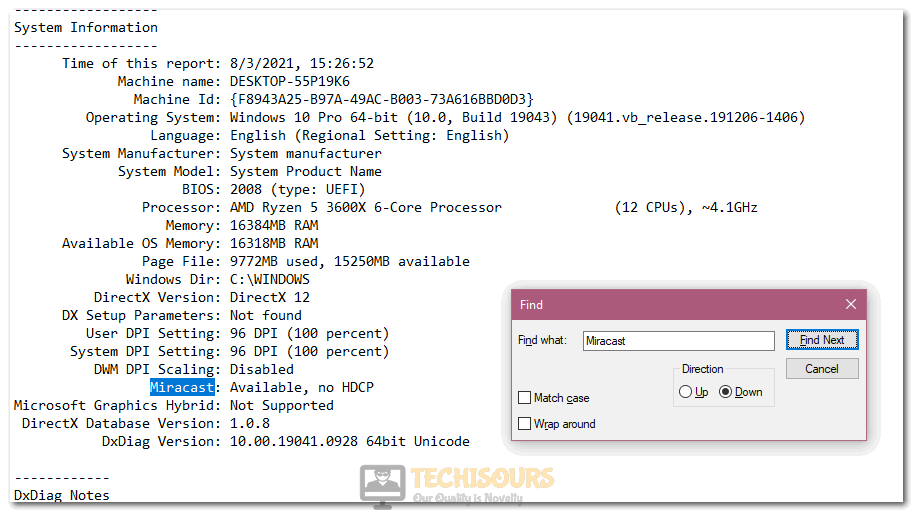
- In the Notepad window press the “Ctrl + F” keys to open up the “Finder”, in the Finder text box type in “Miracast” and press “Enter”.

Searching for Miracast - Now check if Miracast is available with HDCP.

Note: You can also try pressing the “Window + P” keys on your keyboard, if you get a message at the end saying “Connect to a wireless display”, it means your PC supports Miracast. If you don’t see such a text then it does not support Miracast.
Also, navigate to the “Display” tab in the “DirectX Diagnostic Tool” to find the “Driver Model” at the bottom, if the Driver Model is below “WDDM 1.3” then your PC does not support Miracast.
Fixing the “This Device Doesn’t Support Miracast” Error:
Solution 1: Update Network Drivers
You can also try updating Network drivers on your PC if it does not support Miracast. To update the network drivers follow the steps below:
- Press “Win + R“, type in “devmgmt.msc” and press “Enter” to launch into the device manager, when the Device Manager window opens up expand the section for “Network Drivers”.

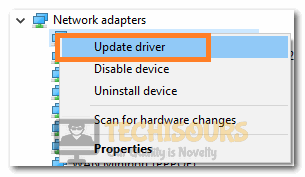
Typing devmgmt.msc in the Run prompt - Right-click on the Network Driver and select “Update Driver” from the drop-down menu, make sure to select the “Automatically look for Drivers Online” option in the next window.

Update Network Driver Note: After completely updating the drivers, repeat the checking procedure that we have mentioned above and check to see if your device now support Miracast. If it still doesn’t, it means that the device won’t support it and you can stop with the solutions below. However, if it says that it does support now, you can continue with the solutions mentioned below.


Solution 2: Make Sure Wi-Fi Is Enabled
Sometimes it is possible that your Wi-Fi is turned off or you turned it off by mistake, it doesn’t hurt but helps to take a look at it. To make sure Wi-Fi is enabled on your Windows 10 PC follow the steps below:
- Press “Windows” + “I” to open settings and click on the “Network and Internet” option, in the pop-up window select the “Wi-Fi” menu from the left pane.

Network and Internet - Now make sure Wi-Fi is turned “ON”, or turn it in ON using the toggle button.
- Check to see if doing so fixes this device doesn’t support Miracast issue.

Solution 3: Enable Intel Integrated Graphics
You can Enable Intel Integrated Graphics from your System BIOS by following the steps below:
- Press the “Windows” button on your keyboard, click on the “Power” icon and select the “Restart” option, once the computer shuts down and is about to restart press the “Del or F2” key to get into the Bios.

Triggering a computer restart Note: The key might differ on different computers so make sure to check which key you have to press to get into the Bios.
- In the BIOS menu navigate into the “Advanced” tab using the Arrow Keys on your keyboard, in the Advanced tab menu locate “Primary Graphics Adapter” or anything that seems similar to that.
- Once you are in the proper location, make sure to set the following order “IGP > PCI > PCI-E”.

Selecting the Appropriate options - After you have done that, make sure that you exit the Bios by pressing the F10 key.


Solution 4: Change Wireless Adapter to Auto
Sometimes, the Wireless Adapter settings that you have configured might not be properly set. Therefore, we suggest that you change it as we have mentioned below to address this issue.
- Press the “Win + R” keys simultaneously to launch into the “Run” dialogue box, in the Run prompt type in “devmgmt.msc” and press “Enter” to open up the Device Manager window.
Typing devmgmt.msc in the Run prompt - In the Device Manager window expand the “Network Adapters” section, right-click on the appropriate in use Network adapter, and select “Properties” from the drop-down menu.

Selecting Network Adapters - In the Properties window navigate to the “Advanced” tab at the top, now select the “Wireless Mode Selection” in the Property section and set it to “Auto” using the dropdown menu to the right.
- Once done click on “OK” and “Restart” your computer afterwards.
Note: You can also try manually setting it to 2.4 GHz. - Check to see if doing so fixes the “Your PC or Mobile doesn’t support Miracast” error.

Solution 5: Turn Off VPN
Sometimes, using a VPN might turn out to be the cause behind this error because it can come in the way of creating the Miracast connection. Follow the steps mentioned below to turn off the default Windows VPN.
- Press “Win + I” to open the settings and from there, click on the “Network and Internet” option.
Network and Internet - Locate the option of “VPN” in the left pane and click to select it.
- In here, check to see if any VPN connection has been enabled.
- Disable the enabled VPN connection by turning off its toggle.
- Check to see if doing so fixes the “Your PC or Mobile doesn’t support Miracast” error.
Solution 6: Uninstall Wireless Network Adapter Driver
- On your keyboard, simultaneously press “Win + R” to launch the Run prompt, type in “devmgmt.msc” and press “Enter” to launch into it.
- In the Device Manager window navigate to the “Network Adapter” option and right-click on your appropriate Network Adapter. From the drop-down menu then select “Uninstall Device”.

Clicking on the “Uninstall Device” option - Next confirm the selection by hitting the “Uninstall” button in the new window, once uninstalled proceed to “Restart” your computer.
Note: After a Restart windows will automatically download and install any missing drivers. - Check to see if doing so allows you to fix this device doesn’t support Miracast error.

Solution 7: Disable Windows Firewall
Windows Firewall manages the data coming in and going out of your computer, it can also block suspicious data sometimes causing other features to not work. So, to disable Windows Firewall follow this procedure:
- Press the “Window + I” keys to open up the Settings window, in the Settings window select “Update and Security”

Update and Security - From the left side, select “Windows Security” and then select the “Firewall and Network Protection” option.
- In the following window select “Domain Network” and turn it “OFF” using the toggle button, then repeat the same for “Private” and “Public” Networks.
- Check to see if doing so fixes the “Your PC or mobile doesn’t support Miracast” issue.

Solution 8: Update Your Graphics Drivers
- From the keyboard, press the “Window + R” keys simultaneously to open up the “Run” dialogue box.
- In the Run prompt type in “devmgmt.msc” and press “Enter” to open up the Device Manager window.
Typing devmgmt.msc in the Run prompt - In the Device Manager window expand the “Display Adapters” section, right-click on your graphics card, and select “Update Driver” from the drop-down menu.

Clicking on the Update Drivers option - In the new window click on “Automatically look for drivers online”, windows will now start looking for any newer drivers available, if found they will be downloaded and installed automatically on your system.
Solution 9: Make Sure Wireless Display Feature Is Added On Your Computer
- Press “Win + S” to launch into the Windows search and type in “Manage Optional Feature” and press “Enter”.
- In the Installed features search box, search for the “Wireless Display” option and if it is found, you don’t need to continue with the rest of the solution.

Searching for Wireless Display - However, If it’s not located press the “Add a feature” button at the top and then add in “Wireless Display”.

Clicking on the search box and then typing in “Wireless Display” and installing it - Once installed, navigate back to the “Settings” page and then click on the “System” menu.
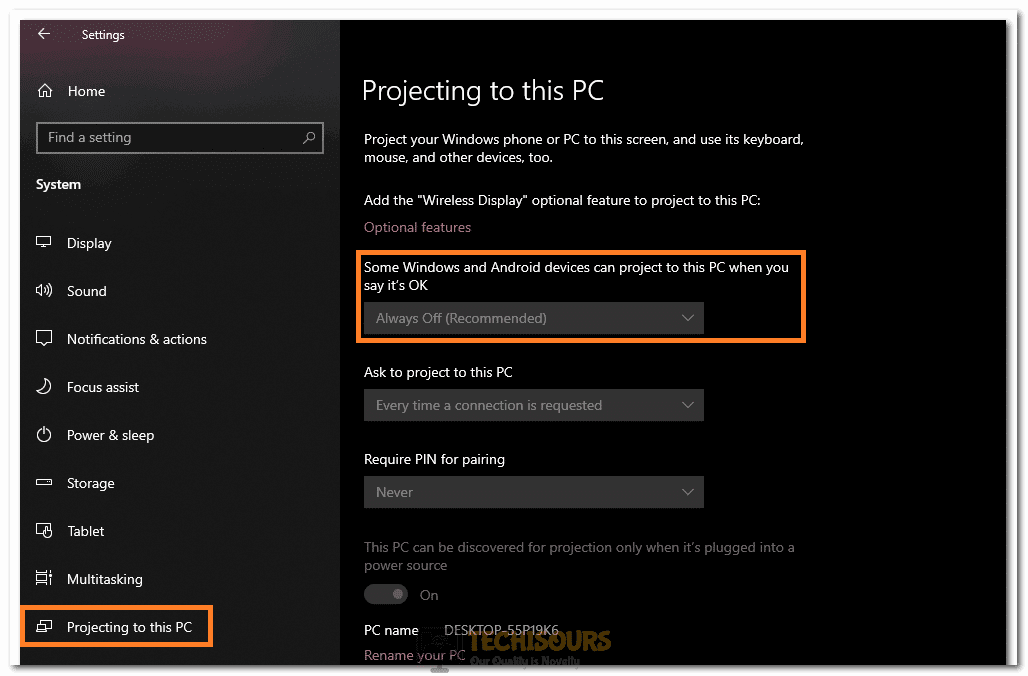
- From the left pane now select “Projecting to this PC”, now set the “Some Windows and Android devices can project to this PC when you say it’s OK” setting to Available Everywhere

Clicking on the option - Also, make sure “PC Discovery” is turned “ON”, once done close the window, and check for the error.


Solution 10: Reconnect Display
- Press the “Window + I” keys to open up “Settings”, in the Settings window select “Devices”.

Clicking on the “Devices” option - In the Devices menu, find your “Display” and click on it.
- Click on the “Remove” option to remove the display from your computer.
- After a few seconds press the “Add Bluetooth or other device” button at the top, from the new window select “Wireless display or dock”, and then select your “Display”.

Clicking on the “Add Bluetooth or Other Device” option - Check to see if doing so fixes this device doesn’t support Miracast error.


Solution 11: Change Your Screen Resolution
- Right-click on any blank space on your desktop and select “Display Settings” from the drop-down menu
- Scroll down some way until you come upon the “Display Resolution” option.

Changing Display Resolution - Click on it and select any other resolution than the one that you have currently selected.
- Click on “Keep Changes” and try to use Miracast.
- Check to see if doing so fixes this device doesn’t support Miracast error.

Solution 12: Uninstall Intel ProWireless Wi-Fi Software
Some users suggested that their issue was solved after they uninstalled the Intel ProWireless Wi-Fi Software:
- Press “Windows + R” to open into the Run prompt, type in “appwiz.cpl” and press “Enter” to launch into the application wizard.

Typing in “Appwiz.cpl” and pressing “Enter” - From here, locate the “Intel ProWireless” software and right-click on it.
- Select the “Uninstall/Change” option to remove the software from your computer.

Uninstall Intel Pro-Wireless Software - Follow the on-screen instructions to completely uninstall the software from your computer.
- Check to see if doing so fixes the “This device doesn’t support Miracast” error.


Solution 13: Disable Wi-Fi Direct Groups
- Press simultaneously “Win + R” to launch into the Run prompt, type in “gpedit.msc” and press “Enter” to launch into the group policy editor.
gpedit.msc - Click on the “Computer Configuration” tree and from there, select the “Windows Settings” option.
- From here, click on your Wifi Connection name.
- At the bottom locate and uncheck the “Don’t allow Wi-Fi Direct Groups” option.
- Once done “Apply” all the changes and click on “OK”.

Solution 14: Turn On Nearby Sharing
- Press the “Window + I” keys together to open up “Settings”, in the Settings window select “System” and then click on “Shared Experiences” in the right pane.

Clicking on the “Sharing Experiences Option” - Now look for “Nearby Sharing” and turn it “ON” using the toggle button, then again turn it “OFF” and use the “Connect” option to connect to the TV.

Clicking on the “Nearby Sharing
” OptionNote: Make sure you unplug any HDMI cables connecting the computer to the TV.
- Check to see if doing so fixes this device doesn’t support Miracast issue.


Solution 15: Use A Display Cable
If none of the methods listed above worked for you then you can connect your computer to a TV using an HDMI cable, it will help portray everything with less lag and increased response times.
Follow the above-mentioned solutions in order to get rid of the error completely but if the problem continues to stay then feel free to Contact Us here.