Steam Client WebHelper High CPU Usage? Fix it Here
If you were occasionally stuttering about the task manager or if your computer was running slow and you came to know of Steam Client WebHelper High CPU Usage in it, you are not alone. This issue has been faced by plenty of users and many of them have been able to fix it. In this article, we will be taking you through the step-by-step process that you can undertake to completely fix the high CPU usage.

Fixing the Steam Client WebHelper High CPU Usage:
Solution 1: Disable GPU Accelerated Rendering in Web Views
Typically, users that were facing the Steam Client WebHelper High CPU Usage issue reported that it was caused by the animated frames that might be running with the Steam features. Therefore, you can try to disable the GPU Accelerated Rendering in Web Views to fix this issue. For that:
- Launch the Steam application and log in with your credentials.
- After logging in, click on the “Steam” option on the top left side.
- Select “Settings” from the menu and then click on the “Interface” button on the left-hand side.
- In this menu, make sure to uncheck the “Enable GPU Accelerated Rendering in Web Views” option.
- Close out of Steam and restart it.

Unchecking the “Enable GPU Accelerated Rendering in Web Views” option - Upon startup, check to see if the Steam Client WebHelper High CPU Usage issue has been fixed.
Solution 2: Disable Animated Avatars and Frames
In certain cases, the Animated Avatars and the frames that are running on your friend’s list might be causing this high CPU usage with the Steam Client WebHelper. Therefore, in the steps below, we will be disabling it completely. For that:
- Launch into Steam, log in with your credentials and click on the “Friends” option at the top left side.
- Now, click on the “View Friends List” button and in the new Friends list menu, click on the “Settings” cog.
- Select “Friends List” from the left side and click on the “Off” button next to “Enable Animated Avatars & Animated Frames in your Friends List and Chat“.

Selecting “Off” for the Animated Avatars and Animated Frames - Close out of this window and restart your Steam application.
- Check to see if this fixes the Steam Client WebHelper High CPU Usage issue.

Solution 3: Disable Steam Overlay
In certain cases, disabling the Steam overlay might fix this issue as that can cause CPU Usage spikes. Therefore, we recommend that you go through the following steps in order to completely fix the Steam Overlay. For that:
- Launch into Steam, click on the “Steam” button at the top left side and select the “Settings” button.
- From here, click on the “In-Game” button on the left side and then uncheck the “Enable the Steam Overlay while in-game” option.
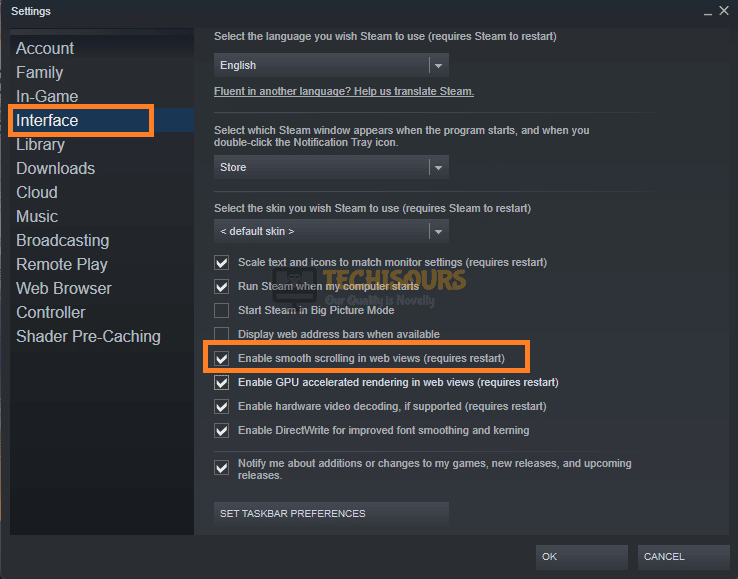
- After this, click on the “Interface” button on the left side of this menu, disable the “Smooth Scrolling in Web Views” button and the “Hardware Video Decoding” option.

Disabling the options - Close out of the Steam application and restart it.
- Check to see if this has fixed the Steam Client WebHelper High CPU Usage issue.

Note: Try to also individually disable the Steam Overlay in all games if they have been individually enabled.
Solution 4: Uninstall the Latest Windows Update
If you have installed a Windows update recently, you might see this spike in resource usage by Steam. Therefore, we suggest that you try and uninstall the update. For that:
- Press “Windows + R” to launch into the run prompt, type in “control panel” and press “Enter” to launch into it.
- Click on the “Uninstall a Program” button and then select the “View Installed Updates” button from the left side.
- Right-click on the recently installed update and select the “Uninstall” button.

Selecting the “Uninstall” button - After removing the update, check to see if this fixes the Steam Client WebHelper High CPU Usage issue.

Solution 5: Launch Steam without Browser Components
Basically, the high CPU Usage with the WebHelper is caused mainly due to the browser components that Steam is running. Therefore, we suggest that you try to launch Steam without these if possible. For that:
- Press “Windows + R” to launch into the Run prompt.
- Type in the following command inside this prompt and press “Enter” to launch into Steam with Small Mode.
C:\\Program Files (x86)\\Steam\\steam.exe” -no-browser +open steam://open/minigameslist
- Make sure to adjust the address according to the location of Steam on your computer.
- Check and see if this fixes the issue.
Solution 6: Close out of Friends List
Some users were able to fix the issue simply by closing out of the Friends list while in-game. This can prevent the WebHelper process from running which in turn prevents the high CPU Usage.
If the issue hasn’t been fixed, contact us for further support.