How to Get Rid of SedLauncher.exe and Should You
A lot of queries have been coming in from users that have been getting the strange sedlauncher.exe process in their task managers and in this article, we have written in detail about this process. Make sure to read through the whole post in order to properly understand why sedlauncher keeps coming back and what it is.

What is Sedlauncher.exe?
A lot of times Updates can bring in issues rather than solving them, the same happened when the KB4023057 Windows 10 update came in. Sedlauncher.exe was a part of the Windows 10 update KB4023057, it was intended to improve the speeds for OS updates, meaning users would be able to install newer Windows updates without worrying about unexpected errors.
Sedlauncher.exe was intended to help users rather than make processes complicated, many users confuse the Sedlauncher.exe for a Virus or Malware on their systems, but instead, it is a Windows task. The Sedlauncher.exe is located at C:\Program Files\rempl\sedlauncher.exe meaning it is a certified Windows 10 file running to make your Updates smoother and faster.
Should Sedlauncher.exe be disabled?
Many users have been asking if they can disable Sedlauncher.exe due to its high CPU Usage, the program was initially built to make things work faster but due to its high usage, it makes simple tasks like copying take larger amounts of time. Disabling Sedlauncher.exe will not put your PC at risk, but it should only be disabled if it’s causing you high CPU usage.
How to Disable windows sedlauncher?
Solution 1: Disable Sedlauncher.exe
The most simple method is to end the process from your task manager, it will disable sedlauncher.exe temporarily, and it will start once again when the PC is restarted. To disable sedlauncher.exe from the task manager follow the steps below:
- Right-click on any empty space on your “Taskbar” and from the drop-up menu choose to select “Task Manager”.
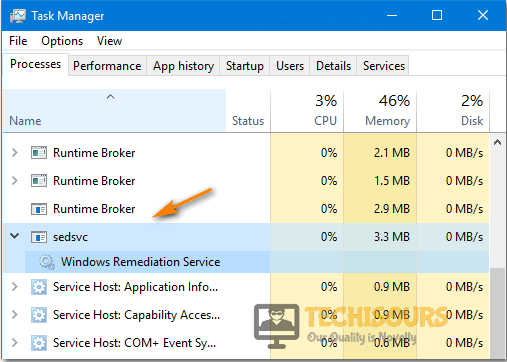
- In the pop-up window scroll down and locate “sedsvc” in the “Processes” tab.
- Once located expand sedsvc to find the “Windows Remediation Service”.
- Then right-click on Windows Remediation Service and select “End Task” from the drop-down menu.

Disable Windows Remediation Service - Once the task is ended, monitor your “CPU Usage” for a while to check if the sedlauncher high disk problem has been solved.
Solution 2: Disable Sedllauncher.exe From Services
To disable Sedlauncher.exe from the service’s utility follow the steps below:
- Press the “Window + R” keys together on your keyboard to open up the “Run” dialog box.
- In the Run prompt type in “services.msc” and press “Enter”.

Typing in “services.msc” - In the Services tab scroll down to find “Windows Remediation Service” and right-click on it to select “Properties” from the drop-down menu.
- In the “General” tab select “Disabled” in the Startup type menu and apply all the changes made and press “OK”.
- Make sure to “Restart” your computer after the process and then see if the error vanishes.

Solution 3: Completely Remove Windows Setup Remediation
Follow the steps below to completely uninstall Windows Remediation services from your computer:
- Press the “Window + I” keys simultaneously on your keyboard to open up “Settings”.
- In the Settings windows select the “Programs and Features” menu and then scroll down through the list of installed applications to locate “Update for Windows 10 for x64- based systems (KB4023057)” in the Apps & Features menu.
- Once found select the program and click on the “Uninstall” button.

Uninstall the Windows Update - Then follow the on-screen instructions to uninstall the program completely and see if you get rid of the sedlauncher disable error now.

Solution 4: Disable the REMPL Task
This solution will show you how to disable the REMPL task in the task scheduler library:
- Open up the “Run” dialog box using the “Window + R” keys together on your keyboard.
- In the Run prompt type in “taskschd.msc” and press “Enter”.

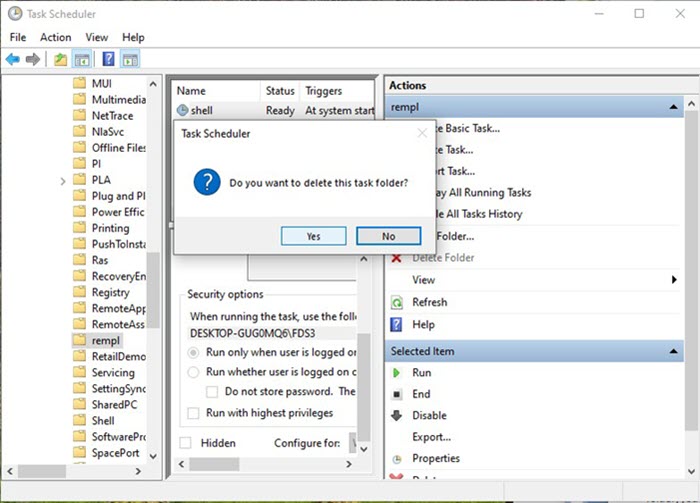
Type taskschd - In the new window click on the arrow beside the “Task Scheduler Library” in the left pane and afterward navigate to the following address:
Microsoft > Windows > rempl
- Once in the “rempl” folder you will see a “Shell task” in the right pane.
- Select the Shell task and press the “Delete” key on your keyboard, then press “YES” to confirm your selection.

Delete the Shell Process - Close all of the Windows now and then check for your “CPU usage” now.

Solution 5: Block Windows Remediation Services Using Windows Firewall
This solution will take you through the step to help block Windows Remediation Services using your Windows Firewall. Proceed with these steps:
- In the search bar near the Start menu search for “Windows Defender Firewall” and press “Enter”.
- In the pop-up window click on “Advanced Settings” in the left pane and then select “Outbound Rules” from the left side.

Choose Outbound Rules - Then click on “New Rule” in the far right vertical tab and in the new pop-up window select “Program” and afterward press “Next”.
- Now navigate to the following location to find the Windows Remediation Service:
C:\Program Files\rempl
- In the folder select the “sedsvc.exe” file and click “Next” three times.
- Enter a name for your “New Rule” and click on “Finish” to complete the process to verify whether the problem is rectified.

Solution 6: Perform A System Restore
If none of the above solutions work, you can perform a system restore to a point before the update. Follow the below-listed steps in this regard:
- In the Cortana search box type in “Create A Restore Point” and press “Enter”.

Create a Restore Point - In the pop-up System Properties window click on “System Restore” and hit the “Next” button to start the process.
- Now you have to select a “Date”, make sure to select one before the update happened on your PC.
- Finally, click on “Next” to begin the system restore process, and once done now check if it solves the problem for you.

Implement the aforementioned fixes to remove the error completely but if the problem still persists then you may Contact Us here for further help.