Easily Fix Nvidia Output not Plugged in Issue [Complete Guide]
Nvidia installs sound and audio drivers on your computer along with the GPU drivers this is because the sound drivers used here also provide clarity in your audio and give you great audio. However, some users have been getting the “Nvidia Output not Plugged in” issue when they see their sound devices and the Nvidia Devices get greyed out.

Therefore, in this article, we have listed all the different solutions and workarounds that you can use to completely fix this issue on your computer. In addition to that, we have also listed the reasons that are behind this error in the first place.
What Causes the Nvidia Output not Plugged in Error?
After having to go through a lot of different methods and solutions used to fix the issue, we concluded that the following must be the most prominent reasons behind it.
- Sound Misconfiguration: It is possible in some cases that the Sound settings on your computer have been misconfigured due to which this issue is being triggered. Therefore, we suggest that you try to reconfigure these settings as we have mentioned below.
- Outdated Drivers: Sometimes, the drivers installed on your computer might have been outdated and due to this, the Nvidia Output not Plugged in error will be triggered. Therefore, we suggest that you try to update these drivers.
- Outdated Bios: In certain cases, the Bios installed on your Motherboard might have gotten outdated and this might trigger the issue at hand. Therefore, we strongly suggest that you try to install the latest version of Bios and check if this fixes the error at hand.
Now that you have been taken through most of the reasons behind the issue, we can finally start implementing the solutions.
Fixing the Nvidia Output not Plugged in Issue:
Fix 1: Check for Sound Configuration
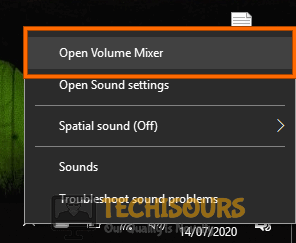
- Right-click on the “Speaker” icon at the bottom right side of your screen and select the “Open Volume Mixer” option.
Open Volume Mixer - From there, make sure to see that the apps being run on your computer don’t have their volume sliders all the way down because this would mute your sounds.
- Check to see if doing so fixes the Nvidia Output not Plugged in issue.
Fix 2: Install Latest Drivers
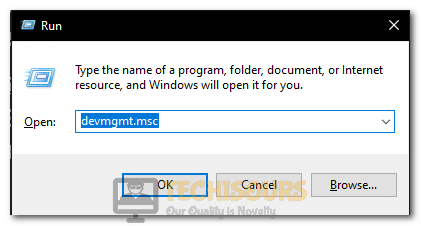
- Press “Window + R”, type in “devmgmt.msc” and press Enter on your keyboard.
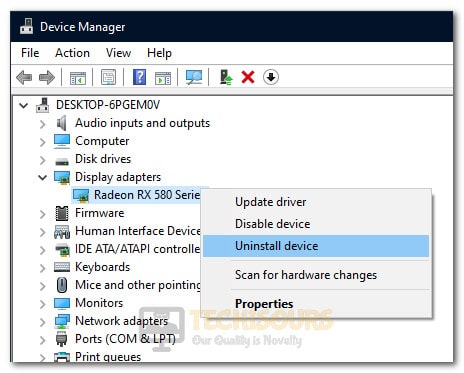
Typing devmgmt.msc in the Run prompt - Double click on the “Display adapters” option and right-click your display device.
- Select the “Uninstall device” option and then head over to Nvidia’s official website and download the latest version of drivers available for your GPU.
Uninstalling GPU Device - Install it by following the on-screen instructions and make sure to tick the “Perform a clean installation” option.
- Restart your PC once the installation is complete and check to see if the issue is now fixed.
Fix 3: Roll Back Drivers
- Press “Window + R”, type in “devmgmt.msc” and press Enter on your keyboard.
Typing devmgmt.msc in the Run prompt - From here, double click on the “Display Adapters” dropdown and right-click on the GPU Drivers.
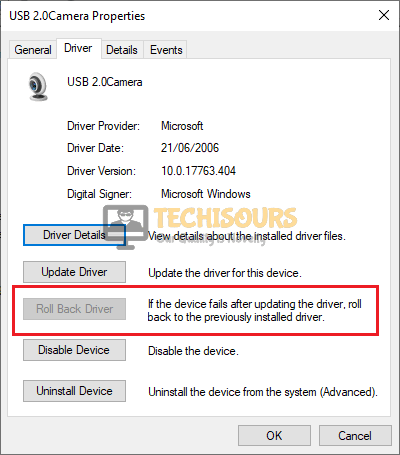
- Select the “Properties” option and head over to the “Driver” tab from there.
- Select the “Roll Back Driver” option and follow the on-screen instructions to complete the process.
Rollback Driver - You can also try downloading an older driver version from the official Nvidia’s website and then clean installing it.
- Restart your PC afterwards and see if the issue is resolved now.
Fix 4: Reconfigure Playback Device
- Right-click on the “Speaker” icon at the bottom right side of the system tray and select the “Sounds” option.
Selecting the Sounds Option - From there, head over to the “Playback” tab and make sure that the Nvidia Output device has been set as default.
- If it hasn’t, click on it and then select the “Set as Default” option.
- Now, close out of this window and check to see if the Nvidia Output not Plugged in issue is fixed.
Fix 5: Reconfiguring Nvidia Control Panel Settings
- Right-click anywhere on your desktop and select the “Nvidia Control Panel” option from the list.
- Now, from here, expand the “Display” section and select the “Set up Digital Audio” option.
Setup Digital Audio - After this, in front of the “HDMI” option, click on the dropdown and select your device from there.
- After that, click on the “Change Resolution” option from the left side and see if the connector is an “HDMI-HDTV (Audio Enabled)” connector.
Clicking on the “Change Resolution” option - If, that isn’t listed there, make sure to change the cable that you connect the PC with your display to an HDMI one.
- Now from the bottom right side, right-click on the “Speaker” icon and select the “Sounds” option.
- From the new window, click on the “Playback” tab and the output device should be listed here.
- Right-click on an empty space here and tick the “Show Disabled Devices” option and also check the “Show Disconnected Devices” option.
- If your device appears, click on it and select the “Set as Default” option.
- Check to see if doing so fixes the Nvidia Output not Plugged in issue.
Fix 6: Reconfigure Realtek HD Audio Manager Settings
- Press “Window + S” to launch the window search, type in “Realtek HD Audio Manager” and press Enter on your keyboard.
- Click the small icon at the top-right corner that says “Connector Settings”.
- Tick the checkbox that says, “Disable front panel jack detection” and save the settings.
Selecting the “Disable Front Panel Jack Detection” option - Check to see if doing so fixes the issue.
Fix 7: Using the Default Driver
- Press “Window + R”, type in “devmgmt.msc” and press Enter on your keyboard.
Typing devmgmt.msc in the Run prompt - Double click “Sound, video and game controllers” and right-click “NVIDIA High Definition Audio”.
- Select the “Update Driver” option and choose the “Browse my computer for driver software” option from the list.
Clicking on the Browse My Computer for Drivers option - After that, select the “Let me pick from a list of Available Drivers” option and select the “High Definition Audio Device” option and click on “Next”.
- After that, follow through with the on-screen instructions and check to see if doing so fixes the issue.
- If the issue isn’t fixed, restart your computer and launch into the device management window and click on the “Scan for Hardware Changes” option.
- Check to see if doing so fixes the Nvidia Output not Plugged in error.
Fix 8: Run Audio Troubleshooter
- Press “Windows + I” to launch into the settings, click on the “Update & Security” option and from the left side, click on the “Troubleshoot” button.
Clicking on “Update and Security” - After that, select the “Additional Troubleshooters” button and select the “Playing Audio” option from the list.
- From there, click on the “Run the Troubleshooter” button and follow the instructions on your screen.
- Check to see if doing so has fixed the Nvidia Output not Plugged in issue.
Fix 9: Choosing Audio and Input Devices
- Press “Windows + I” to launch into settings and select the “System” option from there.
- Now, click on the “Sound” option and from the “Input” and the “Output” dropdowns, select your input and output devices.
Clicking on the “Sound” option - Check to see if the issue is now resolved.
Fix 10: Modifying BIOS Settings
Restart your PC and once the logo screen is displayed, a key will be mentioned which when pressed will get into the BIOS. In the BIOS look for an option related to “Audio” or “Built-in Audio” and switch it to on position instead of Auto. Save these changes and reboot your PC.
Fix 11: Updating BIOS
In certain cases, it is recommended that you try to update your Bios to the latest available version and check to see if doing so fixes the issue. You can do this by loading the latest Bios version on your USB and connecting it to your computer and from your Bios, prompt it to load the latest Bios from your USB.
Fix 12: Modifying the Driver’s inf File
Firstly, download the latest drivers from the manufacturer’s website and download DDU. Using DDU, uninstall your current drivers completely and then before installation of the downloaded drivers, you need to modify its inf file. In the inf file, you will need to replace the hardware id with your current GPU’s hardware id and then install it and your issue should be resolved.
Fix 13: Manually Updating Graphics Drivers
- Press “Window + R”, type in “devmgmt.msc” and press Enter on your keyboard.
Typing devmgmt.msc in the Run prompt - Double click on the “Display adapters” option, right-click on your GPU here and select the “Update Drivers” option.
- Choose the “Browse my computer for drivers” option and click on the “Browse” option.
- Select the “Display.Driver” folder and proceed with the on-screen instructions.
- Restart your PC afterwards and check to see if the Nvidia Output not Plugged in issue is resolved now.
Fix 14: Clean Reinstalling Windows
Sometimes, the Windows installation on your computer might have been corrupted due to which the issue is being triggered. Therefore, we suggest that you try to perform a clean installation of your Windows and check to see if that fixes the Nvidia Output not Plugged in issue.
If the issue is still not fixed, contact us for further information.


