How to Fix ndis.sys Failed BSOD Error on Windows 10
Network Driver Interface Specification (NDIS) handles all the communication and connections between all the components and connected devices over the computer’s network. The ndis.sys file is the system file that is responsible for carrying out these operations. However, users have been getting the DRIVER_IRQL_NOT_LESS_OR_EQUAL ndis.sys Failed issue.
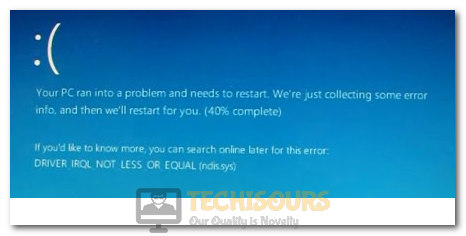
This file can be found in the System32 folder. Although, this file has no effect on your PC’s performance and neither does it interfere with the normal functionality of a computer. But multiple users have come across BSODs due to ndis.sys failures. It might get triggered before you even get into your windows, or it can also occur while you are booted up and try to run an app/software.
There are several different possible causes for the ndis.sys Failed issue. But worry not, we will be showing you multiple fixes to resolve it.
Note: Microsoft has ended support for Windows 7, if you are still using Windows 7 then we would strongly recommend upgrading it to Windows 10 before going through any of the fixes below. As it will not only improve your overall experience but will also improve the overall security of your data.
If you are not able to access Window at all, you will need to enter the safe mode first. You can do that by clicking “Advanced Options” when “Startup Repair” appears and then select “Advanced Options” after clicking on “Troubleshoot”. Here, you will need to select “Startup Settings” and then press “F4” on your keyboard to access Safe Mode.

What Causes the ndis.sys Failed BSOD Error on Windows 10?
In certain situations, the error might be triggered due to different reasons, however, there are certain common triggers due to which the error is being triggered.
- Outdated Windows: Sometimes, the Windows installed on your computer might not be up to date due to which the error is being triggered. Therefore, we suggest that you check for any available updates and then see if doing so has fixed the issue.
- Recently Installed Software: Some recently installed software on your computer might be preventing it from being able to properly run. Therefore, we suggest that you remove any recently installed software and then check to see if doing so fixes the issue.
- Check Software: There is a possibility that the disk or the Operating system files might be preventing it from being able to run properly because they might be damaged. Therefore, we suggest that you try and fix this issue by running some scans and properly fixing the issues.
- Antivirus: The Antivirus installed on your computer might be causing the ndis.sys Failed issue. Therefore, we suggest that you try to disable it temporarily and check to see if doing so fixes the issue.
Now that we have informed you of some of the reasons due to which this error is being triggered, we can finally start implementing the solutions.
Fixing the NDIS.SYS Failed BSOD Error:
Solution 1: Update Your Windows to the Latest Version
Make sure that you are running the latest version of windows. If not, here is how you can update your windows:
- Press the “Window + S” keys together, type in “Check for updates” in the search bar, and press “Enter” on your keyboard.

Check For Updates - If any updates are available, they will be automatically installed. If not, then click on “Download and Install”.
- Finally, “Restart” your PC and see if the issue is resolved.

Solution 2: Reinstall Recently Installed Software
If you have recently installed an app/software after which you have started getting the BSOD then you should probably reinstall it. First, you must uninstall it by following the procedure below and then proceed to reinstall it:
- Press the “Window + S” keys simultaneously on your PC, type in “Apps & features” in the search bar, and press “Enter” on your keyboard.
- Here look for the app/software that you have recently installed, click on it, and press the “Uninstall” button.

Uninstalling from our computer - Lastly, “Restart” your computer and see if the issue is resolved. If it is resolved, then try reinstalling that software/app again.

Solution 3: Update/Roll Back Network Drivers
The most common cause as reported by many users can be a corrupted or outdated network driver. Hence updating it to the latest versions will probably fix your issue. Follow the steps below to do so:
- Press the “Window + R” keys simultaneously to open up the “Run” dialogue box.
- Here type in “devmgmt.msc” in the textbox and press “Enter” on your keyboard.

Typing devmgmt.msc in the Run prompt - In the pop-up Device Manager window, click on the “Network adapters” option and then right-click on your network.
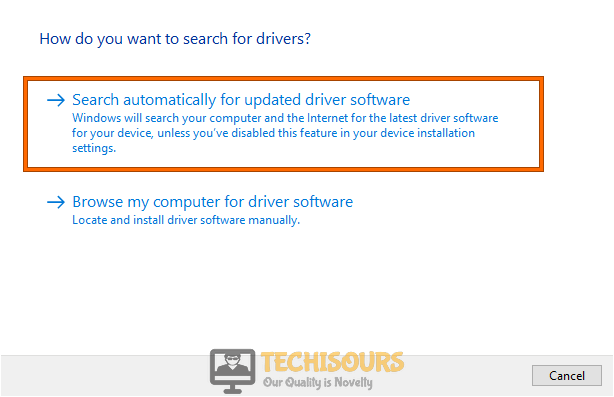
- Click on “Update driver” and then select “Search automatically for updated driver software”.

Search automatically for updated driver - Once the driver gets updated, “Restart” your PC, and see if the problem got fixed.

If you were already running the latest driver then you should roll it back to a previous version as sometimes, newer drivers might introduce some bugs and cause issues. Here is how to roll back your driver:
- In the search bar near the Start menu type in “Device Manager” and click to open it from the search results.
- In the pop-up window click on “Network adapters” and right-click to select your current network.
- Now click on “Properties” and go to “Driver”. Afterwards, select the “Roll Back Driver” option.

Rollback Driver - Then choose a reason for the roll-back and click “YES”.
- Lastly “Restart” your PC and see if the error persists or not.
Note: You can also try a complete reinstall in safe mode.

Solution 4: Replace WinPcap with npcap
Follow the steps below to replace WinPcap with npcap:
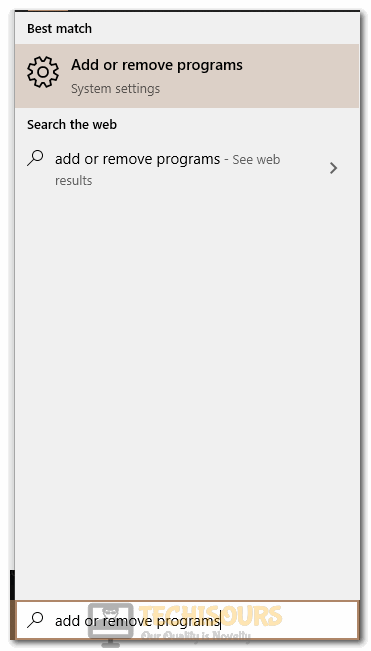
- Press the “Window + S” keys together and type in “Add or remove programs” in the search bar. Then press “Enter” on your keyboard.

Clicking on the Add or Remove Programs option - Now look for “WinPcap” in the list of apps, click on it and select “Uninstall”.
- After the uninstallation is complete, go to this link to download “npcap” and install it by following the on-screen instructions.
- Check to see if doing so fixes the ndis.sys Failed error on your computer.
Solution 5: Run SFC/CHKDSK Scans and DISM
System File Checker will search for any corrupted system files and repair them. CHKDSK scans the file system, verifies the integrity of the filesystem, and will resolve any issues with the filesystem. Here is how to run these scans:
- Press the “Window + R” keys simultaneously to open the “Run” dialogue box.
- Here type in “cmd” in the textbox and press the “Ctrl + Shift + Enter” keys to launch cmd as Administrator.

Typing in cmd - Now type in the following commands and press “Enter” after each:
sfc /scannow

chkdsk /f /r

DISM /online /Cleanup-Image / ScanHealth

DISM /Online /Cleanup-Image /RestoreHealth
- Then perform a “Restart” and see if the ndis.sys Failed error got removed now.

Solution 6: Perform A Full Scan On Your PC
Malware/Viruses might impersonate the ndis.sys file which can cause the BSOD to appear and can also affect your PC’s performance. Performing a full scan will remove these malware/viruses from your PC. Follow the steps below to run a full scan using Windows Defender:
- Press the “Window + S” keys simultaneously and type in “Windows Security” in the search bar. Then press “Enter” on your keyboard.

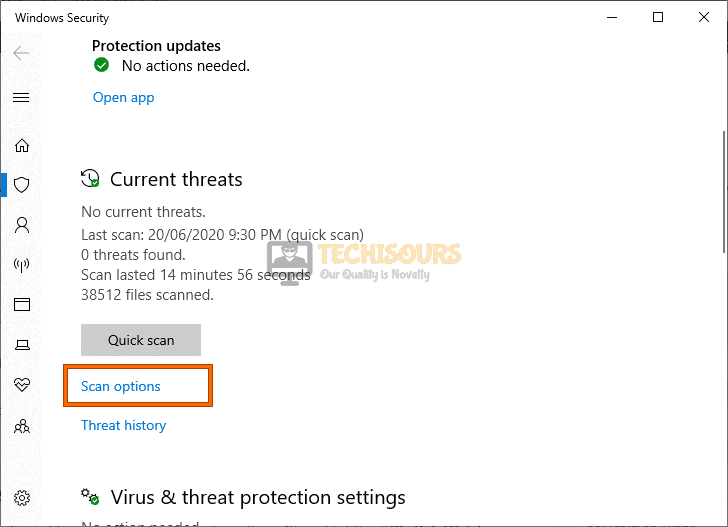
Choose Windows Security Option - In the pop-up window click to select “Virus & threat protection” and then select “Scan options”.

Scan options - Now select “Full scan” and afterwards press the “Scan Now” button to start the scan.
- Wait for the scan to get finished, “Restart” your PC afterwards and see if the ndis.sys Failed problem is solved.

Solution 7: Disable Your Antivirus/Antimalware Software
Having Antivirus/Antimalware software is important as it keeps your data safe. However, it can sometimes interfere with the system’s functionality thus causing issues such as BSOD. For this “Disable” your antivirus software and see if that fixes the issue. If it does, then you should consider switching over to different software. We would suggest using no other than Window’s own Defender software as it has improved drastically over the recent updates. Moreover, you can also replace your ndis.sys file with another one downloaded from any other website. However, we would strongly advise against it, as it can mess up your whole Windows and you will need a reinstallation of windows afterwards.
Solution 8: Perform A System Restore
If none of the solutions listed above worked for you, then you should restore your system to a restore point that was created at an earlier time. Here is how to do it:
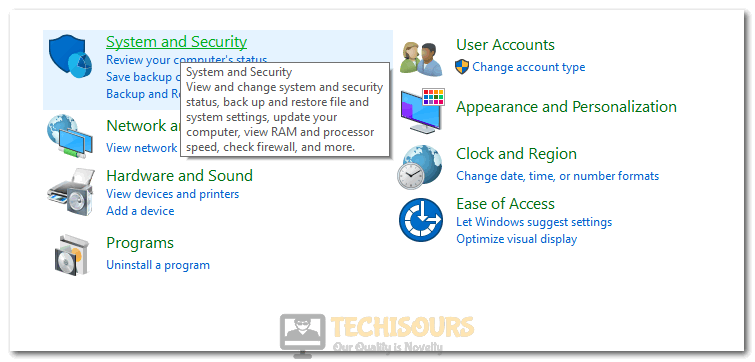
- Press the “Window + S” keys together, type in “Control Panel” in the search bar, and press “Enter” on your keyboard.
- Click on “System and Security” from the displayed menu and select “File History”.

Clicking on System and Security option in Control Panel - Click on “Recovery” from the “See also” section at the bottom-left and select “Open System Restore”.
- Move to the “Next” step, select a restore point and follow the on-screen instructions.
- In the end “Restart” your PC and check if the problem got eradicated now.
Implement the aforementioned solutions in order to get rid of this particular error but if the error still persists then feel free to Contact Us here.