How To Fix MSI Afterburner not Working [Complete Guide]
A lot of users have been complaining about the MSI Afterburner not working issue and we have taken it upon ourselves to compile this guide which details each and every scenario that you might face where a particular feature might not be working or the whole software ceases to work.

MSI Afterburner is basically a must-have for most gamers that like to monitor their performance stats during games and it really keeps you up to date with the things that are happening with your hardware usage. However, we have been getting complaints from users that are unable to use it because MSI Afterburner not Working issue is being triggered.
What Causes the MSI Afterburner not Working Issue?
After going through some troubleshooting techniques commonly adopted by users to circumnavigate this error, we concluded that the following must be some of the most important reasons due to which this error message is triggered in the first place.
- Other Overlays: If you are simultaneously using the Nvidia and Steam overlays along with the MSI Afterburner overlay, it is recommended to disable all of them. This is because, using multiple overlays at the same time can cause misconfiguration issues and due to this, the MSI Afterburner not working issue will be triggered.
- Outdated Software: It is possible that your version of MSI Afterburner or RivaTuner Statistics Server has been outdated due to which the MSI Afterburner OSD not working issue is being triggered. the best way to circumvent this error is to simply uninstall both software and reinstall their latest versions after downloading them from the websites mentioned in the solution below.
- General Misconfigurations: Both the MSI Afterburner and RTSS require you to set them up according to your computer and desired configurations. If you haven’t completed this process or if you have misconfigured some of the settings, you will run into the MSI Afterburner not working issue.
- Missing DirectX Software: Another possibility is that you are missing the essential DirectX software that is very important in running any graphical applications on your computer. It serves as a communication channel between the GPU and applications demanding to use the GPU. Therefore, installing DirectX as mentioned in the solution below, can fix this issue completely.
- Missing Admin Permissions: Sometimes, the software requires admin permissions to be able to monitor certain games or apps and if these permissions aren’t granted, it will be unable to do so. Therefore, as mentioned in the solution below, grant the app with admin permissions and it should fix the MSI Afterburner not working issue.
- Incorrect Rendering Mode: If the MSI Afterburner video capture not working issue is being triggered, you can try to change the rendering mode which is used by the software to render the overlay and video from your application. Doing so is known to sometimes fix this particular issue.
Now that you have been made familiar with most of the reasons behind this error, we can finally move on towards fixing this issue.
Before you Start:
- If MSI overlay is not showing in games, then try using it minimized instead of closing.
- Setting an ON/OFF key in the afterburner for OSD can sometimes solve the MSI Afterburner on-screen display not working issue. This can be done by going into settings, clicking on the “On Screen Display” button from the top, and then selecting the hotkey for toggling the OSD on and off.

Setting Hotkey for toggling OSD On and OFF in MSI Afterburner - Download and install RTSS if not installed with MSI. This can sometimes fix the MSI afterburner OSD not working issue.
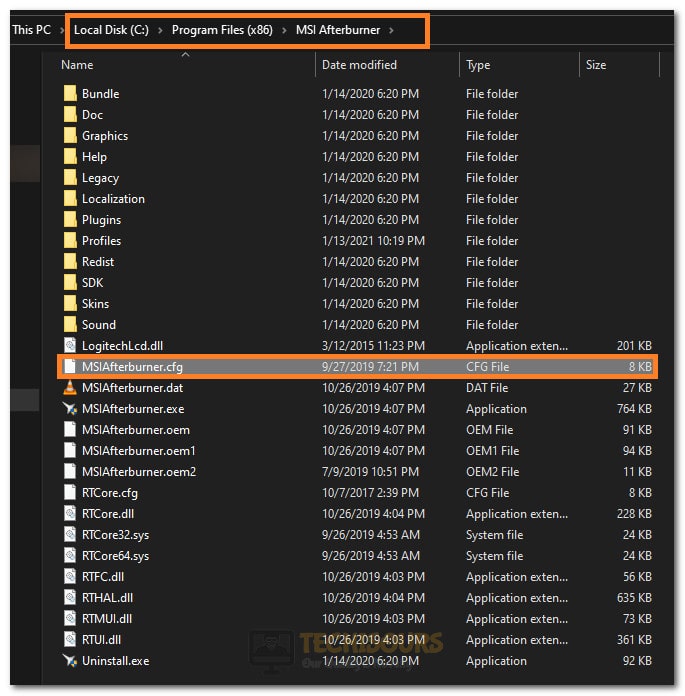
- Delete the “CFG” file for MSI Afterburner located usually at the following location.
C:\program file(x86)\MSI Afterburner

Deleting the CFG - Try pressing the “Ctrl + F” keys on your keyboard simultaneously as it increases the Fan speed. This way, you can get around the MSI afterburner fan speed not working issue.
- Delete all third party controllers except MSI afterburner, this is because you should ideally only have one such application installed on your computer, and having another one can cause incompatibility issues between the two applications.
- Try resetting MSI Afterburner to its default settings by clicking on the reset button after the program has been opened.
General Fixes:
There are a couple of different issues that you could be facing when you are running into the MSI Afterburner not working error. These can range from MSI afterburner OSD not working to MSI afterburner fan curve not working to MSI afterburner video capture not working. However, we have kept in mind all of the different errors with this issue and have compiled some general fixes that you can apply to fix these issues.
Fixing Errors with the MSI Afterburner:
Solution 1: Enable OSD for MSI Afterburner
It seems like a pretty basic thing to do but many users haven’t properly enabled their OSD from MSI Afterburner settings due to which this issue is caused in the first place. Therefore, follow these steps below to fix the MSI Afterburner OSD Not working issue.
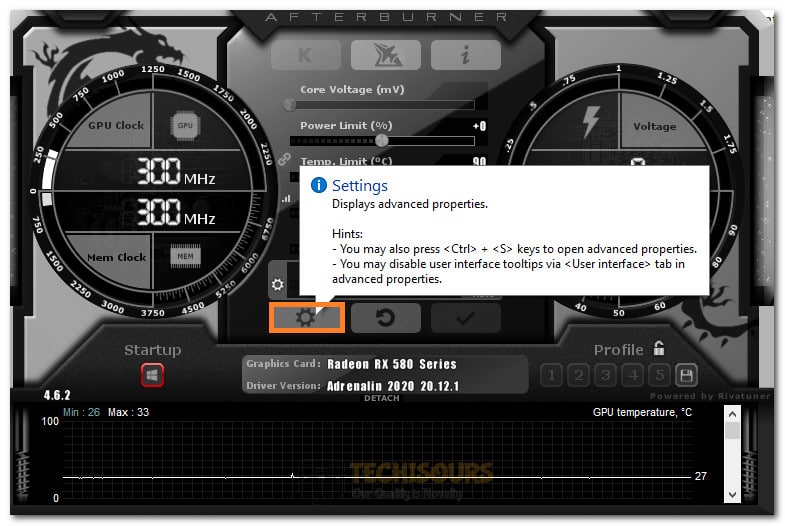
- Launch MSI Afterburner and click on the “Settings Gear” icon.

Launching MSI Afterburner Settings - Go to the “Monitoring” tab and checkmark the “Show in On-Screen Display” box.

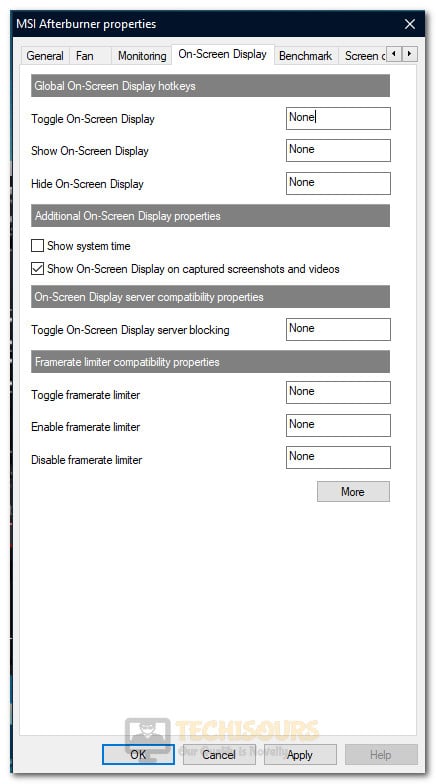
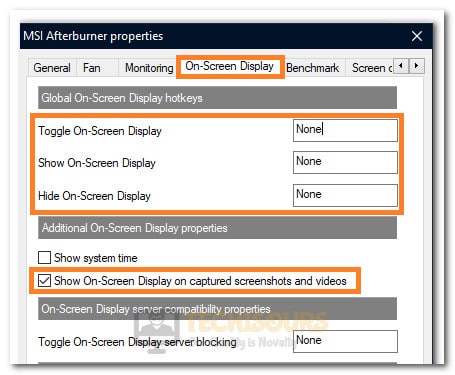
Selecting Show On-Screen Display option - After that, Navigate to the “On-Screen Display” tab.
- In here, Set Hotkeys for “Toggle OSD”, “Show OSD” and “Hide OSD”.
- Checkmark the “Show on Screen Display on Captured Screenshots and Videos” box.

Configuring OSD Settings in MSI Afterburner - Press Backspace to delete the selections for any other options in this setting and this way set that to “None”.
- Click on “Apply” to save your changes and select “OK” to exit out of the software.

Solution 2: Disable Steam Overlay
Disabling Third-party overlays plays an important part in fixing this issue because third-party overlays are known to most commonly cause this error with users. Therefore, follow the steps listed below to completely circumvent this issue by disabling the Steam Overlay.
- Press the “Windows + S” keys on your keyboard and type “Steam” in the search bar.
- Click on the first result to launch Steam on your computer.
- After that, go to the “Library” tab.

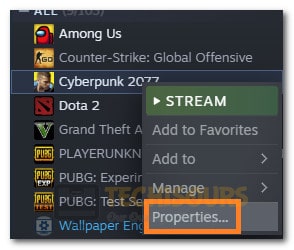
Opening Steam Library - Now, right-click on the game in which you are facing the MSI Afterburner not working issue.
- Select “Properties” from the menu and click on the “General” tab.

Selecting game properties in Steam - Make sure to un-check the “Enable the Steam Overlay while in-game” box.
- Finally, click on “Apply” to save your changes and exit out of Steam.
- Launch the game and check to see if the MSI afterburner not working issue has been resolved.

Solution 3: Disable NVIDIA In-Game Overlay
Nvidia In-Game overlay is another common overlay that most users might have enabled on their computers. Therefore, in this step, we will be completely disabling it as well. For that, follow the step by step instructions that are written as follows.
- Press the “Windows + S” keys on your keyboard and type “Geforce Experience” in the search bar.
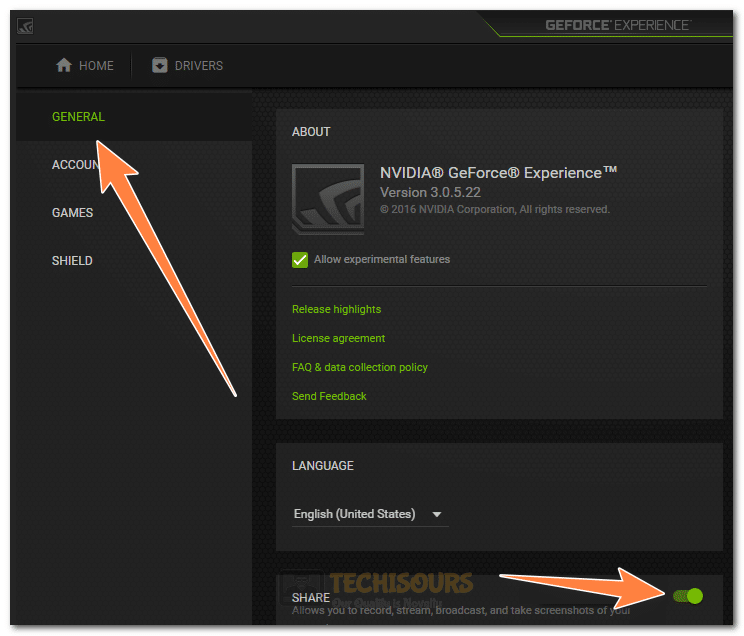
- After that, click on the “Settings Cog” icon, located at the top right corner of the home screen.
- Navigate to the “General” tab and look for the “Share” or the “In-Game Overlay” option depending upon your version of the software.

Clicking on the “In-Game Overlay” option - Now, make sure to turn the toggle off to disable the Nvidia Overlay completely.
- Apply the changes made and launch the game with which you were facing this issue again.
- Check to see if the MSI Afterburner OSD not working issue is still persisting.
Solution 4: Reinstall Updated Afterburner and Riva Tuner Statistics Server
Sometimes, the application installation files can get corrupted due to which the MSI Afterburner not working issue might be triggered. Therefore, in this step, we will be reinstalling both apps involved in this process, and in doing so, we will also be installing their latest versions.
- Press “Windows + R” keys on your keyboard, type “appwiz.cpl” in the run prompt, and press the enter key to open the application wizard.

Typing “appwiz.cpl” - In the “Programs and Features” window, right-click on the “MSI afterburner” and “RTSS” applications in the list.
- Once you’ve found them, right-click on them one by one and select “Uninstall” to remove them from your computer.

Clicking on “Uninstall” - Complete the uninstallation process by following the on-screen instructions.
- After this, download MSI Afterburner and Riva Tuner Statistics Server.
- Install the downloaded executables and install them.
- Now, both the applications will have been updated to the latest available versions.
- Check to see if doing so fixes the MSI Afterburner not working issue.


Solution 5: Set Detection
It is very important to set the RTTS app in such a way that it is able to read and detect the applications that are currently running on your computer. Therefore, in this step, we will be setting its detection settings to be able to do so.
- Press the “Windows + S” keys on your keyboard and type in “RivaTuner Statistics Server” in the search bar.
- After that, click on the “Add” option, located at the bottom left corner of the “RivaTurner” window.
- Now browse for the game’s executable with which you are getting the MSI Afterburner not working issue and double click on it to add it to the list.
- Once the game executable has been added successfully, select the executable from the list and select it.
- Finally, you need to set the “Application Detection Level” option to high.

Adding the game to RivaTuner Statistics Server and setting the Application Detection Level to High - Save the changes and see if the issue resolved.

Solution 6: Run Program with Administrative Privileges
Missing admin permissions are another factor that can prevent the application from being able to work properly. Therefore, in these steps, we will be running the MSI Afterburner program with admin permissions to allow them to be able to monitor the applications properly.
- For this purpose, you need to open the main installation folder where the MSI afterburner is installed. If you have installed it at your preferred position, then go to that folder. Otherwise, the default location should be as follows.
C:\program file(x86)\MSI afterburner.
- Right-click on the “MSI Afterburner.exe” and select “Properties” from the menu.
- Then go to the “Compatibility” tab and uncheck the box associated with “Run this Program in Compatibility mode”.

Opening Compatibility Tab - Then checkmark the box associated with “Run this Program as an Administrator”.
- Finally, select “Apply” to save the changes made and close the window.

Running the Program as an Administrator - Launch the app again to see if MSI Afterburner not working issue has been fixed.


Solution 7: Disable Graphic card
- Turn on your PC and enter the BIOS mode. If instructions on your screen to enter the BIOS mode are displayed on the screen then, follow them. Otherwise, keep pressing Del, F1, or F2 key to enter into the BIOS settings.
- Then navigate to the “Advanced” tab and select the “Onboard Devices Configuration (or Chipset Configuration)-> Primary Graphics Adapter” option.

Prioritizing Dedicated GPU - Now disable it by pressing the enter key while highlighting the enabled option and set the PCI-E selection as enabled and make sure to set it first as well/
- After that, press the “Save your Changes and Exit” button which should be given on-screen.

Saving Changes and Exiting from Bios - Finally, the PC will restart, launch the game, and check to see if the MSI Afterburner not working issue has been resolved.


Solution 8: Add Exclusion
- First of all, Run MSI afterburner and click on the “Settings gear” icon.
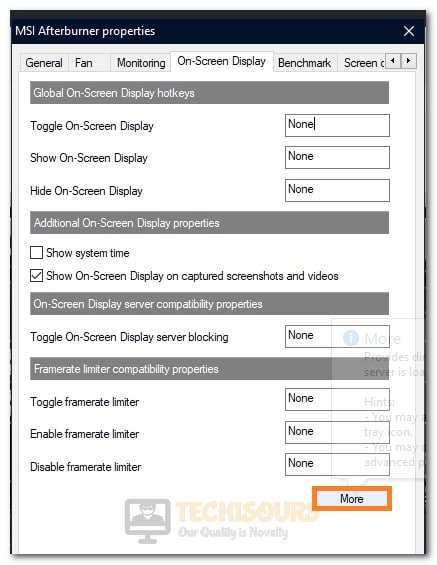
Launching MSI Afterburner Settings - Then select the “On-screen Display tab->more” options.

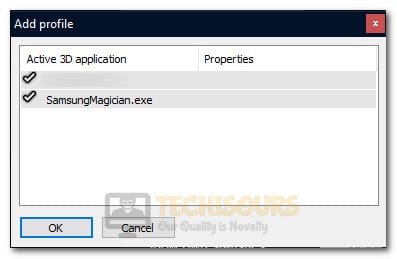
Clicking on More - Now hold “Ctrl” and select “ADD” to open a window listing all the open 3D apps.
- After that, uncheck every box associated with applications other than your game.

Unchecking other apps except for our game - Save changes and run the game to check if the MSI Afterburner not working issue is fixed.
Solution 9: Install DirectX
Most modern operating systems come with pre-installed DirectX software. This software is most essential for people that perform graphical tasks with their computers and therefore, you should have it installed on your computer as well. Navigate to this link and download the DirectX software from the website once downloaded, install it on your computer by running the executable file.
Solution 10: Change in File
- Open the RTSS installation folder by navigating to the following location.
C:\Program Files (x86)\RivaTuner Statistics Server
- Now open the following file with Notepad.
ProfileTemplates\Global Config File

Launching the folder - After that, search under “[RenderVulkan]” and replace “presentfromcompute = 0” to “presentfromcompute = 1”.

Changing the Value - In the end, click on the “File” option on the top left side and select “Save”.
- Restart MSI Afterburner and RTTS app.
- Launch the game and check to see if you have fixed the MSI Afterburner not working issue.


Solution 11: Set Up MSI Afterburner Properly
- Run MSI afterburner and click on the “Settings Gear”.
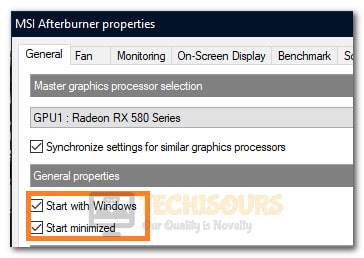
Launching MSI Afterburner Settings - Navigate to the “General” tab and the “Start with Window”, “Start Minimized”, “Unlock Voltage Control” boxes.

Changing MSI Afterburner settings - After that, move to the “Monitoring” tab and checkmark the “Show in On-Screen Display” option.
- Now go to the “On-Screen Display” tab and set your preferred hotkeys.
- Click on “OK” and save your changes.
- Check to see if by making these changes, you have fixed the MSI Afterburner not working issue.

Solution 12: Switch Rendering Mode
- Press the “Windows + S” keys on your keyboard and type in “RivaTuner Statistics Server” in the search bar.
- Click on the first option to launch the application.
- Go to “General Properties” and turn ON “Start with Windows”
- Then change “On-Screen Display Rendering Mode” to “Raster 3D”.

Selecting the Raster 3D option in RTSS - Click ok and close the “RTSS”.

MSI Afterburner Video Capture Not Working:
Solution 1: Reconfigure Video Capture Settings
- Launch MSI Afterburner and click on the “Settings gear” icon.
Launching MSI Afterburner Settings - Navigate to the “Video Capture” tab.
- Now set the hotkeys for screen recording in the box next to “Video Capture”.
- Then set your preferred “Video quality” and “Framerate” using the slider.

Clicking on the Video Capture tab and configuring the video quality settings - After that, set a path for saving recorded videos and make sure that the path is entered correctly.
- Apply the changes made, closeout of MSI Afterburner, and start it back up again.
- Check to see if by doing this, you are able to fix the MSI Afterburner video capture not working issue.

Solution 2: Disable Capture of 3rd Party Overlays
It is important that if you are getting this error with another video capture software, disable 3rd Party Overlays capture in its settings. Also, make sure to set MSI Afterburner Video capture settings to record the 3D Application.

Solution 3: Reconfigure On-screen Display Settings
- Launch MSI Afterburner and click on the “Settings Gear” icon.
- Navigate to the “On-screen Display” tab.
Configuring OSD Settings in MSI Afterburner - After that, scroll down and uncheck the “Show On-Screen Display on Captured Screenshots and Videos” option.
- Run the game and try recording the screen.
- Check to see if you are able to fix the MSI Afterburner Video capture not working issue.
MSI Afterburner OSD Not Working:
Solution: Set Minimized Window
- Run MSI afterburner and click on the “Settings Gear” icon.
- Navigate to the “General” tab and make sure to check the “Start with window” and “start minimized” box.

Changing General Configurations - Save your changes and close out of the MSI Afterburner window.
- Check to see if you are now able to fix the MSI Afterburner OSD Not Working issue.
MSI Afterburner Fan Curve Not Working:
Solution 1: Install Latest GPU Drivers
It is possible that the MSI Afterburner Fan Curve not working issue is being triggered because MSI Afterburner is unable to recognize your GPU Properly. Therefore, in this step, we will be circumnavigating this issue by installing the latest available GPU Drivers. For that purpose, download AMD Drivers if you are using an AMD Provided GPU and download Nvidia Drivers if you are using an Nvidia GPU.
Solution 2: Downgrade GPU Drivers
- Press “Windows + R” keys on your keyboard to launch the Run prompt.
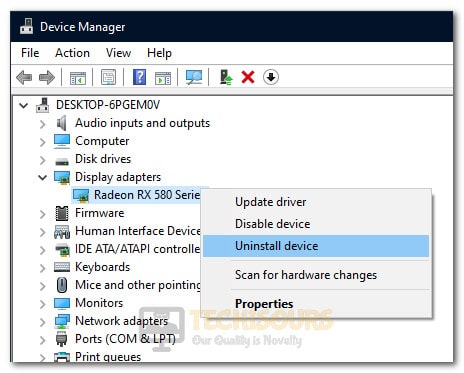
- Type “devmgmt.MSC” and press the “Enter” key to start the device management window.

Typing devmgmt.msc in the Run prompt - In here, look for “Display Adapters” in the list and expand it.
- Right-click on “GPU Driver Name” and select “Uninstall Device”.

Uninstalling GPU Device - After that, navigate to the AMD or the Nvidia site depending on your GPU and download an older version of the driver for your GPU.
- After completing the download, install the drivers and check to see if the issue gets resolved.

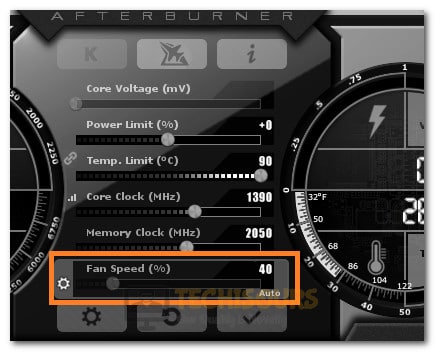
Solution 3: Set Fan Speed Manually
Launch MSI Afterburner and on the main screen, click on the “Auto” button under the Fan Speed option to disable the automatic control of your GPU Fans. From here, you can drag the slider up and down to adjust the GPU Fan speed accordingly.
Solution 4: Setting a Custom Fan Curve
- Launch MSI Afterburner and click on the Gear icon to navigate into its settings.
- Navigate to the “Fan” tab from the top and checkmark the “Enable User-Defined Software Automatic Fan Control” option.

Checking the Enable User-Defined Fan Curve option - After that, select the “Custom” option from the “Predefined Fan Speed Curve” drop-down menu.
- Now manually adjust the parameters in the graph for the Fan Speed.
- You can set a particular value for the Fan Speed by dragging the parameter along the Y-Axis for a particular temperature by dragging it across the X-Axis.
- Try not to set the Fan Speed below 30% under any circumstances to ensure that your GPU remains chilled.
- Apply your changes and click on “OK” to exit out of the window.
- Check to see if you are now able to fix the MSI Afterburner Fan Curve not working issue.

If you are still unable to fix this issue, make sure to contact us and we can further troubleshoot it for you.