Kernel Security Check Failure? Here is how you can Fix it
If you have been getting the Kernel Security Check Failure Error on your PC and don’t have the clarity on how to fix it, you have come to the perfect location. In this article, we have recorded every one of the various strategies and workarounds you can carry out on your PC to fix this issue. It is an error message that Windows 10 showcases on the screen when specific files are tainted and today we’ve addressed this issue in detail in this article.

How to fix the Kernel Security Check Failure Error:
Fix 1: Update Windows
The Kernel Security issue might be triggering due to the outdated version of Windows on your PC and initially, we can try updating Windows to the latest build in order to rectify the issue:
- Firstly, click on the Start tab and type “Settings” in the search bar.
- Now, look for the “Update & Security” option in the settings window, and once found choose the “Check For Updates” option. As soon as you click on that button Windows will start looking for the latest updates.
Check for updates - If any latest updates are found “Install” them and most probably you’ll get over the Kernel Security Check Failure error.
Fix 2: Scan Your OS Disk
Sometimes this error can arise due to hardware failure therefore it is better to scan your drive for errors. Follow the steps indexed beneath throughout in order to get rid of the error:
- Locate the “This PC” option and right-click on it to select the “Open” option.
- In the pop-up window right-click on your “Windows Drive” and from the drop-down menu choose to select “Properties”.
- Then click on the “Tools” tab at the top of the window and here select “Check” in the “Error Checking” section.
- Afterward, select “Scan Drive” and let the process complete.
Clicking Scan Drive Option - Once it gets completed now proceed to verify if the Kernel Security Check Failure error still persists or not.
Fix 3: Look for Memory Bugs
Sometimes memory (RAM) issues can likewise be distinguished by an underlying Windows 10 scanner, therefore, running the Windows Memory Diagnostic Tool may help in rectifying the problem:
- Firstly, click on the “Start” button located adjacent to the taskbar and type “Windows Memory Diagnostic” in the taskbar.
- In the pop-up window select the “Restart Now and Check For Problems (Recommended)” option and make sure that you save your files before proceeding.
Restart now and check for problems - At the point when your PC boots up again, the memory diagnostics tool will attempt to recognize any mistakes and issues with respect to your RAM and rectify them.
- Verify if this has fixed the Kernel Security Check Failure issue.
Fix 4: Run the SFC Scan
- To initiate, click the Windows Start button, then type “cmd” into the search box and press the “Enter” key.
- In the command prompt window, type the following command and press the “Enter” button.
Sfc / scannow
- Now verification phase of the system scan will take place, wait for it to complete and then restart your PC.
- After that, type in the following command inside this prompt and press “Enter” to start the check disk scan.
chkdsk c: /r
- Wait for the scan to be finished and check to see if doing so fixes the Kernel Security Check Failure error.
Fix 5: Temporarily Disable The Antivirus
Sometimes the antivirus software scans the newly created files on your computer, and this scan can cause the Kernel security error. To temporary disable antivirus, follow the below-mentioned procedure:
- Navigate to the “Show Hidden Icons” option on the right side of the taskbar, locate your antivirus, and right-click on it.
- Select the option “Pause Protection” or “Disable Antivirus” (the option may vary depending upon your antivirus).
Disable antivirus - A warning prompt window will appear, click on the “OK” button.
Fix 6: Update Device Drivers
It might be possible that outdated device drivers might be the backbone of the issue therefore it is recommended that you should try updating your device drivers so that this problem might be resolved:
- Press the “Windows + S” keys simultaneously to open the Start menu and type “Device Manager”.
Type Device Manager - All categories of drivers will be displayed in front of you and from there look for any component that is showing “Yellow Exclamation Mark” or any other driver that needs to be updated. Afterwards right-click on it and choose the “Update Driver” option.
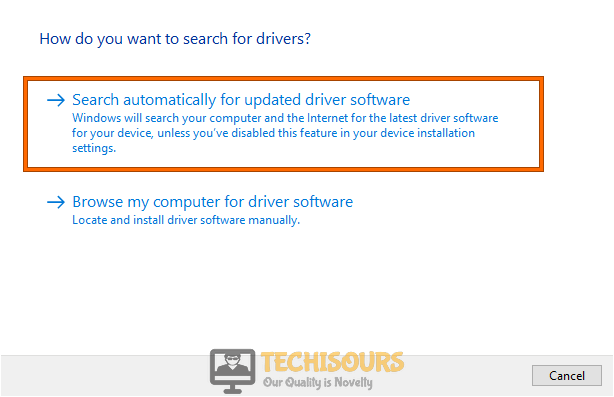
- A window will appear in front of you and from that window choose the “Search Automatically For Drivers” option and wait until the updating process is completed.
Search automatically for updated driver
Fix 7: Boot Into Safe Mode
It is possible that your PC isn’t able to boot properly because something that launches with the start of the operating system is preventing it from being able to run properly. Therefore, we recommend starting your PC in Safe mode and if you are successful in doing so, fix this issue from there. For that:
- On the Blue Screen that contains the Error, click on Advanced Options, and from there, select “Troubleshoot” and then click on the “Advanced Options” screen.
- From there, click on the “Startup Settings” option, and from there select the “Restart” button.
- After the restart, follow the on-screen instructions to successfully get inside the safe mode.
- Inside the safe mode, make sure to uninstall any recently installed applications that you think might be causing these issues, and also make sure to update any outdated drivers.
- If you recently installed any drivers that caused this issue, we recommend that you uninstall them as soon as possible and then check to see if doing so fixes the Kernel Security Check Failure issue.
If you still get this issue after going through all of these fixes, we suggest that you Contact Us for further troubleshooting.


