Easily Fix Invalid Signature Detected Error [Complete Guide]
If you have been getting the “Invalid Signature Detected. Check Secure Boot State in Setup” error on your computer after updating your Bios or UEFI software, you have come to the right place. We were facing this issue on one of our test benches and got to fix it by applying different troubleshooting techniques. Below, we have listed a bunch of different methods that you can apply to completely fix the issue and have also listed some reasons due to which it might occur.

What Causes the Invalid Signature Detected Issue?
After having to go through most of the solutions commonly used to fix the issue, we came to conclude that the following must be the most important triggers behind it.
- External Devices: It is possible that the External Devices that you have connected to your computer might have been causing the “Invalid Signature Detected” error. Therefore, we suggest that you try to remove extra external devices from the computer and check to see if that fixes the issue.
- Fast Boot: If you have Fast Boot enabled on the computer, there is a chance that it could be causing this error. Therefore, we suggest that you try to disable it as we mentioned in the steps below and check to see if that fixes the issue.
- Recent Update: If a recent update has been installed on the computer and this issue started occurring, it is possible that the issue was with the update itself. Therefore, we suggest that you try to remove the recent update and check to see if that fixes the issue.
Now that you have been taken through most of the reasons behind the occurrence of the issue, we can finally start implementing the steps to fix it.
How to Fix Invalid Signature Detected HP Issue completely:
Solution 1: Disconnect External Drives
If any external drive like a USB or hard drive is connected to your computer it might be causing the error while booting because the system is trying to boot through that external drive. A simple and quick fix for this is to remove any external drive connected to the computer and restart the computer afterward.
Solution 2: Disable Secure Boot Control
- Enter the “BIOS” mode on your PC by pressing the “F1 or F2” keys on your keyboard.
Note: When you turn “ON” the system you can see the message on the screen showing the keys for entering into BIOS. - Now use the arrow keys to navigate to the “Security” tab, “Authentication” tab, or “Boot” depending on your BIOS.
- Here you will find “Secure Boot” under any one of the above tabs. Use the “Down Arrow Key” to select the option and press “Enter”.
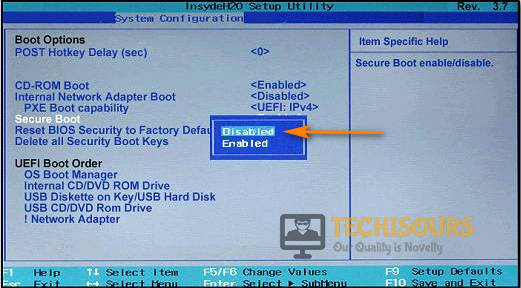
- Then select “Secure Boot Control” and choose “Disabled”.

Disable Secure Boot
Solution 3: Disable Fast Boot and Enable CSM
- Enter the “BIOS” mode on your PC by pressing the “F1 or F2″ keys on your keyboard.
Note: When you turn “ON” the system you can see the message on the screen showing the keys for entering BIOS. - Now use the arrow keys to navigate to the “Security” tab.
- Here look for the “Fast Boot Option” or “Boot” tab, select it, and press “Enter”. Then choose the “Disable” option.
- Next move to “Launch CSM” and choose “Enabled”. In the new window “CSM” might be listed as “Legacy USB” under “Advanced”.
- Navigate to the “Save and Exit”, finally choose “Yes” to save the changes.
Solution 4: Disable Driver Signature Enforcement
- Boot Windows 10 from the installation media to access the “Recovery Environment”.
- Once the installation screen comes up, press the “Shift + F10” keys at the same time.
- Now enter the following commands in the Command Prompt window and press “Enter” after each command:
bcdedit.exe -set loadoptions DISABLE_INTEGRITY_CHECKS

bcdedit.exe -set TESTSIGNING ON
Now we have to remove the driver that was causing the problem. To do so proceed as follows:
- After the windows boot up, press the “Windows + R” together to open the “Run” dialog box.
- Here type “sigverif” and press the “Enter” button to open the “File Signature Verification Utility”.

Open File Signature Verification Utility - Now click on “Start”, a scan will begin to detect all the unsigned drivers that are on your computer.
- After the scan, you will get a list of drivers, “Uninstall” the drivers that are causing problems.
- After that again “Install” the signed latest version of drivers that you recently uninstalled.

Solution 5: Reconfigure Key Management Options
- Enter the “BIOS” mode by pressing the “F1 or F2” keys on your keyboard.
Note: When you turn on the system you can see the message on the screen containing the keys for entering BIOS. - Next use the arrow keys to navigate to the “Security” tab, here look for “Key Management” and select it.
- Then set all keys to “Not Installed”.
Solution 6: Uninstall the KB3084905 Windows Update
- Navigate to the Start menu and here type “Control Panel”. Then press the “Enter” key to open the control panel window.
- In the Control Panel window select “Programs” and in the following window select “View Installed Updates” under the Programs and Features option.

View installed updates - Now look for the “KB3084905” update in the list, click on it and select “Uninstall”.
- Next, follow the on-screen instructions and uninstall it completely.
- Lastly, update to the latest version of the Windows available to fix the invalid signature detected MSI issue.

Solution 7: Perform A System Restore
- If nothing works you have to reinstall the windows, save Windows 10 on a USB Flash drive, and boot via “UEFI”.
- After that go to “Troubleshoot” and select “Advanced Options” and then click on “System Restore”.
- Now, choose a “Restore Point” and click “Next”.
Note: This solution will only work if you have previously created a recovery point. - Finally, click on “Finish” and wait until the restoration process is finished.
Solution 8: Tweak BIOS Settings
This error may also occur when BIOS loses its link to the boot image. This can be overcome by eliminating Windows Boot Manager as an option in the BIOS and then adding a new link to the hard drive and image in the boot directory.
Follow the aforementioned solutions in order to get rid of this error and for any more queries feel free to Contact Us here.