What is the Host Process for Setting Synchronization (SettingSyncHost.exe) and Fix High CPU Usage
A lot of users upon seeing the Host Process for Setting Synchronization or SettingSyncHost.exe inside their task manager get confused as to what the process is and what it does on your computer. In this article, we have explained this in detail and have listed and fixed some issues associated with this process as well.

What is Host Process for Setting Synchronization (SettingSyncHost.exe) on Windows?
The SettingSyncHost.exe is present inside the System32 folder on your computer and the process is very essential for the operating system. Basically, it is responsible for syncing settings on the device that you are currently using and on the other devices that you are using with the Microsoft account. This includes the Wallpaper, Onedrive, Xbox, Internet Explorer and other Windows-related settings.
However, sometimes, users have complained about High CPU Usage issues with the SettingSyncHost.exe process and in this article, we have explained in detail some steps that you can undertake to fix the issue completely.
Before you Start:
- If the issue arises while running or using a specific application, we suggest that you try to make sure that you update that app to the latest available version because outdated apps can sometimes cause the issue.
- Press “Windows + R” to launch the Run prompt, type in “services.msc” and press “Enter”. From here, make sure to right-click on the “Background Intelligent Transfer Service (BITS)” and select the “Disable” button to prevent it from running on your computer. Later on, you can try to enable this service again in an attempt to fix the Host Process for Setting Synchronization High CPU Usage issue.

Typing in “services.msc” -
If you are getting this issue while trying to transfer your camera photos from your SD card to your PC, we recommend that you try connecting the camera directly with the computer using a data cable and try transferring through that.
- Moreover, a faulty RAM stick might also be responsible for the Host Process for Setting Synchronization High CPU Usage error. You might want to check your RAM by running the Windows own Diagnostic tool. (Can be run by pressing “Window + S”, typing in “Windows Memory Diagnostic” and pressing Enter OR by using an app named “Memtest86”) and you will have to replace the RAM sticks if the memory issue is confirmed.

Fixing the Host Process for Setting Synchronization (Settingsynchost.Exe) High CPU Usage:
Fix 1: Reconfiguring Registry Key Permissions
- Press “Window + R”, type in “Regedit” and press Enter on your keyboard.

Typing “regedit” - In the Registry Editor, navigate to through to the following address.
HKEY_CURRENT_USER\Software\Microsoft\InputPersonalization\TrainedDataStore
- Right-click on the “TrainedDataStore” folder and click “Permissions…”.

Selecting “Trained Data Store” permissions - Tick the checkbox for “Full Control” under “Allow” and click on “Apply”.
- Restart your PC and see if the Host Process for Setting Synchronization High CPU Usage issue is resolved.


Fix 2: Updating Windows
- Press “Window + S”, type in “Check for updates” and press Enter on your keyboard.

Check For Updates - Windows will automatically start downloading and installing updates if available or you can click “Download and Install”.
- Once the updates are finished installing, restart your PC and see if the Host Process for Setting Synchronization High CPU Usage issue is resolved.

Fix 3: Reconfigure Internet Properties
- Press “Window + S”, type in “Internet Options” and press Enter on your keyboard.

Internet Options - Go to the “Security” tab and click on “Trusted Sites”.
- Select “Sites” and type in the following websites in the field “Add this website to the zone” and click “Add”. each time:
https://www.live.com
https://www.microsoft.com
- Restart your PC, and see if the issue is resolved

Fix 4: Using PowerShell to End Process
- At the bottom-left corner of the screen, right-click the “Start” icon and select the “Windows PowerShell (Admin)”.

Windows PowerShell (Admin) - Type in the following command in PowerShell and press Enter afterwards.
Register-ScheduledJob -Name "Kill SettingSyncHost" -RunNow -RunEvery "00:05:00" -Credential (Get-Credential) -ScheduledJobOption (New-ScheduledJobOption -StartIfOnBattery -ContinueIfGoingOnBattery) -ScriptBlock { Get-Process | ?{ $_.Name -eq "SettingSyncHost" -and $_.StartTime -lt ([System.DateTime]::Now).AddMinutes(-5) } | Stop-Process -Force} - Input your credentials to complete the process. Restart your PC and see if the process now terminates automatically and the issue is resolved.
- If you want to reverse the above procedure then type in the following in the PowerShell and press Enter.
Get-ScheduledJob | ? Name -eq "Kill SettingSyncHost" | Unregister-ScheduledJob
- Restart your PC and check to see if you have been able to get rid of the issue

Fix 5: Booting in Safe Mode
- Press “Window + S”, type in “Recovery options” and press Enter on your keyboard.
- Under “Advanced startup”, click on the “Restart now” option.

Advanced Startup - Once your PC restarts, select the “Troubleshoot” button and then select “Advanced options”. Click “Startup Settings”.
- Now, click “Restart”. Once restarted, different options will appear, press “F4” and your PC will restart into safe mode.
- If the issue is resolved in this safe mode state, it means that it was being caused due to a background app or service.
- Therefore, we suggest that you try to isolate the app/service that was causing this issue by using the method below.

Fix 6: Performing Clean Boot
- Press “Window + R”, type in “msconfig” and press Enter on your keyboard.

Typing in “Msconfig” - Go to the “Services” tab and tick the checkbox “Hide all Microsoft services”.
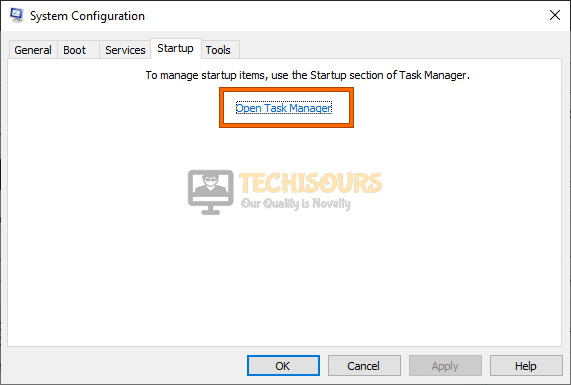
- Select “Disable all” and move on to the “Startup” startup and click on the “Open Task Manager” option.

Open Task Manager - Right-click all the programs one by one and select “Disable” each time.
- Restart your PC and see if the Host Process for Setting Synchronization High CPU Usage issue is resolved. If it is, then you need to repeat all the steps except that this time you need to enable groups of programs/services and perform a restart every time in an attempt to identify the culprit.

Fix 7: Reconfigure Sync Settings
- Press “Window + I” and click on “Accounts”.
- From the options on the left, select “Sync your settings” and disable “Sync settings”.

Selecting the “Sync Settings” option - Restart your PC and see if the issue is resolved now.

Fix 8: Checking for Malware
- Press “Window + S”, type in “Windows Security” and press Enter on your keyboard.
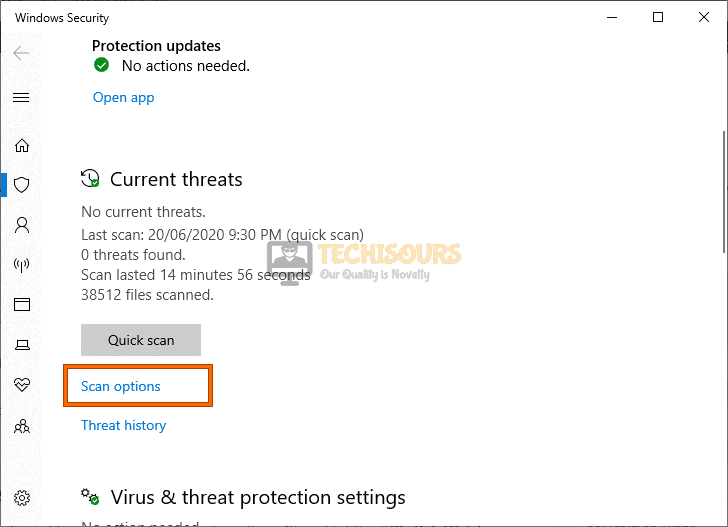
- Click “Virus & threat protection” and select “Scan options“.

Scan options - Choose “Full Scan” and click “Scan now”.
- Once the scan is complete, perform the necessary actions, restart your PC and see if the issue is resolved.
Fix 9: Running Windows built-in Troubleshooters
- Press “Window + S”, type in “Troubleshoot settings” and press Enter on your keyboard.
- Click on “Additional troubleshooters” and from here, make sure to run the troubleshooter.

Clicking on Additional Troubleshooters - From here, make sure to run the troubleshooter for different things that have been listed here.
- Check to see if doing so fixes the Host Process for Setting Synchronization High CPU Usage issue.

If the issue is still occurring on your computer, contact us for further troubleshooting.