11 Solutions to Fix Error Code 83 Disney Plus [Complete Guide]
Disney Plus is one of the most popular streaming services and users flock to it in their free time to watch their favorite shows. However, we have been getting some reports of certain users encountering the Error Code 83 Disney Plus issue which prevents them from being able to stream at all. Therefore, in this article, we have written in detail on how to fix this issue.

Why is the Error Code 83 Disney Plus Triggered?
After having to go through most of the solutions commonly used to fix the issue, we concluded that the following must be the reasons behind its occurrence.
- Outdated App: Sometimes, the Disney Plus application might have been outdated due to which the error Code 83 Disney Plus issue might be triggered. Therefore, we suggest that you try to update the application and then check to see if that fixes this issue.
- Outdated Firmware: In certain scenarios, if the firmware of the device has been outdated, the error code 83 Disney Plus issue can get triggered. Therefore, we suggest that you try to update the device firmware as it plays a crucial role in device functions.
- Cache/Cookies: In certain cases, the cache or the cookies stored by your browser or device might affect the loading of the stream and therefore, we suggest that you get them regenerated by clearing the old ones out.
Now that you have been taken through most of the reasons behind the occurrence of the issue, we can finally start implementing the solutions.
Before You Start:
- Restarting the Disney Plus streaming service on your browser might resolve your issue.
- Some users reported that resetting the network settings and restoring the router to the internet provider’s default settings fixed their issue.
- Sometimes Disney’s server is down due to routine maintenance or internet disruption hence wait until the maintenance procedure is complete or check the status of the Disney Plus website from this link.
- Many users reported that this error arises due to the incompatibility of the hardware they are using. You can check the list of supported devices on Disney Plus’s official website.
- Some users suggested that signing in with a different Disney Plus account might fix your issue and also check your billing details and subscription status.
- Some users reported that if you are logging in to your Disney Plus account for the first time on your laptop, then a prompt message will appear asking you to let Disney Plus check the eligibility of your device for playback. When you click “Allow” and let the DRM check go through, then most likely Error 83 will appear. To fix this, simply select “Dismiss” on the next attempt, afterward try to stream any video again, and hopefully, the error won’t appear again.
- Many users reported that avoid using Linux to stream content on Disney Plus as Linux is not compatible with Disney Plus.
- Due to interference in your internet connection users can face this error. It can arise due to a fault in your router or there is an issue with your internet service provider’s server. Restart your router and wait for it to stabilize and if the issue still persists then contact your internet service provider’s helpline.
Minimum System Requirements:
Before going through the article, make sure that your device meets the minimum system requirements to run the Disney Plus application.
For Desktop Browser Users:
Windows Users:
- Google Chrome 75+ on Windows 7 or later version
- Microsoft Edge on Windows 10 or later version
- Mozilla Firefox 68+ on Windows 7 or later version
- Internet Explorer 11 on Windows 8.1 or later version
macOS Users:
- Safari 11+ on macOS 10.12 or later version
- Google Chrome 75+ on macOS 10.10 or later version
- Mozilla Firefox 68+ on macOS 10.9 or later version
For Smart TV Users:
- Apple TV 4th Generation or later version
- Roku TV
- Samsung Tizen Smart TV
- LG WebOS Smart TV
- Android TV Devices
- Amazon Fire TV
- Apple AirPlay
- Chromebook
- Chromecast
For Console Users:
- Sony Playstation 4 or later version
- Xbox One or later version
For Android Smartphone And Tablet Users:
- Operating System 5.0 (Lollipop) or later version
For Apple iPhone And iPad Users:
- iOS 11.0 or later version
Other Operating Systems:
- Mobile browser playback is not supported
- Browsers on Smart TVs, game consoles, and other devices are not supported
- Browsers on ChromeOS and Chromebook are not supported
- Linux is also not supported
How to fix Error Code 83 Disney Plus:
Solution 1: Update Disney Plus App
This error can occur due to an outdated version of the Disney Plus Application on your smartphone or Smart TV. Installing the latest available update can fix this issue. Follow the below-mentioned procedure to successfully update the app.
Method 1: For Android / Tablet Users
- Navigate to the “Play Store” from the app menu and then type “Disney Plus” in the search box.
- Select the “Disney Plus” application from the search results and check if the updates are available for this application.
- If updates are available, tap on the “Update” button and wait until the app is updated successfully.

Update PlayStore Apps - When the latest update package is successfully installed on your device, launch the app again.

Method 2: For Smart TV Users
- Find the “Applications” icon from the menu and afterward open the “Google Play” app.
- Navigate to the “My Apps” section, select the “Disney Plus” application from the list, tap on the update button and let your Smart TV download and install the latest update files.

My Apps Option Smart TV - Restart your device after the update has been installed successfully.

Solution 2: Update Your Device
Method 1: For Mobile / Tablet Users
- Select the “Settings” option from the notification bar of your device.

Accessing Settings Option - Navigate to the “Device Options” from the settings menu and, afterward locate and select the “System Updates” option.

Locating System Updates Option - Select the “Check Now” button and observe if any updates are available.

Tap Check Now Option - If any latest software update is available, you can download and install that update on your device later.


Method 2: For Smart TV Users
- From the home screen of your Android TV, navigate to the “Settings” option.
- Head to the “About/Support” section, locate and select the “Software/System Update” option and then choose the option “Update Now”.

Performing Smart TV System Update - If any latest software update is available, you can download and install that update on your device afterward.

Solution 3: Restart Your Device
Sometimes just restarting your device solves the problem that may arise due to temporary bugs as this procedure restores your connection and removes the various faults occurring in the device. Follow the procedure mentioned below to perform the off-on test of your device.
- Switch off your phone by holding the power button until it turns “OFF” completely.

Tap on Power Off - Turn off your android TV, Wi-Fi router and unplug them from the power source.
- Leave all the devices in a powered-down state for 5-10 minutes, afterward power on all your devices and launch the Disney Plus app on your device and check if the app is working properly or not.

Solution 4: Update the Browser
This issue can arise when your browser is not updated to the latest available update or when you have turned off the browser’s automatic update feature. Installing the latest available update on your browser can fix this issue. Follow the instructions given below to successfully update your browser:
For Firefox Users:
- Firstly, launch Firefox, and in the “Options” menu, select the “Settings” option located at the bottom.

Firefox Settings Option - Type “update” in the search box located at the top of the window and afterward click on the “Check for Updates” option.

Checking Firefox Updates - The browser will let you know if any latest updates are available and afterward follow the on-screen instructions to install the latest update on your system.


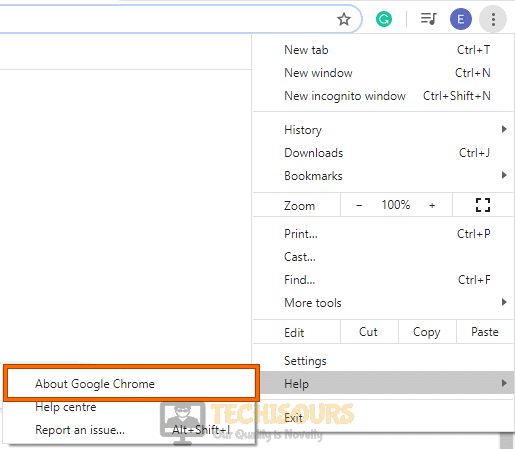
For Google Chrome Users:
- Launch Google Chrome, click on the “Options” menu, navigate to the “Help” option and then click on the “About Google Chrome” option.

About Google Chrome - The browser’s settings window will appear in front of you and it’ll check and download if any latest updates are available hence, click on the “Relaunch” button afterward.
Solution 5: Clear Cache & Cookies
Temporary internet files and cookies keep on piling up on the hard drive which can cause the browser to malfunction hence removing the browser’s cache memory can fix this issue. Follow the instructions given below to successfully clear the cache memory of your browser:
Method 1: For PC Users
For Firefox Users:
- In the “Options” menu of your Firefox Browser, click on the “Settings” option and then locate the “Privacy and Security” tab in the left pane.

Clicking on the Privacy and Security Option - In the “Cookies and Site Data” section, click on the “Clear Data” option located at the bottom of the window.
-

Firefox Cookies And Site Data - Select both options i.e. “Cookies and Site Data” and “Cached Web Content” in the prompt window and afterward click on the “Clear” option.

Clearing Firefox Cache Memory - After following the above-mentioned procedure, close the Firefox window and relaunch it.


For Chrome Users:
- In the “Options” menu of your Chrome browser, navigate to the “More Tools” option and afterward select the “Clear Browsing Data” option.

Clear Google Chrome Browsing Data - In the Clear Browsing Data window, set the time range to “All Time”, select all boxes and click on the “Clear Data” box.

Select Clear Data Option - Finally, close your Google Chrome browser and launch it again.


Method 2: For Mobile App Users
- Locate the “Disney Plus” app from the app menu of your phone, long-press the app icon, and tap on the “App Info” option.
- Locate the “Storage” option, select it and afterward select the “Clear Data” option, and tap on both options i.e. “Clear Data” and “Clear Cache” individually.

Clearing Disney Plus Cache

Method 3: For Smart TV users
- Navigate to the “Settings” option, head to the “Applications” section, find the “Disney Plus” App, select it and then pick the option “Clear Cache” and afterward “Clear Data”.

Clear Cache On Android TV - When the cache memory has been successfully removed, restart your Smart TV afterward.

Solution 6: Clear Disney Plus Site Data
For Firefox Users:
- In the “Options” menu of your Firefox browser, click on the “Settings” option.
Firefox Settings Option - Type “Cookies and Site Data” in the search box and then click on the “Manage Data” option.

Clicking On Firefox Manage Data Option - Type “Disney plus” in the search box, click the “Remove All Shown” option and afterward click on the “Save Changes” button.

Removing The Site Data


For Google Chrome Users:
- Start Google Chrome, go over to the “Options” menu, and scroll down to the “Settings” option.

Accessing Google Chrome Settings - Click on the “Security and Privacy” tab in the left pane and afterward click on the “Cookies and Other Site Data” option.

Accessing Google Chrome Cookies And Site Data - Scroll down the menu and click on the “See All Site Data And Permissions” option.

Selecting The Site Data Permission Option - Type “Disneyplus” in the search box, afterward click on the “Clear All Data” button, and select the “Clear” option on the prompt window when it appears.

Removing The Site Data


Solution 7: Force Stop the Application
Sometimes the app becomes unresponsive due to bugs or memory overload and it hangs the system. Follow the below-mentioned procedure to force stop the Disney Plus app:
Method 1: For Android / Tablet Users
- Navigate to the app menu of your phone, locate the “Disney Plus“ app, long-press the app icon, and tap on the “App Info” option.
- Find and select the “Force Stop” option and tap on the “OK” button on the prompt message.

Force Stop Disney Plus

Method 2: For Smart TV Users
- Navigate to the “Settings” option, in the “Applications” section, locate and select the “Disney Plus” app and then select the option “Force Stop”.

Force Stop Disney Plus On Smart TV - Afterward, shut down your TV, turn it on after some time and launch the app again on your TV.

Solution 8: Use A VPN
Disney Plus application is not available in selected countries due to copyright and legal issues and to bypass that restriction, many users access the Disney Plus app through a VPN. Follow the guide given below on how to use a VPN on your system:
- Firstly, sign up and download ExpressVPN from their website and afterward launch the VPN application, navigate to the menu, choose a server of your choice from the list and click on the “Connect” button.

Connecting VPN - When the VPN is successfully connected through that server, launch Disney Plus and then stream the content of your choice.

Solution 9: Change Your Browser
If you are logging into your Disney Plus account through one of these browsers (Google Chrome, Mozilla Firefox, Microsoft Edge, etc.) and not using the app, then try logging into your Disney Plus account from a different browser instead of the current one. This error can possibly arise due to some unknown bug related to the browser which leads to this issue. First, update your current browser and if the issue isn’t resolved then try accessing your Disney Plus account from a different browser.
Solution 10: Setup Google Public DNS
Some users suggested that setting up their networking equipment to Google’s Public DNS Service improved their Disney Plus viewing experience and for that purpose, set your router’s DNS settings to primary and secondary servers. Follow the instructions given below to set up the DNS service on your router:
- Press the Windows key, type “Network and Sharing Center” in the search box, and press the “Enter” button.

Typing In Network And Sharing Center - Locate the “Network & Internet” option and afterward click on the option “Change Adapter Options”.

Accessing Change Adapter Options - In the Network Connections window, right-click on the LAN or Wi-Fi connection according to your requirement and then select the “Properties” option.

Selecting LAN/Wi-Fi Properties Option - Locate the “Internet Protocol Version 4 (TCP/IPv4)” or “Internet Protocol Version 6 (TCP/IPv6)” option from the list, select it and then click on the “Properties” option.

Accessing IPv4 Properties - An IPv4/IPv6 properties window will open in front of you, select the option “Use the following DNS server addresses” and afterward enter the following IP address of the Google DNS servers:
For IPv4 DNS Server
8.8.8.8

8.8.4.4
For IPV6 DNS Server:
2001:4860:4860::8888

2001:4860:4860::8844

Typing In DNS Server IP - Click on the “OK” button, close the window and afterward check if your connection is working as it should.


Solution 11: Update Your Smart TV
For users accessing the Disney Plus application on their Roku or Apple TV, follow the guide below:
Method 1: For Roku TV Users:
- Firstly, check that your Roku Smart TV is compatible with the Disney Plus app by clicking on this here.
- Also, make sure that your Roku Smart TV has the latest operating system update installed by following the procedure mentioned in Solution 2 above.
Performing Smart TV System Update - Verify that the Disney Plus app on your smart TV is running on the latest available update by following the procedure mentioned in “Solution 1” of this article.
- After performing the above-mentioned procedures, restart your Smart TV and check if the Error Code 83 Disney Plus issue is resolved.
Method 2: For Apple TV Users:
- Make sure that your Apple TV has the latest available update installed and it is compatible with the Disney Plus app.

Performing Apple TV System Update - Check the status of Disney Plus servers by clicking on this link and removing the Disney Plus app’s cache memory.
- Finally, switch off your Apple TV and turn it back on after some time. Check if the Error Code 83 Disney Plus is now fixed.

Solution 12: Reinstall The Disney Plus App
Try reinstalling the application if none of the aforementioned alternatives work for you. Follow the steps outlined below to accomplish this.
Method 1: For Mobile / Tablet Users
- Launch the “Play Store“ app on your device, navigate to the “My Apps/Manage Apps” section, select the “Disney Plus” app from the list, and tap on the “Uninstall” option.

Uninstalling Disney Plus - When the app has been successfully uninstalled, navigate to the Play Store, type “Disney Plus” in the search bar, tap on the “Disney Plus” application, select the “Install” option, and when the installation is complete, launch the application, and check if it is working as it should.

Installing Disney Plus App


Method 2: For Smart TV Users
- Navigate to the “Settings” option, proceed to the “Applications” section, locate the Disney Plus App, and then select the “Uninstall” option.

Uninstalling Disney Plus On Smart TV - Later in the applications section, locate and open the “Google Play” app, type “Disney Plus” in the search bar, select the “Install” option and when the app has been successfully installed on your device, open it and verify that it is functioning properly.

Installing Disney Plus On Smart TV - Check to see if this has fixed the Error Code 83 Disney Plus issue.


Workaround:
If none of the above-mentioned solutions work out for you, then try contacting Disney Plus support team as their developer team can troubleshoot this issue, and hopefully, they’ll be able to resolve your error.
If you still can’t figure out how to fix this issue, Contact Us for further troubleshooting.