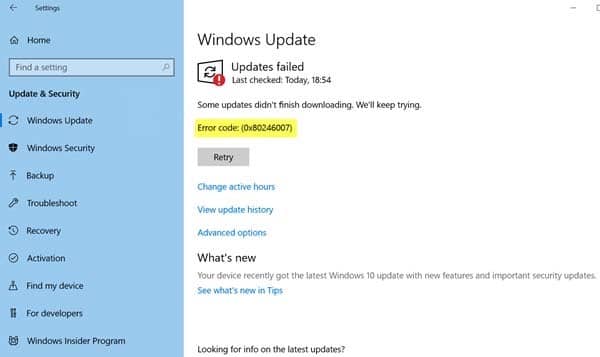
Easily Fix Error Code 0x80246007 Windows Update [Complete Guide]
The Error Code 0x80246007 while updating windows is usually triggered due to a glitch in the system or due to a general bug during the installation process. In this article, we investigated all the potential reasons behind the occurrence of this error and have listed them here. Make sure to follow all the listed solutions one-by-one until one of them fixes the issue for you and also to go through the reasons due to which it occurs in the first place.
What Causes the Error Code 0x80246007 on Windows 10?
After going through certain fixes, we came to the conclusion that the following must be the most crucial reasons behind the occurrence of this error.
- Antivirus: In certain cases, it is possible that the antivirus installed on your computer has been preventing the Windows update files from being installed. This can occur due to a number of reasons but false positives are usually the cause behind it. Therefore, following the solutions below, you can simply disable the Antivirus to get rid of this issue.
- Date and Time Settings: In certain situations, the date and time settings of your computer might not have been configured properly due to which it is running into the Error Code 0x80246007 message while updating Windows. Therefore, setting the date and time properly might get rid of the issue.
- Background Applications: Some background applications can interfere with system functions and services which can, in turn, prevent Windows from being able to load the files properly. Therefore, we suggest that you try to prevent the background applications from running in order to fix this issue.
- Damaged System Files: If the system files have been damaged or corrupted due to a storage failure or due to any other reason, applying Windows updates can be a tricky task. Therefore, we suggest that you run some scans as mentioned in the solutions below to check and rectify any system file errors.
- Corrupted Update Files: If the downloaded update files have been corrupted, the Error Code 0x80246007 will be seen because they cannot be installed on the computer. A simple workaround to this would be to delete the downloaded files in order to be able to download them again.
- Firewall Disabled: The Firewall running on the computer might have been disabled by you or any other app installed on the computer and this can in certain cases prevent the PC from running properly. Therefore, we suggest that you try and enable the Firewall again as mentioned to get rid of this issue.
Now that you have been taken through almost all of the possible triggers behind it, we can finally start implementing the solutions.
Fix error code (0x80246007) on Windows 10:
Solution 1: Disable Your Antivirus
Sometimes antiviruses are not fully compatible with Windows 10. So you might get an error 0x80246007 while downloading Windows 10 build. To resolve this error you have to disable your antivirus firewall. If the problem still exists try disabling the whole antivirus or remove it. Then check if that solves the issues or not. If the problem is still there, try switching to another antivirus. You can disable your antivirus by following these couple of steps:
- Open your desktop and right-click on the antivirus icon.
- From the popup context menu, choose to select “Disable”.

Disable antivirus - Check to see if doing so fixes the issue and you can resume the Antivirus after the update has been installed.

Solution 2: Check Date and Time Configuration
Sometimes this error is caused by incorrect data and time.
- Press the “Windows” logo key to open up the “Start” menu. Type “Date and Time Settings ” in the search bar and press “Enter”.

Choose Date and Time - After that select your respective time zone and click “OK” to change the time and date.
- Check to see if this fixes the issue.

Solution 3: Empty the Temporary Folder
- Press the “Window” + “R” keys at the same time to open up the “Run” prompt.
- Then type in “%temp%” and press “Enter”.

Typing in “%temp%” - Select all folders using the “Ctrl + A” keys together and delete them all.
- Check to see if doing so fixes the error message while updating Windows.

Solution 4: Set BITS Service to Run Automatically
- Press the “Window + R” keys at the same time to open up the “Run” prompt and here type in “services.msc” and press the “Enter” key.

Typing in “services.msc” - In the newly opened window search navigate to “Background Intelligent Transfer Service (BITS)” and right-click on it. A dropdown menu will appear and select “Properties”.

Background Intelligent Transfer service - Go to the “General” tab and navigate to “Startup Type” and set that to “Automatic (Delayed Start)”. Click the “Start” button and then click “Apply”.
- Finally, click the “OK” button to save the changes and most probably error code (0x80246007) would be rectified.


If BTS Fails to Start:
- Press the “Windows” logo key and “R” at the same time to open up the “Run” prompt. Here type in “regedit” and click “OK”.
Typing “regedit” - In the pop-up “Registry Editor” window go to the following path.

HKEY_LOCAL_MACHINE\SYSTEM\CurrentControlSet\Control\BackupRestore\
- After going there, find the “FilesNotBackup”. If you can’t find it then you have to create it. Click on “Edit” and then select “New” and after that click on “Key”. Then name the key “FilesNotBackup”. Afterward, close the registry editor.
Solution 5: Run A New Task
- Open the “Start” menu, type in “Task Manager” in the search bar, and press “Enter”.
- Go to the “File” menu, select “Run New Task “ and type the following:

Running new task

Get-appxprovisionedpackage –online | where-object {$_.packagename –like “*windowscommunicationsapps*”} | remove-appxprovisionedpackage –online
Then hit the “OK” button.
- Now, check if the problem is resolved or not.
Solution 6: Perform A Clean Boot
- Press the “Window + R” keys at the same time to open up the “Run” prompt. Here type in “msconfig” in the dialog box and press the “Enter” key.

Typing in “Msconfig” - In the System Configuration window click on the “Services” tab and check “Hide all Microsoft Services” option which is present at the bottom of the window. After that click the “Disable All” button.

Hide all Microsoft services - Then go to the “Startup” tab and click “Open Task Manager”.
- In the Task Manager disable all the startup applications. For that, you have to right-click on the application and a dropdown menu will appear. Click on “Disable” to disable the application.
- Repeat step 4 for all the startup applications. After that close the Task Manager window and go to the “System Configuration” window. Click on “Apply” and after that click on “OK” to save the changes and restart your computer.
- After restarting, make sure to check if the Error Code 0x80246007 is gone.


Solution 7: Delete Files from Windows Update Folder
- Press the “Window + R” keys at the same time to open the “Run” window. Here type in “C:\Windows\SoftwareDistribution” and click “OK”.
Note: You might have to change C:\ to the other drive where you have installed the windows if you have not installed windows in C Drive. - After the new window opens, go to the “Download” folder and delete all folders and files in it.
Solution 8: Run the DISM tool
- Open the “Start” menu, type in “Command Prompt” and right-click on it to select “Run As Administrator”.

Run command Prompt - Type following commands one by one on “Command Prompt” and press “Enter” after each command:

Dism /Online /Cleanup-Image /CheckHealth

Dism /Online /Cleanup-Image /ScanHealth

exe /Online /Cleanup-image /Restorehealth
- The process will probably take a couple of minutes so don’t close the window until it is finished.
- After it closes, check if the Error Code 0x80246007 is fixed.
Solution 9: Perform An SFC Scan
- Open the “Start” menu, type in “Command Prompt” and right-click on it to select “Run As Administrator”.
- Now type the following command and hit the “Enter” key.
sfc/scannow

sfc / scannow - Check to see if doing so fixes the error.

Solution 10: Reset the Windows Update Component Manually
- Open the “Start” menu, type in “Command Prompt” and right-click on it to select “Run As Administrator”.
- First, we have to store the “BITS”, “Cryptographic”, “MSI Installer” and the “Windows Update Service”. To do this you have to type the following commands one by one in the Command Prompt window and press “Enter” after each command:
net stop wuauserv

net stop cryptSvc

net stop bits

net stop msiserver
- After that, you have to rename the “SoftwareDistribution” and “Catroot2”. You can do this by typing the following commands one by one in the Command Prompt window and press “Enter” after each command:
ren C:\Windows\SoftwareDistribution

ren C:\Windows\System32\catroot2 Catroot2.old
- Now you have to restart the “BITS”, “Cryptographic”, “MSI Installer” and the “Windows Update Service”. To do this you have to type the following commands one by one on the Command Prompt and press “Enter” after each command:
net start wuauserv

net start cryptSvc

net start bits

net start msiserver
- Now close the Command Prompt window by typing in “Exit” and pressing the “Enter” key. Finally, “Restart” your computer.
- Verify upon the startup that the Error Code 0x80246007 has been fixed.
Solution 11: Create Your Own Repair.bat File
- Go to the “Start” menu, type in “Notepad” and press “Enter”.
- After opening the notepad paste the following commands:
net stop wuauserv

cd %systemroot%SoftwareDistribution

ren Download Download.old

net start wuauserv

net stop bits

net start bits
OR
net stop wuauserv

cd %systemroot%SoftwareDistribution

ren Download Download.old

net start wuauserv

net stop bits

net start bits

net stop cryptsvc

cd %systemroot%system32

ren catroot2 catroot2old

net start cryptsvc
- Go to “File”, which you can find at the top left corner of the notepad window. A dropdown window will appear. Click on “Save As” to save the file.

Save as - A dialog box will open. In the textbox of “File Name” which you can find at the bottom of the window, type “Repair.bat”. In the “Save as type: “ box below, select “All Files (*.*)”. Save the file on the “Desktop” by clicking the “Save” button.
- Right-click on the “Repair.bat” file that is on the “Desktop” and select “Run as Administrator” from the menu which will appear after right-clicking on the file.
- Restart the computer and try to install the Update build again.
Solution 12: Check If Windows Defender Firewall Service Is Running
- Press the “Window + R” keys at the same time to open up the “Run” prompt. Here type in “services.msc” and press the “Enter” key.
Typing in “services.msc” - Navigate to “Windows Defender Firewall”. Here check the status of the “Windows Defender Firewall”. If the status is “Not Running “ then right-click on it and choose “Start”.
- After doing so, see if the Windows update is installed normally and the Error Code 0x80246007 is gone.
Solution 13: Change User Account Control Settings
- Press the “Windows” logo key to open up the “Start” menu. Here type in “User Account Control” in the search bar and select “Change the User Account Control Settings”.

Change User Account Control Settings - You can see a slider at the left of the window. Move the slider all the way down to the “Never Notify” option.
- Click on “OK” to save the changes.
- Check and confirm that the Error Code 0x80246007 has been fixed.

Solution 14: Run the Windows Update Troubleshooter
- Press the “Windows” logo key to open up the “Start” menu. Type “Troubleshoot” in the search bar and select “Troubleshoot”.
- Click on “Additional Troubleshooter” and a new window will appear. Click on “Windows Update” and then click on “Run the Troubleshooter”.

Run the Troubleshooter - Follow the instructions and let the troubleshooter finish its work and after that check whether the error is resolved or not.

Solution 15: Restore the System Using Restore Point
This solution will only work if you have already created “Restore Points” in the past.
- Press the “Windows” logo key to open up the “Start” menu. Type in “Restore Point” in the search bar and select “Create A Restore Point”.

Create a Restore Point - Go to the “System Protection” tab and click on the “System Restore”. After that hit the “Next” button.
- Here you will see a list of restore points that you have created in the past. Select any “Restore Point” that you want your system to restore to. After that click “Next”.
- After restoring, check if the Error Code 0x80246007 fixed.

Hopefully, by following all of the above fixes you would be able to resolve the error easily but if it still persists then feel free to Contact Us here for more help.