Easily Fix Error 1053: The Server Did not Respond to the Start or Control Request [Complete Guide]
A lot of users have gotten the Error 1053: The Server Did not Respond to the Start or Control Request in a timely fashion. Basically, the error message occurs because your request gets timed out before the server is able to initiate a connection or a response. This error was faced by different users trying to start or access system services, third party services and even by developers that were developing software.

In this article, we have taken it upon ourselves to make sure that we investigate its causes and provide you with a precise instruction set to be able to completely fix it on your computer for free without any technician. Therefore, before proceeding, we also suggest that you read through the reasons due to which it is triggered to ensure that you are made familiar with its background as well.
What Causes the Error 1053 The Server Did Not Respond Error?
After studying different user comments and forums, we came to the conclusion that the following must be the most important reasons due to which the Error 1053 is being triggered.
- Timeout Settings: In certain cases, if your connection request is getting timed out before the connection can be responded to by the server, you might get Error 1053. Therefore, we recommend that you try and increase the timeout period so that it wouldn’t get timed out. To do so, follow the solution below.
- Corrupted System Settings: Some users might not be able to establish a connection with the server because some crucial system files might have been corrupted or misplaced. Therefore, we suggest checking for any corrupted files and then repair them to fix the Error 1053 The server did not respond to the Start or Control Request in a timely fashion.
- Outdated Windows: It is possible that your operating system has been outdated due to which this error is being triggered on your computer. Therefore, we suggest that you try and check if there are any updates available and download them on your computer.
- Network Configurations: Some network configurations on the computer might not have been set properly due to which the Error 1053 might be triggered on your computer. Therefore, we suggest that you try and reconfigure such settings in order to fix the issue.
Now that we have taken you through some of the most important reasons due to which this error occurs, we can finally move on towards implementing the solutions.
Fixing the Error 1053:
Solution 1: Alter Timeout Settings
To begin with, a simple fix one must try changing the timeout settings of the services through the registry editor. This is because whenever a service is requested a predefined timer with a set value starts with it and if that service isn’t started within that time frame this error message pops up. Therefore, in this method, we will alter this predefined value through the computer registry. Also, if this does not exist we will create a new key for it. Follow the method below to implement this solution:
- Press the “Window + R” keys simultaneously to open up the “Run” dialogue box.
- Here type “regedit” in the dialogue box and hit “Enter”.

Typing “regedit” - In the Registry Editor window now navigate to the following path:
HKEY_LOCAL_MACHINE\SYSTEM\CurrentControlSet\Control\
- Then look for the “ServicesPipeTimeout” key, if you don’t find it then right-click on “Control” and select “New > DWORD (32-bit Value)” respectively.

Creating a New Registry Key - Name this key as “ServicesPipeTimeout” and set its value to “180000”.
- In the end, save the changes made and click on “Exit”. Also, “Restart” your computer and try launching this service again to see if the error exists or not.


Solution 2: Check For Corrupt System Files
Sometimes it may also happen that if your Windows is corrupt and has some of the files missing it may cause hindrance in the proper functioning of a few services in turn giving rise to this particular error. So, in this solution, we will be checking for any corrupted system files using the Windows system file checker. Follow the steps beneath in order to carry out this fix:
- Press “Windows + R” to open the Run prompt, type in “cmd” and press “Shift + Ctrl + Enter” to launch into the administrative command prompt.

Typing in cmd - In the Command Prompt window execute the following commands respectively and also hit “Enter” after each:
sfc /scannow
DISM /Online /Cleanup-Image /RestoreHealth
- Once done now proceed to “Restart” your computer and check if the issue got resolved.

Solution 3: Reinstall the Specific Application
Another potential fix is to directly uninstall and then reinstall that particular application that is requesting the service. Normally this happens with the third-party applications installed on your system that might have any outdated or missing components. And in this case, the only useful tip is to reinstall that application from scratch. First, proceed with the steps below in order to uninstall it completely from your PC:
- Press the “Window + R” keys simultaneously in order to open the “Run” dialogue box.
- In the Run textbox type in “appwiz.cpl” and hit “Enter” to open the Programs and Features window.

Typing in “Appwiz.cpl” and pressing “Enter” - Here scroll down through the list of applications to find your related app, then right-click on it and press “Uninstall”.
- Lastly, “Restart” your PC, then install that application again, and then check if the error got eradicated.

Solution 4: Reset the Network Configurations
This solution is applicable only if you are using such a service that connects to the internet directly and then completes its functionality. In such cases, it might happen that your service isn’t able to connect to the internet properly hence giving rise to this error. Therefore, try resetting the network cache and configurations, in this case, to help remove this error:
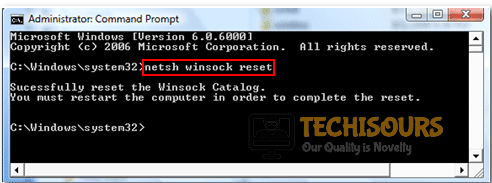
- In the search bar near the Start menu type in “Command Prompt” and from the list of search results right-click on it to select “Run As Administrator”.
- In the Command Prompt window execute the following commands respectively and also hit “Enter” after each:
netsh winsock reset
ipconfig /renew

Executing Winsock Reset Command - Once you have done the network resetting now check to see your internet connection and confirm if the error does not occur now.
Solution 5: Change the Owner Ship Of the Application
If you don’t have the ownership of the application which is demanding the service, it is most likely to give rise to this error as well. In such a scenario the app isn’t able to send/read the response properly from that service. So, proceed to the .exe file of the application and change its ownership to your username. This might prove to be helpful in removing this error:
- On your PC navigate to the “Executable File” of this particular application and right-click on it to select “Properties”.
- In the Properties window move to the “Security” tab and then click on “Advanced” at the bottom-right corner of the window.
- In the following window click to select the “Change” button in front of the “Owner” option in order to change its value from default to your PC account.

Clicking on the “Change” option in front of the Owner’s name - In the preceding window enter your “User Account Name” and then click on the “Check Names” button. Windows will automatically list all of the accounts that are a hit against this name.

Clicking on the “Check Names” button - You can also try finding your account name manually f you are not able to do it using the above-listed steps.
- To do so you need to click on “Advanced” in the Select User or Group window and then in the following window press the “Find Now” button.
- You will find a list at the bottom of the window consisting of the names of all the “User Groups” on your system. Simply select your account from here and click on “OK”.
- Then check the line “Replace Owner On Sub Containers and Objects” in order to make sure that all of the files/folders within this folder also change their ownership.
- Click on “Apply” and then close the Properties window.
- Now open the Properties window again and proceed to the “Security” tab. Here click on “Edit”.

Clicking on the “Edit” option - In the following window click on “Add” at the bottom of the screen.
- In the next window click on “Select Principle” and the next window that appears on your screen implement the same step 4 as mentioned above. Check all permission and then click on “OK”.
- Next check the line “Replace all child object permission entries with inheritable permission entries from this object” and click “Apply”.

Checking the “Replace all Child Object Permissions” box - Finally, close all of the windows, “Restart” your computer and try checking if the error 1053 got solved now.


Solution 6: Check For Windows Updates
- Press “Windows + I” to open the Windows settings.
- In the Settings window select “Updates and Security”.

Update and Security - Next click on the “Check For Updates” option under the Windows Update heading.
- If any latest updates are available click to “Download” and “Install” them on your PC by following the on-screen instructions.
- After updating your system then proceed to check if the error exists or not.

Solution 7: Change the Service Mode
If you are currently in the service Debug configuration try changing it to the Release mode. In order to disable the service mode in Visual Studio you can carry out the following simple steps:
Proceed to click on the “Configuration Manager” from the “Build” menu and from here select “Debug” or “Release”.
Or you can also do the same by following this:
In the “Solution Configuration” list you can either choose “Debug” or “Release” from the toolbar.
Solution 8: Reinstall the Service
You can also try uninstalling the service first and then reinstall it again by following the commands listed below. Execute these in a respective manner in order to uninstall and then reinstall it again:
InstallUtil -u WindowsServiceName.exe
InstallUtil -i WindowsServiceName.exe
Solution 9: Check For the Service And Server Compatibility
Sometimes this error can also occur when the Net framework of your service gets upgraded but correspondingly the server does not have that Net framework installed. A few users reported this cause where the service got upgraded to .NET 4.5 framework but the server didn’t have this framework installed. Therefore, to help avoid the Error 1053 error try checking for this cause too.
Follow the afore-mentioned solutions in order to get through this error successfully but if you have any more queries in regarding this you can Contact Us here.